Well, at the risk of "beating a dead horse," I recently purchased and swapped a complete set of pristine 1995 Riv front/rear seats for my 97 Riv. Overall it went well, but the driver’s seat was much more involved than I expected.

Here’s a
very detailed, step-by-step procedure in case anyone else decides to do the same:
Needed Tools:
- Torx bit #40 (3/8 in)
- ¾” Socket and high-torque wrench
- Standard Socket set
- Rust Preventer (optional - lithium grease)
- Phillips-head screwdriver (large)
- Hammer
- 12VDC Power Source and clip cables
- Drop cloths
- Shop Vac
- Portable light source (flashlight, etc.)
- Riviera Service Manual (optional but helpful)
Rear Seats1. Start with removing the lower cushion of the rear seat.
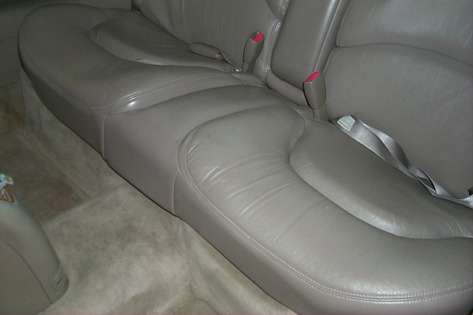
2. Remove the lower rear seat cushion by grasping the bottom front edge, and placing both hands, one on each side.

3. Quickly pull the cushion upwards (toward the ceiling) and tilt the front edge up and away from the seat frame. Two (2) rear plastic tabs must clear the upper rear seat before the lower cushion can be removed.
4. Carefully rotate and lift the lower cushion out the side door, avoiding as much as possible making contact with the battery and fuse boxes located beneath.
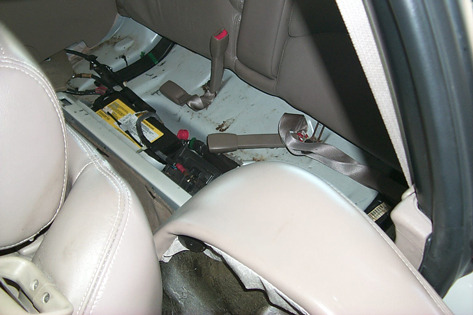
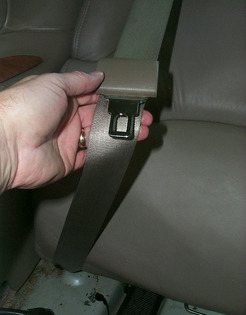
5. Locate the two large anchor bolts that hold the upper rear seat metal U-loops as well as the seat belt hardware.

6. Using a .75-inch socket and wrench, loosen and remove the anchor bolts and seat belt hardware. Try to keep the seat belt hardware together as you remove the bolt so as not to forget the stacking order.
Hint: if the bolts won’t budge, use a larger open-end wrench to get them loose.

7. Grasp the upper rear seat panel from the bottom edge and firmly lift straight up until you can feel the seat is free from the back-side metal retaining hooks (back side of upper rear seat panel and metal hooks shown).

8. Move the shoulder seat belts out and away from the seat while lifting the upper rear seat panel out of the rear seat quarters. Again, be careful not to let the seat’s metal U-loops touch the battery or fuse box area while removing.

9. With the rear seats removed, take this opportunity to clean and prep the area. Carefully remove and vacuum dirt and debris, being careful not to disturb the battery and fuse box area when doing so. (I also applied a little white lithium grease to the bolt holes and bolts to help prevent future corrosion and ease re-assembly.)
Rear Seats-InstallationInstall the replacement rear seats, in the same but opposite method used for disassembly:
10. Starting with the upper rear seat panel, orient it slightly higher than its final resting position. You’ll need to pull the seat belts out and away so that you can slip the upper seat panel underneath the seat belts.
11. Press the upper seat panel rearward and then down making sure the seat “latches” to the rear retaining hooks. You’ll know you have the correct placement when the lower metal U-loops are over the anchor bolt holes and the seat will not “pull out” from the top.
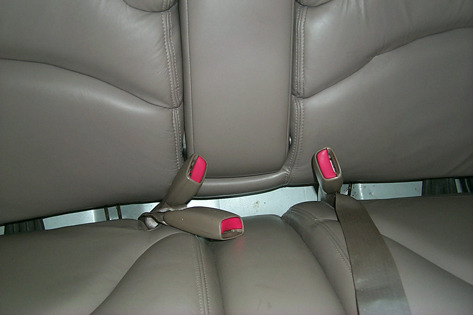
12. Identify the right and left anchor bolts and their corresponding seat belt hardware. Note that the seat belt hardware should face “inward” from the right and left bolts as shown in the previous disassembly photo.


13. Align the seat panel’s metal U-loops to the holes and replace/tighten the anchor bolts.

14. Insert the replacement lower cushion into the base frame by raising the back of the cushion so that its two (2) plastic hooks slip underneath the bottom edge of the rear seat panel. At the same time, make sure the seat belt hardware is accessible in the crack between the upper rear seat and lower cushion.
15. Once aligned to the base, press down firmly on one side of the front edge of the cushion until it “snaps” in place. You may find that once you have one side in place, simply sit on the other side and it should quickly snap in place as well.

16. That’s it for the rear…now on to the front seats!
Front Seats-PassengerRemoval
1. Remove the seat belt from the top of the existing seat by removing the shoulder belt guide loop Philips-head screws and pulling the loop off the seat.
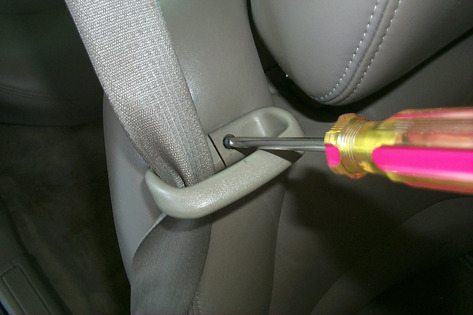
2. Gently pry the loop open at the slit and slide the seat belt out and through the slit.

3. Using the Power Seat Position Switch, move the seat position fully raised and forward.

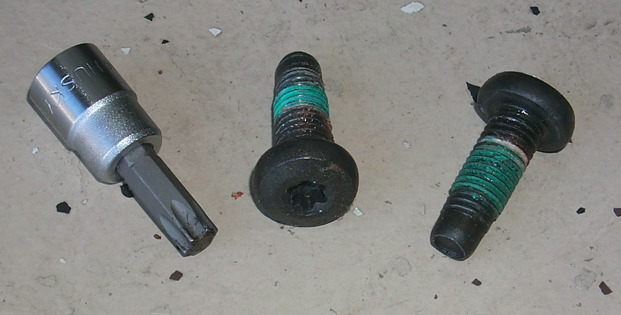
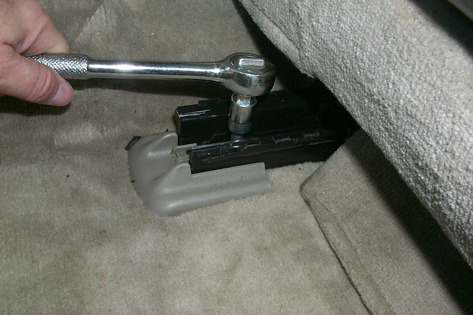
4. Locate the two rear Adjuster Assembly attaching bolts on the adjuster assembly. Remove both bolts with a torx bit and socket wrench.
Hint: first insert the torx bit into the attaching bolt head and tap it with a hammer to make sure it is fully seated. Then insert the socket wrench.

5. With the bolts removed and again using the power seat switch, move the seat all the way to the rear.
6. Grasp the lower back of the seat, and tilt it fully forward so the top front headrest is as close to the dash as possible.
7. Lift the seat up and out (and slightly to the rear) to release the front bracket floor hooks
8. Once the seat is free, set it back down on the floor and tilt the seat back onto the rear seat so that the front of the seat is up and you have access to the under portion.
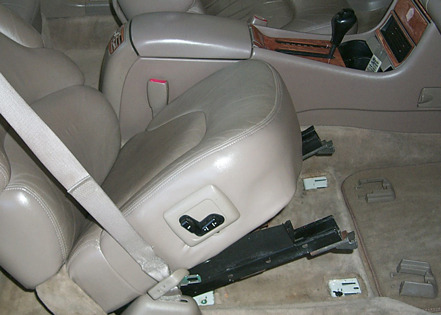
9. Locate the power connector mounting clip attached to the metal support floor bracket.
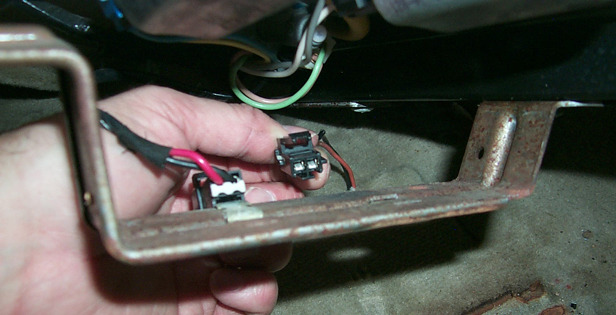
10. Disconnect the power cable by pressing the small release tab and pulling the smaller plug portion out from the larger socket-side.
11. Grab the seat from the rear and front bottoms and lift it out of the passenger compartment.
12. Collect the seat adjuster Front Covers that may have fallen off the Adjuster Assembly (two in front; one for the rear).
13. With the seat removed, take this opportunity to clean and prep the area. Carefully remove and vacuum dirt and debris. (I also applied a little white lithium grease to the bolt holes and bolts to help prevent future rust corrosion and ease re-assembly.)
14. Put down clean drop cloths on the floor of your work area, and lay the original (‘97) seat down on its back with the bottom exposed.
15. Lay the replacement seat (‘95) down next to the original seat with its bottom exposed as well.
16. Because the ’95 seat will not fit properly into the ’97 seat area with its original bottom metal support floor bracket, you will need to “swap” the floor brackets.
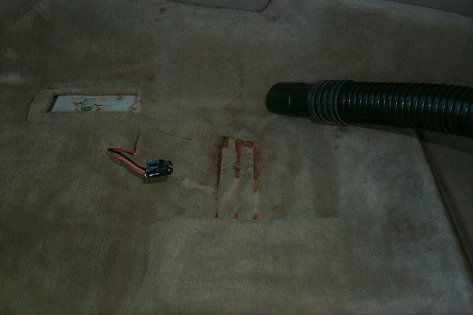
17. Slide the power connectors off from the metal floor brackets of each seat.
18. Remove the two (2) floor bracket Phillips-head screws and brackets from both seats.
19. Mount the ‘97 floor bracket to the bottom of the ‘95 seat as shown in the photo. The floor bracket holes should line up the same. Tighten the Phillips-head screws.
Front Seat-PassengerInstallation
20. Lift the replacement seat into the passenger compartment with its back on the rear seats and its front tilted up to access the underneath area.
21. Re-attach the power connector wires.
22. Re-attach the seat Adjuster Front Covers (2).
23. Place the seat level on the carpet and move the Power Seat Switch to fully raised and rearward.
24. Tilt the seat forward toward the dash and as before, slide the front seat bracket hooks into the floor slots.
25. With the Power Seat Switch, move the seat fully forward to expose the rear Adjuster Assembly holes.
26. Align the single rear seat Adjuster Cover with the floor hole (closest to the center) and reattach it to the Adjuster Assembly as before.
27. Using the same two (2) torx bolts removed earlier, fasten the rear seat Adjuster Assembly to the floor.
28. Slide shoulder belt guide loop over the seat belt and reattach the bracket and belt to the seat with the same two (2) Phillips-head screws removed previously.
Front Seats-DriverRemoval
NOTE: Because many of the removal procedures for the Driver’s Seat are similar to those of the Passenger front seat, refer to the previous photos shown for the Passenger Seat section.
1. Remove the seat belt from the top of the seat by removing the two mounting Philips-head screws and lifting-off the shoulder belt guide loop from the seat.
2. Gently pry the shoulder belt guide loop bracket open at the slit and slide the seat belt out and through the slit.
3. Using the power seat position switch, move the seat position fully raised and forward.
4. Locate the two rear attaching bolts on the seat Adjuster Assembly.
5. Remove both torx head attaching bolts with a torx bit and socket wrench.
Hint: First insert the torx bit into the attaching bolt and tap it with a hammer to make sure it is fully seated. Then insert the socket wrench.
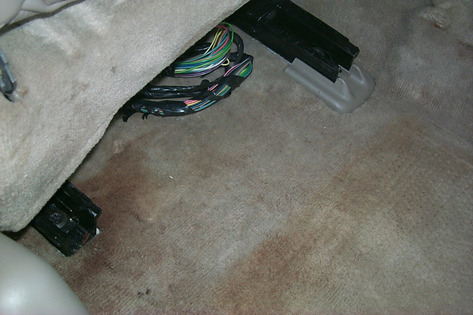
6. At this point, while the seat is still fully forward, become familiar with any exposed wiring that goes between the carpet and the seat. My ‘97 Riv has the Memory Seat/Heat features so therefore, some wires connect to module units beneath the seat cushion, while others simply to other connectors.
HINT: I marked the wires/connectors with masking tape and number markers at each end accordingly so as not to forget the wiring scheme for future reconnection.
7. Carefully disconnect as many of the rear-accessible wires as you can by pressing their connector release tabs and separating the male/female connectors on the modules and wires. If you can’t reach those toward the front of the seat, don’t worry as you can get those after the seat is removed and titled backwards.
8. Use the Power Seat Switch and move the seat all the way to the rear.
9. Grasp the lower back of the seat, and tilt it fully forward so the top front headrest is as close to the steering wheel as possible.
10. Lift the seat up and away (and slightly to the rear) to release the front seat floor hooks.
11. Once the seat is free, set it back down on the driver’s floor area and tilt the seat back onto the rear seat so that the front of the seat is up and you have access to the under portion.
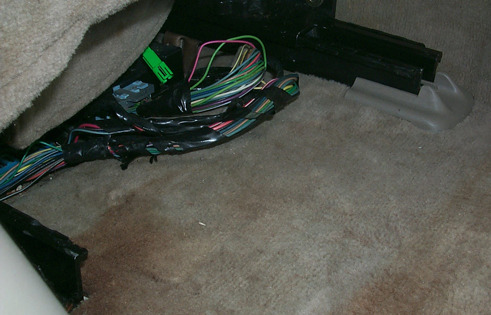
12. Finish disconnecting wires between the carpet and the seat modules/connectors. Again, number them with masking tape for future reconnection.
13. Don’t forget to disconnect the seat belt alarm wire and connector that runs along the edge of the seat near the belt buckle connector.
14. When all wires are disconnected, grab the seat from the rear and front bottom and lift it out of the driver’s compartment.
15. Collect the seat adjuster covers that may have fallen off the slide brackets (front and rear).
16. With the seat removed, take this opportunity to clean and prep the area. Carefully remove and vacuum dirt and debris. (Again, I also applied a little white lithium grease to the bolt holes and bolts to help prevent future rust corrosion and ease re-assembly.)
17. Place both the ’95 and ’97 driver’s seats (on a drop cloth) on their backs with the bottoms accessible.


18. Because the ’95 seat I purchased was differently-equipped (didn’t have the memory mirrors/seat, heat feature, etc.) than that of my ’97, it was necessary to swap the entire seat Adjuster Assemblies, including the wiring, modules and mechanical components! At first I was overwhelmed by this prospect, but after studying both seats’ Adjuster Assemblies, it was not as bad as it first seemed. (The ’95 seat was not heated, but I transferred the’97 heater components anyway to keep the adjuster assembly complete.)
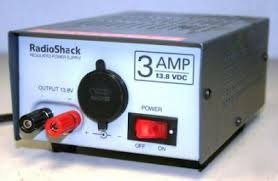
NOTE: To allow access to the Adjuster Bolts, the ’95 seat may need to be moved. (Obviously I had no control of the seat position before it was removed and shipped to me.) Therefore, you’ll need access to a 12VDC power source (battery, external power supply, etc.) in order to complete the following steps. I used my external 13.8VDC/3A power supply from Radio Shack along with appropriate connecting wires and alligator clips.
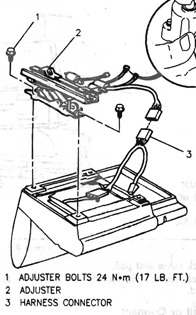
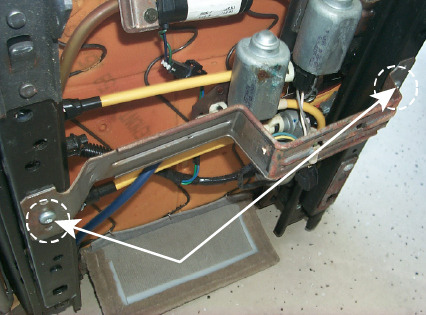
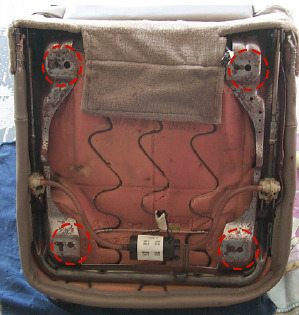
19. Starting with the ’95 seat, note the location of the four (4) Adjuster Attaching Bolts that attach the actual seat cushion to the adjuster assembly (photo shown with base removed for easier bolt- hole identification). If the seat Adjuster Assemblies are not positioned properly, you will not be able to fit a socket wrench onto these attaching bolts for removal. Therefore, locate the seat’s 12V power connector, connect it to your 12V power source by whatever means works best.
 Hint
Hint: I cut off the connector and simply hard-wired it to my Power Supply unit (remember + to + and – to –) and used the Power Seat Adjustment Switches to get enough clearance for my socket wrench onto the seat mounting bolts.
20. Once the seat and Adjuster Assembly is positioned properly for bolt access, remove the 12VDC source. Don’t remove the Adjuster Attaching bolts just yet.
21. Disconnect all the wiring between the actual seat and its metal base. Mark any connections with masking tape and numbering for future reference (if needed).
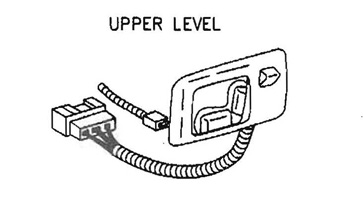
NOTE: The tricky part here is the Upper Level Switches; note that they are contained in a larger protective plastic wiring harness case. The '95 seat has no way to disconnect the harness (however, the '97 has a connector as shown in the following figure). For the '95 seat, pick a halfway point on this harness case and cut the case and internal wires.
22. Locate the two Phillips-head mounting screws for the Power Seat Adjustment Switch panel cover (at the bottom) and remove both screws.
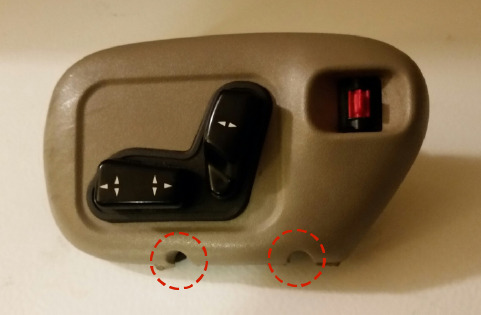
23. Pull Power Seat Switch panel cover out and away from the seat and at the same time, feed the portion of the still-attached wiring case harness up through the seat and out through the Seat Switch panel access hole. Set the Power Switch Panel aside for now.
24. With all wiring disconnected, remove the four (4) Adjuster Assembly mounting bolts.
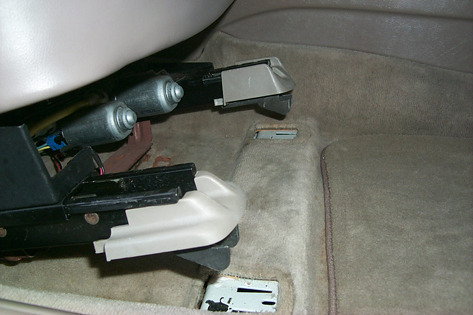
25. The Adjuster Assembly is now free to be moved away from the seat, with the exception of the driver’s seat belt strap which simply slides out of the seat belt strap holder.
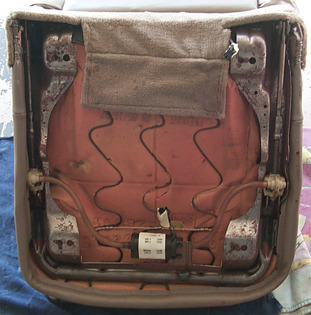
26. With base removed, the seat bottom should appear similar as shown in the photo.
27. In a similar way, remove the Adjuster Assembly from the ’97 seat. However, with the ’97, do not cut the Power Seat Switch wiring harness and casing, but instead, disconnect it from its corresponding seat control module and feed it and out through the panel cover hole (remove the panel cover and switch of course first).
28. Remove the Heated Seat Relay from the front of the seat cushion bracket held by its two mounting screws.
29. With all wiring disconnected, remove the four (4) Adjuster Bolts.
30. The Adjuster Assembly is now free to be moved away from the seat, with the exception of the driver’s seat belt strap which simply slides out of the seat belt strap holder.
Hint: I actually swapped the seat belt connector from the ’97 to make sure it worked properly with the seat/shoulder belt. Simply unscrew the nut.

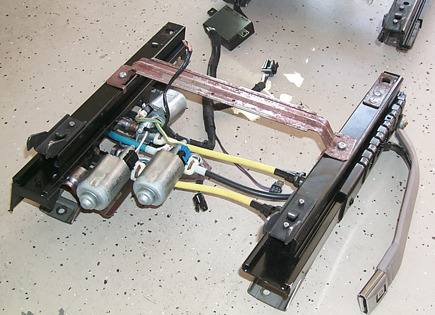
31. Here’s a view of the ’95 and ’97 Adjuster Assemblies side-by-side after removal:

32. Similar to the front passenger seat, swap the metal floor Mounting Brackets between the two seat Adjuster Assemblies.
33. On the ’95 seat, re-install the Power Seat Switch wiring and hardware. I used a combination of both the hardware from the ’95 with the wiring from the ’97. Use your own discretion on what parts you use, but most importantly use the '97 wiring so that it will reconnect to the seat module electronics. Fasten the Seat Switch cover panel to the ’95 seat with the same two screws removed earlier.
34. Orient the ’97 Adjuster Assembly with the ’95 seat, and when correctly positioned, fasten it to the seat cushion frame using the same four Adjuster Attaching Bolts removed earlier.
35. Re-connect all the internal seat wiring, noting the tape markings from earlier. The connectors should “mate” properly so no special wiring is required.
Installation:
29. Lift the replacement seat into the passenger compartment with its back on the rear seats and its front tilted up to access the underneath area.
30. Re-attach the connector wires per your earlier markings.
31. Re-attach the seat adjuster front covers (2).
32. Place the seat level on the carpet and move the power seat switch to fully raised and rearward.
33. Tilt the seat forward toward the steering wheel and as before, slide the front seat bracket hooks into the floor slots.
34. With the power seat switch, move the seat fully forward to expose the rear adjuster assembly holes.
35. Align the single rear seat adjuster cover with the floor hole (closest to the center) and reattach it to the adjuster assembly as before.
36. Using the same two (2) torx bolts removed earlier, fasten the rear seat adjuster assembly to the floor.
37. Slide shoulder belt guide loop over the seat belt and reattach the bracket and belt to the seat with the same two (2) Phillips-head screws removed previously.
38. That completes the swap-out.
Hope this helps someone with the same project...sorry it's so long!


