| | Write-Up: Thermostat Installation |  |
|
+19robotennis61 steve s Ash DEMonte1997 TonySmooth89 Eldo T Riley curious riv 97rivsc AA Rickw EASHER BillBoost37 Chicken albertj Buapo 1998 Riv deekster_caddy ibmoses 23 posters |
|
| Author | Message |
|---|
Buapo
Addict

Name : Ben
Age : 38
Location : Eastlake, OH
Joined : 2007-07-17
Post Count : 691
Merit : 2
| | Subject: Re: Write-Up: Thermostat Installation Thu Jul 03, 2008 9:15 pm | |
| I could see the metal-to-metal thermostat housing on the engine block developing a leak if a proper seal could not be created due to lack of a gasket. It's cheap and safe just to do both of them. | |
|
| | |
Chicken
Aficionado

Name : Mark
Age : 58
Location : Montana
Joined : 2008-06-13
Post Count : 1296
Merit : 8
| | Subject: Write-Up: Thermostat Installation Fri Jul 04, 2008 7:44 pm | |
| Images and additional comments (in blue) added by AA, 01/08/12Tools Required: 10mm wrench or socket Materials needed:Thermostat (180* recommended) - Intense P/N TST-180 or other brand Thermostat seal - Fel-Pro P/N 35666 or other brand Thermostat Housing Gasket - Fel-Pro P/N 35595 or other brand Difficulty:*****Instructions:*first read albertj & BillBoost37's post below before proceeding*(1) Locate Thermostat Housing AA: right side of engine, near intake/throttle body, connected to upper coolant hose.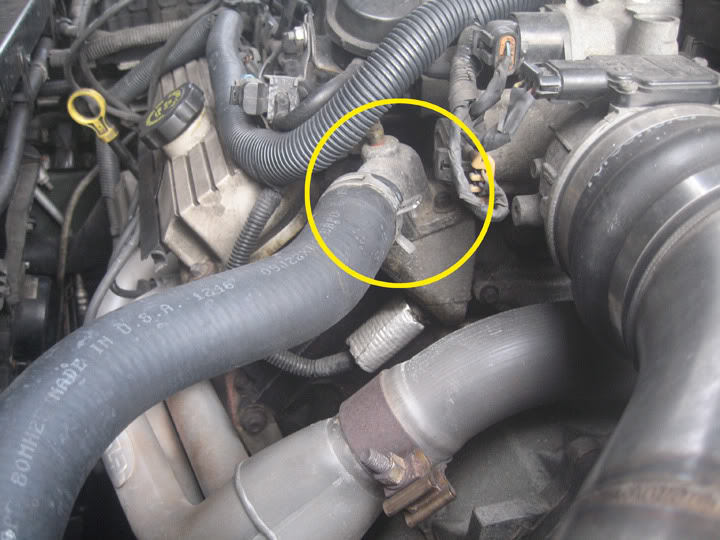 AA: for less mess, place a drain pan under the area. A flex funnel can be used to direct spilled coolant into the pan. 3-4 shop towels placed around the housing area will catch the rest. AA: for less mess, place a drain pan under the area. A flex funnel can be used to direct spilled coolant into the pan. 3-4 shop towels placed around the housing area will catch the rest. (2) Carefully unplug any vacuum lines obscuring your access to the 10mm bolts on the upper Thermostat housing AA: you may not need to remove any lines. I was able to find access for a socket at both screws. 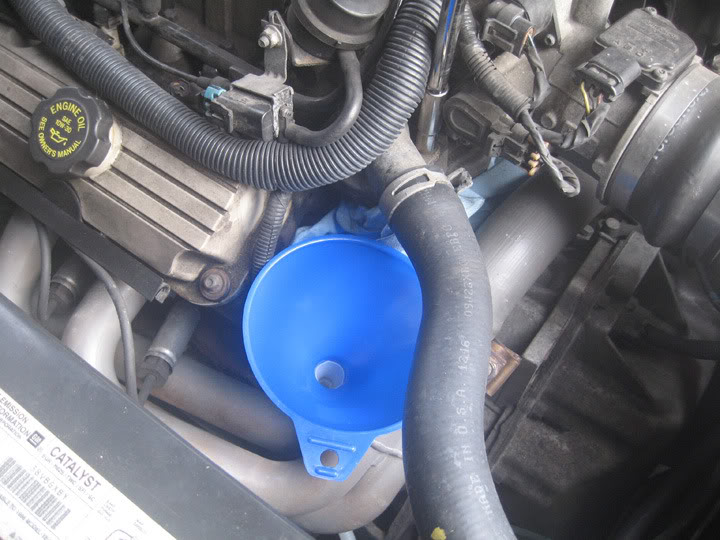 (3) Remove the Thermostat Housing Bolts and loosen the upper housing (4) Move the Upper Thermostat Housing Body attached to the hose out of your way.  (5) Remove the old gasket and clean the ends of both the upper and lower Thermostat housing (Scraping maybe required to remove the old gasket from both the lower & upper Thermostat Housing.) AA: if the old gasket remains intact on the upper housing, it is possible to reuse. Inspect the gasket and replace if it appears deteriorated, or has been leaking.(6) Remove the old Thermostat 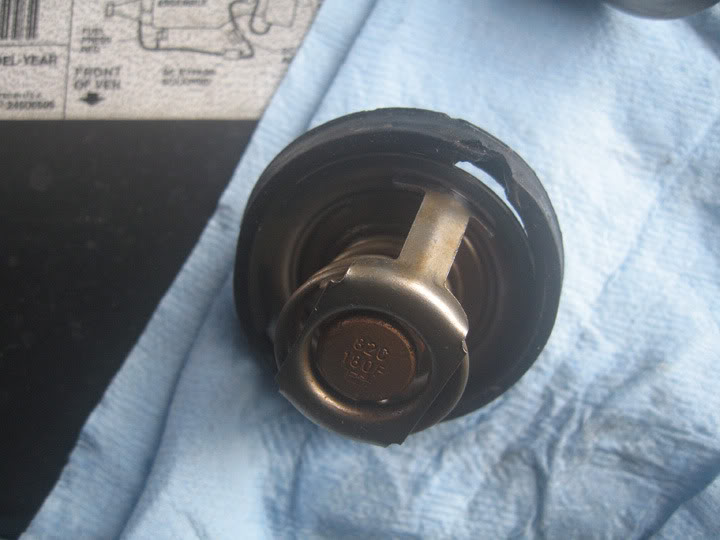 (7) Place the new Thermostat seal around the new Thermostat. (Look at your old Thermostat to correctly install the seal right end up) AA: note damage to seal in previous image.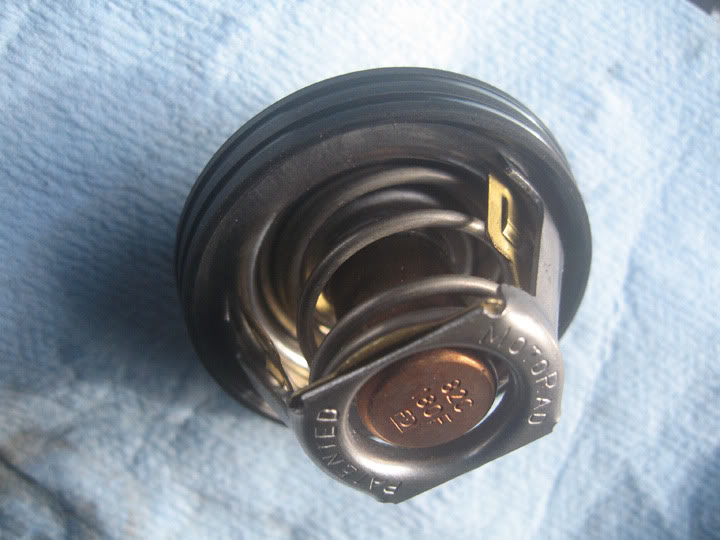 (8) Install the new Thermostat with seal, spring side down 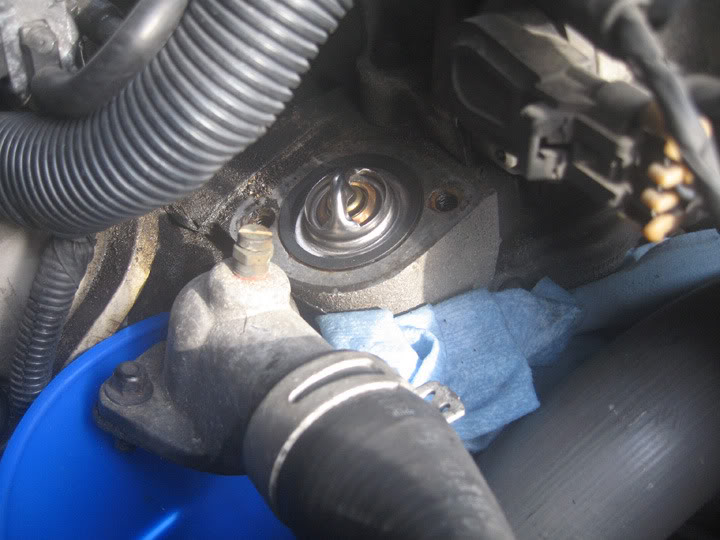 (9) Place the new Thermostat gasket on the lower housing AA: (if necessary)(10) Replace the Upper Thermostat Housing Body and finger tighten both bolts  (11) Tighten both bolts on the housing equally using the 10mm wrench or socket, making sure the bolts are tightened evenly. AA: tighten screws to 20 ft-lb.(12) Replug any vacuum lines you removed (13) Start the engine and let the temperature on your gauge reach 180* plus. Check for leaks around the housing.
Last edited by Chicken on Mon Jul 07, 2008 1:49 pm; edited 7 times in total | |
|
| | |
ibmoses
Aficionado

Name : Bert
Location : North Alabama
Joined : 2008-02-03
Post Count : 1701
Merit : 32
| | Subject: Good work! Sun Jul 06, 2008 12:00 pm | |
| Nice job!
The wifes 99 Riv has a "bleeder" screw on the thermostat housing.
Bert:tavis: | |
|
| | |
Chicken
Aficionado
Name : Mark
Age : 58
Location : Montana
Joined : 2008-06-13
Post Count : 1296
Merit : 8
| | Subject: Re: Write-Up: Thermostat Installation Sun Jul 06, 2008 5:01 pm | |
| mine does too.....what's that for? Releasing the pressure before you remove the upper housing? I guess if you needed to change the thermostat while the engine was still hot that would make sense.... | |
|
| | |
albertj
Master

Name :
Location : Finger Lakes of New York State
Joined : 2007-05-31
Post Count : 8598
Merit : 180
| | Subject: Re: Write-Up: Thermostat Installation Sun Jul 06, 2008 5:42 pm | |
| Hi, Mark
The bleeder screw on the thermostat housing is for releasing air trapped in cooling system if and when it's the case that the radiator cap is not the high point when you open the cooling system and close it back up. It just let's you bleed off trapped air.
You definitely have to open the bleeder when you fill coolant after a compete drain and flush. And it is good practice to check it after replacing a cooling component.
Albertj | |
|
| | |
BillBoost37
Junkie
Location : Enfield CT
Joined : 2007-11-28
Post Count : 769
Merit : 26
| | Subject: Re: Write-Up: Thermostat Installation Mon Jul 07, 2008 7:05 am | |
| I would suggest adding removing 3/4 of a gallon of coolant and adding it back in to the procedures along with the burping process.
Looks great. | |
|
| | |
EASHER
Member

Name : ERIK M. ASHER
Age : 55
Location : BLOUNTSTOWN, FL
Joined : 2008-10-24
Post Count : 85
Merit : 0
| | Subject: Replacing my thermostat Thu Nov 13, 2008 2:25 pm | |
| I ordered a 180deg. thermostat from ZZP. It came with rubber o-ring instead of a regular gasket.
Do I need to get a gasket or is this o-ring all I need to use?
Any issues I need to know about with this replacement? | |
|
| | |
Rickw
Guru
Name : Rick
Location : Lancaster, MA
Joined : 2008-09-13
Post Count : 6282
Merit : 119
| | Subject: Re: Write-Up: Thermostat Installation Thu Nov 13, 2008 2:45 pm | |
| There is both an O-Ring type seal (look closely at it. It wraps around the thermostat. There is a groove in the middle of the seal.) and a gasket.
You can pick up the gasket at the local auto parts store before you do the job. I always replace both, no sealant required. Other than that it is a straight forward thermostat R&R job. | |
|
| | |
1998 Riv
Expert

Name : Dave
Age : 63
Location : In The AZ Oven
Joined : 2007-01-17
Post Count : 4502
Merit : 44
| | Subject: Re: Write-Up: Thermostat Installation Thu Nov 13, 2008 4:13 pm | |
| Yes, get the regular flat gasket from local parts store, FOR SURE. | |
|
| | |
AA
Administrator

Name : Aaron
Age : 46
Location : C-bus, Ohio
Joined : 2007-01-13
Post Count : 18448
Merit : 252
| | Subject: Re: Write-Up: Thermostat Installation Thu Nov 13, 2008 4:29 pm | |
| You might be able to reuse the gasket (flat paper) that's on the car. I have changed my T-stat about 6 times, but only used a new gasket once. I do not use silicone RTV to install, never had a leak yet. _________________ '05 GTO 6.0L • 6-spd • 95k miles • 0-60: 4.8s • 16.9 avg MPG • Nelson Ledges Lap: 1:26'95 Celica GT 2.2L • 5-spd • 165k miles • 0-60: yes'98 SC Riviera • 281k miles • 298 HP/370 TQ • 0-60: 5.79s • ET: 13.97 @ 99.28 • 4087 lb • 20.1 avg MPG • Nelson Ledges Lap: 1:30
3.4" pulley • AL104 plugs • 180º t-stat • FWI w/K&N • 1.9:1 rockers • OR pushrods • LS6 valve springs • SLP headers • ZZP fuel rails
KYB GR2 struts • MaxAir shocks • Addco sway bars • UMI bushings • GM STB • Enkei 18" EV5s w/ Dunlop DZ101s • F-body calipers
EBC bluestuff/Hawk HP plus • SS lines • Brembo slotted discs • DHP tuned • Aeroforce • Hidden Hitch^^^ SOLD ^^^  '70 Ninety-Eight Holiday Coupe 455cid • 116k miles '70 Ninety-Eight Holiday Coupe 455cid • 116k miles^^^ SOLD ^^^ | |
|
| | |
97rivsc
Fanatic

Name : mike
Age : 34
Location : appleton wisconsin
Joined : 2008-09-28
Post Count : 437
Merit : 0
| | Subject: just got 180 tstat Thu Dec 18, 2008 12:14 am | |
| was just wondering do i need new gasket and o-ring? and also do you need to drain the entire system, or just enough to get it out of the upper hose? | |
|
| | |
1998 Riv
Expert
Name : Dave
Age : 63
Location : In The AZ Oven
Joined : 2007-01-17
Post Count : 4502
Merit : 44
| | Subject: Re: Write-Up: Thermostat Installation Thu Dec 18, 2008 12:24 am | |
| Yes, replace both the gasket and o-ring. No need to drain the whole system. Be sure you bleed all the air out when you refill, with the bleed screw on the t-stat housing. | |
|
| | |
97rivsc
Fanatic
Name : mike
Age : 34
Location : appleton wisconsin
Joined : 2008-09-28
Post Count : 437
Merit : 0
| | Subject: Re: Write-Up: Thermostat Installation Thu Dec 18, 2008 12:52 am | |
| bleed screw? sorry im not too familiar with this. | |
|
| | |
1998 Riv
Expert
Name : Dave
Age : 63
Location : In The AZ Oven
Joined : 2007-01-17
Post Count : 4502
Merit : 44
| | Subject: Re: Write-Up: Thermostat Installation Thu Dec 18, 2008 12:57 am | |
| There is an air bleed screw built into the top of the thermostat housing. I'd assume your 97 has it also? When you're all put back together and filled with coolant, you run the engine til it's warm enough for the thermostat to open, then crack open the screwa bit to let trapped air escape. Air in the system is not good. | |
|
| | |
97rivsc
Fanatic
Name : mike
Age : 34
Location : appleton wisconsin
Joined : 2008-09-28
Post Count : 437
Merit : 0
| | Subject: Re: Write-Up: Thermostat Installation Thu Dec 18, 2008 1:04 am | |
| | |
|
| | |
EASHER
Member
Name : ERIK M. ASHER
Age : 55
Location : BLOUNTSTOWN, FL
Joined : 2008-10-24
Post Count : 85
Merit : 0
| | Subject: Re: Write-Up: Thermostat Installation Thu Dec 18, 2008 8:46 am | |
| I had a leak after replacing my T STAT and found out that you do not need the gasket if you use the O RING.
I removed my gasket and the leak stopped completely. | |
|
| | |
curious riv
Addict

Name : Chris
Age : 44
Location : C'view FL
Joined : 2008-10-20
Post Count : 521
Merit : 3
| | Subject: Re: Write-Up: Thermostat Installation Thu Dec 18, 2008 8:50 am | |
| - EASHER wrote:
- I had a leak after replacing my T STAT and found out that you do not need the gasket if you use the O RING.
I removed my gasket and the leak stopped completely. I didn't want to take chances. I used the gasket w/ some rtv and no leaks. Next time I will use the gasket again.... Come to think of it, Ive never not used a gasket | |
|
| | |
1998 Riv
Expert
Name : Dave
Age : 63
Location : In The AZ Oven
Joined : 2007-01-17
Post Count : 4502
Merit : 44
| | Subject: Re: Write-Up: Thermostat Installation Thu Dec 18, 2008 8:54 am | |
| The gasket and o-ring combo was not used in all the model years from the factory. It IS listed for the later models for sure. I replaced both last year when I did my 180. No sealing issues. You need to completely remove the old gasket, probably requiring that you scrape it all off, I had to do quite a bit of scraping. If you don't have clean mating surfaces, you won't have a good seal. | |
|
| | |
deekster_caddy
Master
Name : Derek
Age : 52
Location : Reading, MA
Joined : 2007-01-31
Post Count : 7717
Merit : 109
| | Subject: Re: Write-Up: Thermostat Installation Thu Dec 18, 2008 5:15 pm | |
| I did see a few years of SI 3800s that had both, and I've seen quite a few 3800 thermostats that had only an O-ring and never leaked. I prefer the O-ring, much easier to change and no gasket scraping needed. I would only use one or the other. | |
|
| | |
T Riley
Guru

Name : Travis
Age : 34
Location : Minnesconsin
Joined : 2007-02-08
Post Count : 5127
Merit : 10
| | Subject: Re: Write-Up: Thermostat Installation Thu Dec 18, 2008 5:17 pm | |
| - deekster_caddy wrote:
- I did see a few years of SI 3800s that had both, and I've seen quite a few 3800 thermostats that had only an O-ring and never leaked. I prefer the O-ring, much easier to change and no gasket scraping needed. I would only use one or the other.
lol i have both....  | |
|
| | |
97rivsc
Fanatic
Name : mike
Age : 34
Location : appleton wisconsin
Joined : 2008-09-28
Post Count : 437
Merit : 0
| | Subject: Re: Write-Up: Thermostat Installation Thu Dec 18, 2008 8:41 pm | |
| so should i get both or just an o ring or just a gasket? | |
|
| | |
AA
Administrator
Name : Aaron
Age : 46
Location : C-bus, Ohio
Joined : 2007-01-13
Post Count : 18448
Merit : 252
| | Subject: Re: Write-Up: Thermostat Installation Thu Dec 18, 2008 8:43 pm | |
| I have them both, always have. No silicone used ever. _________________ '05 GTO 6.0L • 6-spd • 95k miles • 0-60: 4.8s • 16.9 avg MPG • Nelson Ledges Lap: 1:26'95 Celica GT 2.2L • 5-spd • 165k miles • 0-60: yes'98 SC Riviera • 281k miles • 298 HP/370 TQ • 0-60: 5.79s • ET: 13.97 @ 99.28 • 4087 lb • 20.1 avg MPG • Nelson Ledges Lap: 1:30
3.4" pulley • AL104 plugs • 180º t-stat • FWI w/K&N • 1.9:1 rockers • OR pushrods • LS6 valve springs • SLP headers • ZZP fuel rails
KYB GR2 struts • MaxAir shocks • Addco sway bars • UMI bushings • GM STB • Enkei 18" EV5s w/ Dunlop DZ101s • F-body calipers
EBC bluestuff/Hawk HP plus • SS lines • Brembo slotted discs • DHP tuned • Aeroforce • Hidden Hitch^^^ SOLD ^^^ '70 Ninety-Eight Holiday Coupe 455cid • 116k miles^^^ SOLD ^^^ | |
|
| | |
97rivsc
Fanatic
Name : mike
Age : 34
Location : appleton wisconsin
Joined : 2008-09-28
Post Count : 437
Merit : 0
| | Subject: Re: Write-Up: Thermostat Installation Thu Dec 18, 2008 9:09 pm | |
| ok, and do i need to drain the coolant or not? chicken's writeup has me worried | |
|
| | |
AA
Administrator
Name : Aaron
Age : 46
Location : C-bus, Ohio
Joined : 2007-01-13
Post Count : 18448
Merit : 252
| | Subject: Re: Write-Up: Thermostat Installation Thu Dec 18, 2008 9:18 pm | |
| Just use some paper towels to soak up the spill. It's enough lost coolant that you'll want to replace it, but not enough that you can't drive before refilling. Shouldn't need to drain coolant for a T-stat install. _________________ '05 GTO 6.0L • 6-spd • 95k miles • 0-60: 4.8s • 16.9 avg MPG • Nelson Ledges Lap: 1:26'95 Celica GT 2.2L • 5-spd • 165k miles • 0-60: yes'98 SC Riviera • 281k miles • 298 HP/370 TQ • 0-60: 5.79s • ET: 13.97 @ 99.28 • 4087 lb • 20.1 avg MPG • Nelson Ledges Lap: 1:30
3.4" pulley • AL104 plugs • 180º t-stat • FWI w/K&N • 1.9:1 rockers • OR pushrods • LS6 valve springs • SLP headers • ZZP fuel rails
KYB GR2 struts • MaxAir shocks • Addco sway bars • UMI bushings • GM STB • Enkei 18" EV5s w/ Dunlop DZ101s • F-body calipers
EBC bluestuff/Hawk HP plus • SS lines • Brembo slotted discs • DHP tuned • Aeroforce • Hidden Hitch^^^ SOLD ^^^ '70 Ninety-Eight Holiday Coupe 455cid • 116k miles^^^ SOLD ^^^ | |
|
| | |
97rivsc
Fanatic
Name : mike
Age : 34
Location : appleton wisconsin
Joined : 2008-09-28
Post Count : 437
Merit : 0
| | Subject: Re: Write-Up: Thermostat Installation Thu Dec 18, 2008 9:20 pm | |
| like how much coolant are we talking? | |
|
| | |
Sponsored content
| | Subject: Re: Write-Up: Thermostat Installation | |
| |
|
| | |
| | Write-Up: Thermostat Installation | |
|


