| | Write-Up: BD Trims and Sherwood Dash Kit Installation |  |
|
+43stan charlieRobinson joshuadalegrimes llamalor2112 abaucom al_roethlisberger 69GSColorado BMD ghpcnm dboydakid Eldo vovchik robotennis61 #1BearsFan Rickw LARRY70GS Mr.Riviera TonySmooth89 patillac KillaKeninaRiv ibmoses ToledoRIv sburch23 Kustom Kreationz oldsman105 jimmyriv IBx1 ewolfe0050 Natesriv palermocorey90 mr.19982tone Ridin-Rivi robertwolf86 T Riley turtleman 97rivman AA racinfan xxsupergman25xx SpaceBar Jack the R 99Rivman 97Riv-Jon 47 posters |
|
| Author | Message |
|---|
Jack the R
Master

Joined : 2007-01-16
Post Count : 8054
Merit : 105
| | Subject: Re: Write-Up: BD Trims and Sherwood Dash Kit Installation Wed Sep 16, 2009 9:25 pm | |
| The pieces are pretty, but they won't look that great if you have lighter colored dash pieces behind them. | |
|
| | |
Rickw
Guru
Name : Rick
Location : Lancaster, MA
Joined : 2008-09-13
Post Count : 6282
Merit : 119
| | Subject: Re: Write-Up: BD Trims and Sherwood Dash Kit Installation Wed Sep 16, 2009 9:47 pm | |
| - Jack the R wrote:
- The pieces are pretty, but they won't look that great if you have lighter colored dash pieces behind them.
What do you mean JR. If there is lighter colored wood or simulated wood behind them.? It was you or someone else that installed a kit that suggested to remove or paint the existing wood pieces, am I correct.? | |
|
| | |
Jack the R
Master
Joined : 2007-01-16
Post Count : 8054
Merit : 105
| | Subject: Re: Write-Up: BD Trims and Sherwood Dash Kit Installation Wed Sep 16, 2009 10:03 pm | |
| It's the nature of color that light colors draw the eye's attention. If your interior is a light color and you put a darker color dash kit in, the parts of the dash that aren't covered are going to scream at you. Like around the guages, there will be a rings of light color where the dash kit doesn't give full coverage.
Yeah, I'm the guy who painted his dash pieces. It was a lot of work but it was worth it. My kit is rockin'
Larry70GS - Be sure when you install your pieces that you don't get any air bubbles trapped behind them. Don't slap them down and think you're going to work the bubbles out. Once the edges are stuck down those bubbles are there forever. Well, you can try drilling air holes from the back but man that's tricky. Go too far and you'll be in the overlay. I pulled it off but I don't want to ever do it again. | |
|
| | |
LARRY70GS
Aficionado

Name : Larry
Age : 67
Location : Oakland Gardens, NY
Joined : 2007-01-23
Post Count : 2183
Merit : 149
| | Subject: Re: Write-Up: BD Trims and Sherwood Dash Kit Installation Thu Sep 17, 2009 11:30 am | |
| - Jack the R wrote:
- It's the nature of color that light colors draw the eye's attention. If your interior is a light color and you put a darker color dash kit in, the parts of the dash that aren't covered are going to scream at you. Like around the guages, there will be a rings of light color where the dash kit doesn't give full coverage.
Yeah, I'm the guy who painted his dash pieces. It was a lot of work but it was worth it. My kit is rockin'
Larry70GS - Be sure when you install your pieces that you don't get any air bubbles trapped behind them. Don't slap them down and think you're going to work the bubbles out. Once the edges are stuck down those bubbles are there forever. Well, you can try drilling air holes from the back but man that's tricky. Go too far and you'll be in the overlay. I pulled it off but I don't want to ever do it again. I don't know, I'm just not that discerning  or anal. I've seen this kit installed and it looked just fine to me. I posted pictures of it in this thread, and the interior color was the same. I intend to take the entire dash plate off and apply the kit. It will much easier with the larger pieces that way. I will be very careful. | |
|
| | |
99Rivman
Aficionado

Name : Randall
Location : North Carolina
Joined : 2007-01-16
Post Count : 2009
Merit : 89
| | Subject: Re: Write-Up: BD Trims and Sherwood Dash Kit Installation Fri Sep 18, 2009 3:54 pm | |
| - LARRY70GS wrote:
- Got my Sherwood Dash kit today. It looks great and was packaged well. It will be a few weeks before I can install it though. Gonna fix my climate control back lighting at the same time.
Kit looks good!    . . . . . . . Good luck with the install. | |
|
| | |
99Rivman
Aficionado
Name : Randall
Location : North Carolina
Joined : 2007-01-16
Post Count : 2009
Merit : 89
| | Subject: Re: Write-Up: BD Trims and Sherwood Dash Kit Installation Fri Sep 18, 2009 3:55 pm | |
| - Jack the R wrote:
- The pieces are pretty, but they won't look that great if you have lighter colored dash pieces behind them.
I have the DARK BURLWOOD on my TAN dash and I think they look GOOD, difference of opinion I guess?!? | |
|
| | |
ewolfe0050
Aficionado

Name : Eric
Location : Indianapolis, IN
Joined : 2007-07-31
Post Count : 1159
Merit : 27
| | Subject: Re: Write-Up: BD Trims and Sherwood Dash Kit Installation Fri Sep 18, 2009 4:02 pm | |
| Randall,
I think he is talking about the factory wood dash pieces around the radio and shifter. The factory pieces are a little larger than Sherwood's so you can see them around the edges. He painted them black I believe to lessen the look of having dash trim on top of dash trim...
http://www.extinctionlevelevent.com/misc/riv/bd_trims_review/05g_console.jpg | |
|
| | |
Jack the R
Master
Joined : 2007-01-16
Post Count : 8054
Merit : 105
| | Subject: Re: Write-Up: BD Trims and Sherwood Dash Kit Installation Fri Sep 18, 2009 4:13 pm | |
| I painted the edges of every piece I put an overlay on. I thought the dash pieces looked bad everywhere they showed through behind and around the overlay. I've looked at many interior/overlay color combinations and I didn't think any of them looked as good as they could have looked, leaving the dash pieces unpainted. | |
|
| | |
Rickw
Guru
Name : Rick
Location : Lancaster, MA
Joined : 2008-09-13
Post Count : 6282
Merit : 119
| | Subject: Re: Write-Up: BD Trims and Sherwood Dash Kit Installation Fri Sep 18, 2009 4:32 pm | |
| JR, did you use a flat black or gloss black.? | |
|
| | |
LARRY70GS
Aficionado
Name : Larry
Age : 67
Location : Oakland Gardens, NY
Joined : 2007-01-23
Post Count : 2183
Merit : 149
| | Subject: Re: Write-Up: BD Trims and Sherwood Dash Kit Installation Fri Sep 18, 2009 4:46 pm | |
| - ewolfe0050 wrote:
- Randall,
I think he is talking about the factory wood dash pieces around the radio and shifter. The factory pieces are a little larger than Sherwood's so you can see them around the edges. He painted them black I believe to lessen the look of having dash trim on top of dash trim...
http://www.extinctionlevelevent.com/misc/riv/bd_trims_review/05g_console.jpg That's not Sherwoods kit, it's a BD Trim kit. There could be a difference. I will find out when I install mine. | |
|
| | |
Jack the R
Master
Joined : 2007-01-16
Post Count : 8054
Merit : 105
| | Subject: Re: Write-Up: BD Trims and Sherwood Dash Kit Installation Fri Sep 18, 2009 5:20 pm | |
| Rick - I'm pretty sure it was flat. The goal is to hide those edges so you don't want any shiny in there.
Larry - Maybe but I don't think so. I don't think the overlay will be designed to go over the radiused curves of the dash piece edges. | |
|
| | |
LARRY70GS
Aficionado
Name : Larry
Age : 67
Location : Oakland Gardens, NY
Joined : 2007-01-23
Post Count : 2183
Merit : 149
| | Subject: Re: Write-Up: BD Trims and Sherwood Dash Kit Installation Fri Sep 18, 2009 5:42 pm | |
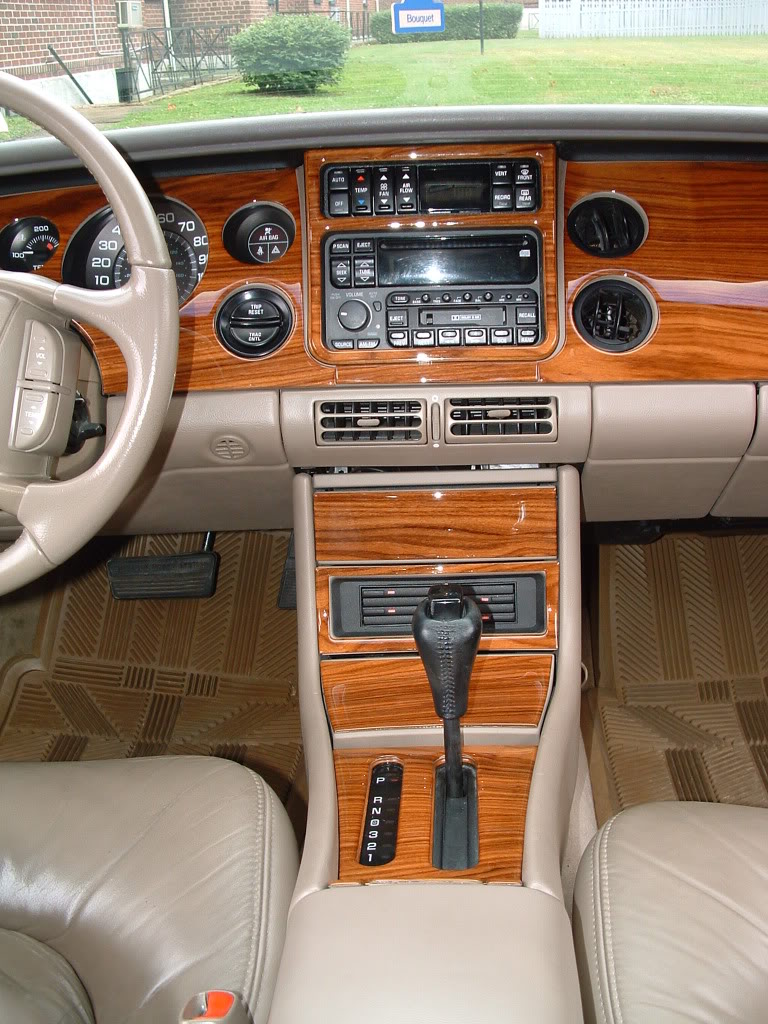
| I just went out and laid the Sherwood shifter plate on top of the stock wood grain. The Rosewood color I selected is right on, and certainly close enough so that it is not distracting at all IMHO. Here is the stock shifter wood grain  and the Sherwood overlay on top. I think it looks great. 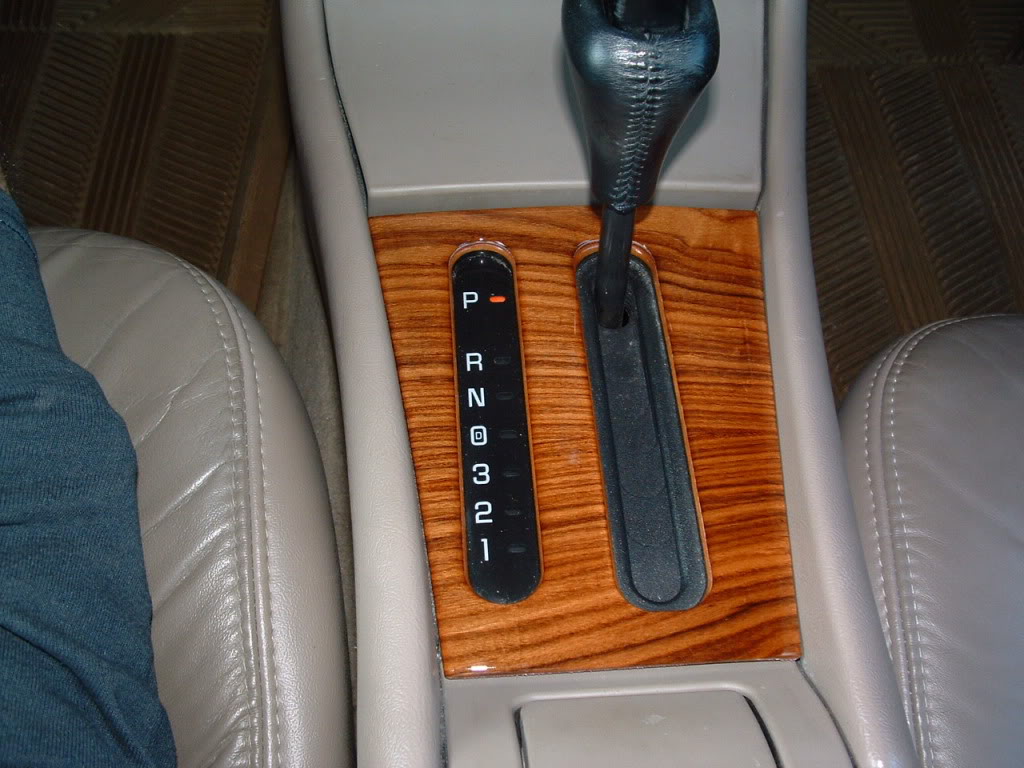 | |
|
| | |
LARRY70GS
Aficionado
Name : Larry
Age : 67
Location : Oakland Gardens, NY
Joined : 2007-01-23
Post Count : 2183
Merit : 149
| | Subject: Re: Write-Up: BD Trims and Sherwood Dash Kit Installation Fri Sep 18, 2009 5:47 pm | |
| Jack,
I can certainly see what you are talking about. I looked at your pictures again. The color you selected is much darker than the stock pieces and is very noticeable. There is much less of a contrast with my combo. I intend to remove the front dash entirely to fit the dash pieces. I will remove the radio surround and use the Sherwood piece on it's own rather than cover the factory piece. | |
|
| | |
LARRY70GS
Aficionado
Name : Larry
Age : 67
Location : Oakland Gardens, NY
Joined : 2007-01-23
Post Count : 2183
Merit : 149
| | Subject: Re: Write-Up: BD Trims and Sherwood Dash Kit Installation Fri Sep 18, 2009 7:30 pm | |
| - Rickw wrote:
- LARRY70GS wrote:
- My interior is tan, same as the pictures I posted. The dash kit in the pictures is real rosewood. I ended up ordering that kit from www.carid.com. I talked with Chris Garcia, ext 801. I paid 260.00 with free shipping.
I can't find any pictures that you may have posted, that's why i asked.
The price on their web site say's $281.00 for the Real Rosewood.
Did he offer you a discount over the phone or did you ask.? Rick, I just realized that I didn't answer your questions. The pictures I posted are on page 12 of this thread. I asked about the kit by e mail, and Chris replied and told me if I called, he could save me some money. I called and I did. I paid 260.00 shipped. I later saw it for 245.00 shipped from another vendor, but it was no big deal to me at that point. Here are links to the pictures: https://2img.net/h/i172.photobucket.com/albums/w20/SLD1624/RivDashKit1.jpg https://2img.net/h/i172.photobucket.com/albums/w20/SLD1624/RivDashKit2.jpg | |
|
| | |
robotennis61
Guru

Name : robotennis
Age : 62
Location : las vegas
Joined : 2007-12-17
Post Count : 5562
Merit : 143
| | Subject: Re: Write-Up: BD Trims and Sherwood Dash Kit Installation Fri Sep 18, 2009 7:35 pm | |
| do you know what would look really tight? a black stained sherwood set that lets the grain show through.. | |
|
| | |
ewolfe0050
Aficionado
Name : Eric
Location : Indianapolis, IN
Joined : 2007-07-31
Post Count : 1159
Merit : 27
| | Subject: Re: Write-Up: BD Trims and Sherwood Dash Kit Installation Fri Sep 18, 2009 8:10 pm | |
| They have it and it is called zebra wood... | |
|
| | |
Jack the R
Master
Joined : 2007-01-16
Post Count : 8054
Merit : 105
| | Subject: Re: Write-Up: BD Trims and Sherwood Dash Kit Installation Fri Sep 18, 2009 8:13 pm | |
| I don't think you could improve on this piece by painting it. Or the radio trim piece by painting/removing it. | |
|
| | |
ewolfe0050
Aficionado
Name : Eric
Location : Indianapolis, IN
Joined : 2007-07-31
Post Count : 1159
Merit : 27
| | Subject: Re: Write-Up: BD Trims and Sherwood Dash Kit Installation Fri Sep 18, 2009 9:33 pm | |
| Agreed. That looks sharp. Now get the rest done and post pictures! | |
|
| | |
LARRY70GS
Aficionado
Name : Larry
Age : 67
Location : Oakland Gardens, NY
Joined : 2007-01-23
Post Count : 2183
Merit : 149
| | Subject: Re: Write-Up: BD Trims and Sherwood Dash Kit Installation Sat Sep 19, 2009 5:35 pm | |
| - ewolfe0050 wrote:
- Agreed. That looks sharp. Now get the rest done and post pictures!
Will do. | |
|
| | |
LARRY70GS
Aficionado
Name : Larry
Age : 67
Location : Oakland Gardens, NY
Joined : 2007-01-23
Post Count : 2183
Merit : 149
| | Subject: Re: Write-Up: BD Trims and Sherwood Dash Kit Installation Sat Oct 03, 2009 11:35 am | |
| | |
|
| | |
ibmoses
Aficionado

Name : Bert
Location : North Alabama
Joined : 2008-02-03
Post Count : 1701
Merit : 32
| | Subject: Re: Write-Up: BD Trims and Sherwood Dash Kit Installation Sat Oct 03, 2009 11:39 am | |
| That does look awesome!  Bert  | |
|
| | |
IBx1
Expert

Name : ILAN
Age : 32
Location : College Station, TX
Joined : 2007-12-30
Post Count : 4304
Merit : 69
| | Subject: Re: Write-Up: BD Trims and Sherwood Dash Kit Installation Sat Oct 03, 2009 12:42 pm | |
| The long stripes go perfect with the dashboard panel's proportions. | |
|
| | |
Rickw
Guru
Name : Rick
Location : Lancaster, MA
Joined : 2008-09-13
Post Count : 6282
Merit : 119
| | Subject: Re: Write-Up: BD Trims and Sherwood Dash Kit Installation Sat Oct 03, 2009 12:42 pm | |
| Larry,
You have the same color interior as me and now that I see how great that looks in your car I'm very tempted on putting this kit on my Christmas list.
Just to confirm, this kit is the "Real Rosewood" made by BD Trim. Correct?
And, did you remove the dash panel to install.?
Were there any complications or advice on install that you can pass on.?
Thanks a lot. It looks super!!!!! | |
|
| | |
LARRY70GS
Aficionado
Name : Larry
Age : 67
Location : Oakland Gardens, NY
Joined : 2007-01-23
Post Count : 2183
Merit : 149
| | Subject: Re: Write-Up: BD Trims and Sherwood Dash Kit Installation Sat Oct 03, 2009 1:18 pm | |
| - Rickw wrote:
- Larry,
You have the same color interior as me and now that I see how great that looks in your car I'm very tempted on putting this kit on my Christmas list.
Just to confirm, this kit is the "Real Rosewood" made by BD Trim. Correct?
And, did you remove the dash panel to install.?
Were there any complications or advice on install that you can pass on.?
Thanks a lot. It looks super!!!!! Yes, this is the Real Rosewood color, but it is not BD Trims kit, it is Sherwood's kit. I did remove the dash panel to install those pieces. The big pieces are difficult to work with. The smaller pieces are much easier to center, and align. I heated the pieces with my hairdryer to make them more flexible. Clean the dash thoroughly as per the instructions. They recommend 3M Prep Sol 70 followed by a wipe down with rubbing alcohol. Test fit the piece and try and mark a guideline with a pencil on one end of the piece. Remove the tape from one end (about an inch or two) Start at one end and stick it lightly down. See how the other end aligns. If you have to, you can pick up the end you started with and realign it. Once you press down the piece, it is difficult to pull it back up if it is going on wrong. I made that mistake and put a slight tear in the drivers side piece (Top of the speedometer opening). It is slight, and you can't see it because of the dash over hang. I learned my lesson. I am very pleased with the quality of the kit. I have the SW-0614 kit. They have several depending on year and options. I ordered here. They gave me a better price on the phone, call. http://www.carid.com/product.php?productid=53561&cat=8557&page=1 | |
|
| | |
LARRY70GS
Aficionado
Name : Larry
Age : 67
Location : Oakland Gardens, NY
Joined : 2007-01-23
Post Count : 2183
Merit : 149
| | Subject: Re: Write-Up: BD Trims and Sherwood Dash Kit Installation Sat Oct 03, 2009 1:39 pm | |
| I carefully pried up the "Riviera" emblem and the "unleaded fuel only" emblems on the dash piece. After installing the wood grain, I used a drill to drill from the back to the front using the original mounting holes(3 holes/emblem). I then remounted the emblems in their exact spots using the original barrel clips. | |
|
| | |
Sponsored content
| | Subject: Re: Write-Up: BD Trims and Sherwood Dash Kit Installation | |
| |
|
| | |
| | Write-Up: BD Trims and Sherwood Dash Kit Installation | |
|