Riv Performance
Would you like to react to this message? Create an account in a few clicks or log in to continue.

The 8th Gen Riviera Resource
 
HomeDashboardLatest imagesSearchRiviera Questions & AnswersWrite-Ups IndexRegisterRelated LinksLog in


 Write up: Tinting your tailights PROFESSIONALLY, Very high res pics

Go down 
+2
bigdave
c0reyl
6 posters
AuthorMessage
c0reyl
Addict
c0reyl


Name : Corey
Age : 33
Location : JMU virginia
Joined : 2011-07-25
Post Count : 569
Merit : 2

Write up: Tinting your tailights PROFESSIONALLY, Very high res pics Empty
PostSubject: Write up: Tinting your tailights PROFESSIONALLY, Very high res pics   Write up: Tinting your tailights PROFESSIONALLY, Very high res pics EmptyTue Dec 18, 2012 2:06 am

Here's a quick write up of me trying to explain how to get a good professional quality look to tinting your tail lights. I don't have a huge amount of pics but it's pretty simple. If you are worried about it being illegal, don't do this, but this will achieve a tint job that looks like it was made stock factory like the firebird tail lights. I haven't been pulled over in 2 years straight yet with my tinted lights. Make sure you don't need to drive your riv all day.

PREP/ TOOLS NEEDED:

-If you want the pics way bigger, right click and copy image address then paste it in a new tab. These pics are huge.

-Lens tint, the best Iv'e seen by far as of yet is Rustoleum lens tint. It's at pretty much every walmart and auto parts store Iv'e seen so far and pretty cheap like 8 bucks a can which is more than enough

-Krylon Fusion UV clear coat

-Plastic polish/sealer

-Masking tape

-400 grit sand paper

-800 grit

-1000 grit

-2000 grit

-3000 grit

-Rubbing compound

-Soft cloth

-Tack cloth

Rubbing alcohol

A MENTAL NOTE: So you know, there is a lot of sanding involved in this. If you are too lazy to do it right, it will look like crap, and you will get pulled over often because cops will notice it much more. In my case, it literally looks like it was made stock like this.

PROCEDURE:

Basically, you want to remove your tail lights to do this. Iv'e done it without doing that once and the spray gets all over your car prety much no matter what. If you are too lazy for some reason to remove the tail light assembly, then rub out the tint that gets on your car with nail polish remover.

Remove your tail lights by unscrewing the plastic liner that goes over the trunk locking mechanism, then lift up the carpet piece and unscrew the 8 plastic wing nuts retaining the tail light assembly to the car. Remove your license plate as well. The 8 nuts are pretty easy to find with the carpet part out of the way. if the tail light assembly doesn't pull right out, DO NOT FORCE IT, this will make the tail light s possibly misaligned. Make sure all the nuts are removed then tap the bolt threads with a hammer lightly angling it up toward you a little and do that on each bolt until it frees itself.

Unplug the harness and pull the wire out, and make sure to take out the running lights/turn signal marker lights on the sides before trying to yank it out.

After that, you're going to want a perfect clear surface for the tint to adhere to, and this involves a lot of work if you wanna do it the right way. Our cars are old, and worn damaged plastic will affact the overall transparency of the tint job because of how the tint solution cures. I doubt anyone will ever get a 100 % pure perfect tint job unless they have brand new tailight lenses, but it can be pretty damn close, and no one will ever notice unless they are inches from the tail light at night with them on, because the flaws will only be seen when the tail lights are on at night, in day time, it looks 100% perfect.


To make a perfect surface, we will need to wetsand the lens.masking off the chrome is a good idea. We start by sanding it with 400 grit paper until it's very cloudy and you are sure that the entire surface has been sanded down past any worn plastic, then work your way up to 3000 grit until it looks brand new with a near mirror finish. You will gradually feel the surface getting more slick to each step up of grit. When you're done it should be super smooth and the 3000 grit sponge should glide over it very smoothly.

After that, make sure you mask off the chrome trim properly as well as the backup lights.

Write up: Tinting your tailights PROFESSIONALLY, Very high res pics Dsc00859bf

To get the masking tape to adhere around the chrome properly, do it in little sections around the curve. Use a small flathead screwdriver to press the tape to the chrome trim in between the crack. The backup light masking takes a bit of skill. I ripped of little bits of the tape around the edge and manipulated the shape perfectly with my finger nail. Masking the backup light enables it's functionality perfectly and makes it look much more stock and you are far less likely to get pulled over.

After that, wipe it clean with alcohol and let it dry, then wipe it with the tack cloth and make sure its perfectly clean, then apply the spray in very light coat, and then 5 mins later add a couple more light coats. You can spray it pretty liberally and light will still shine though and that's why the rustoleum is the best one to get, but that will make it look like crap, so we like to do light coats.


Write up: Tinting your tailights PROFESSIONALLY, Very high res pics Dsc00916g

This is the finish you see the average kid who tries to tint their lights with and it's a dead giveaway to be pulled over. it looks crappy and all cloudy and blocks more light like this. we will fix that by wet sanding it up to 3000 grit again. but first, peel off the tape from the backup lights and spray a fine mist from decently far away to blend the white to the black. Use your judgement, and if you screw up, you can sand it with 800 grit back up to 3000 and try again but it's really not hard. A very light coat of this won't dull the backup lights but makes it look much better.

After the backup lights dry, wetsand it up to 3000 grit and make sure it looks perfectly smooth.

Write up: Tinting your tailights PROFESSIONALLY, Very high res pics Dsc00924y

Looks so much better already sanded back to 3000 grits, right? I did rubbing compound and rinsed it as well so yours won't look as good unless you do that. Honestly, it's abetter idea just to use rubbing compound on the whole thing and make the chrome look brand new before applying the clear coat. The clear coat will also give your chrome a lot of luster and protect it from the sun.

wipe it with alcohol again and the tack cloth, then spray a few coats of Krylon Fusion UV clear coat. After about a week, this stuff cures to nearly rock hard, it's good shit. after the clearcoat fully dies, wetsand it with 2000 grit and 3000 grit paper until it's near flawless, do rubbing compound then rinse it with water.

Write up: Tinting your tailights PROFESSIONALLY, Very high res pics Dsc00922cl

This is how it looks after I rinsed mine.

Write up: Tinting your tailights PROFESSIONALLY, Very high res pics Dsc00920cno

And this was after I applied plastic polish. In person, it looked like a black mirror lol.
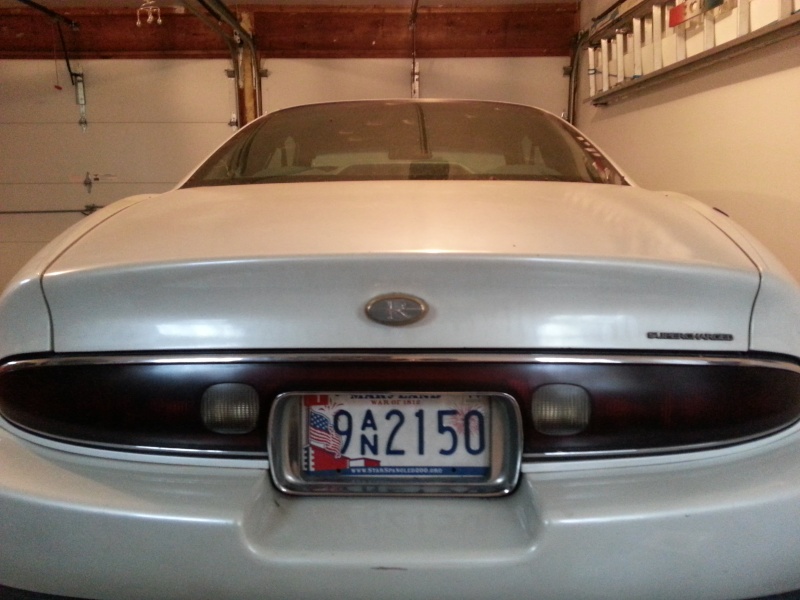
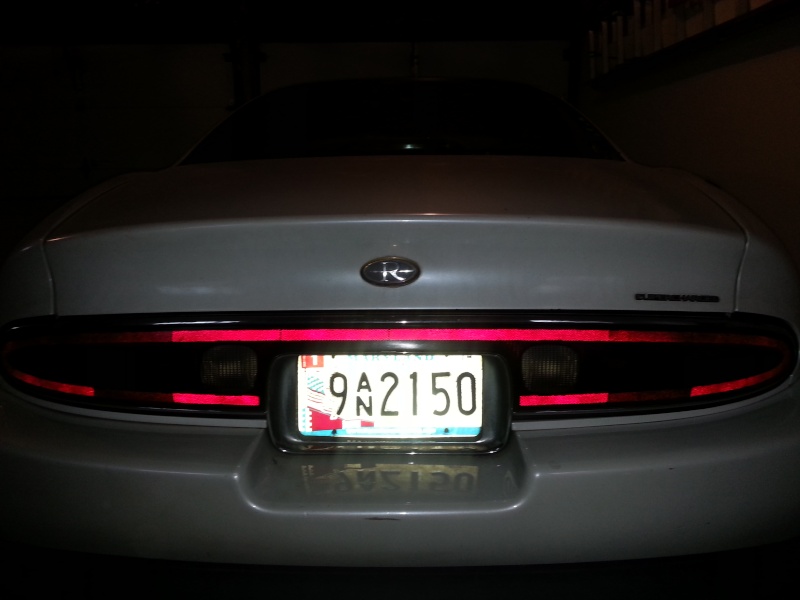

AFTER I WAS DONE:

Write up: Tinting your tailights PROFESSIONALLY, Very high res pics Dsc00928cj

These are running lights only, and the brakes make it a good bit brighter and also they were partially burned out bulbs on my part. New bulbs makes it better, and in person, it's very visable especially during braking and turn signals.

Write up: Tinting your tailights PROFESSIONALLY, Very high res pics Dsc00933x

Write up: Tinting your tailights PROFESSIONALLY, Very high res pics Dsc01071cf

Write up: Tinting your tailights PROFESSIONALLY, Very high res pics Dsc00934ye

Write up: Tinting your tailights PROFESSIONALLY, Very high res pics Dsc01061md


It's a lot of work sanding, but if you want a truly professional finish, it's necessary.


Last edited by c0reyl on Tue Dec 18, 2012 9:29 am; edited 2 times in total
Back to top Go down
bigdave
Fanatic


Name : Dave
Age : 60
Location : Cheektowaga , NY (Buffalo)
Joined : 2010-10-17
Post Count : 399
Merit : 22

Write up: Tinting your tailights PROFESSIONALLY, Very high res pics Empty
PostSubject: Re: Write up: Tinting your tailights PROFESSIONALLY, Very high res pics   Write up: Tinting your tailights PROFESSIONALLY, Very high res pics EmptyTue Dec 18, 2012 7:00 am

Great job Corey! That looks excellent. I hope your Riv is running well for you now.
Back to top Go down
charlieRobinson
Expert
charlieRobinson


Name : Charlie
Age : 38
Location : Toledo, OH
Joined : 2011-05-17
Post Count : 3923
Merit : 31

Write up: Tinting your tailights PROFESSIONALLY, Very high res pics Empty
PostSubject: Re: Write up: Tinting your tailights PROFESSIONALLY, Very high res pics   Write up: Tinting your tailights PROFESSIONALLY, Very high res pics EmptyTue Dec 18, 2012 8:42 am

Dude! Very nice! I am waiting until Spring to do mine!
Back to top Go down
c0reyl
Addict
c0reyl


Name : Corey
Age : 33
Location : JMU virginia
Joined : 2011-07-25
Post Count : 569
Merit : 2

Write up: Tinting your tailights PROFESSIONALLY, Very high res pics Empty
PostSubject: Re: Write up: Tinting your tailights PROFESSIONALLY, Very high res pics   Write up: Tinting your tailights PROFESSIONALLY, Very high res pics EmptyTue Dec 18, 2012 8:52 am

Thanks guys smile

My car runs good mechanically now but my electrical system is all screwed up. Seat motors won't work without hooking them up to a 12v battery with tiny alligator clips on the contact terminals of the clip in wires. The gauge cluster back lighting won't work, and my battery symbol is always lit up on the gauge gauge cluster as well. I need to change my fluids soon too. Also my air ride suspension is disabled but I like the stiffer ride a lot better. Less body roll for some reason

Also I found out last that obd2 scan tools can't read data. I'm talking a out a professional scan tool, not a cheap bluetooth reader.
Back to top Go down
ajgee2011
Amateur
ajgee2011


Name : A.J. Gee
Age : 30
Location : lovington, IL
Joined : 2011-12-10
Post Count : 45
Merit : 1

Write up: Tinting your tailights PROFESSIONALLY, Very high res pics Empty
PostSubject: Re: Write up: Tinting your tailights PROFESSIONALLY, Very high res pics   Write up: Tinting your tailights PROFESSIONALLY, Very high res pics EmptyTue Jan 08, 2013 11:56 am

Looks good will definately be doing this
Back to top Go down
albertj
Master
albertj


Name :
Location : Finger Lakes of New York State
Joined : 2007-05-31
Post Count : 8606
Merit : 180

Write up: Tinting your tailights PROFESSIONALLY, Very high res pics Empty
PostSubject: Re: Write up: Tinting your tailights PROFESSIONALLY, Very high res pics   Write up: Tinting your tailights PROFESSIONALLY, Very high res pics EmptyTue Jan 08, 2013 6:35 pm

c0reyl wrote:
Thanks guys smile

My car runs good mechanically now but my electrical system is all screwed up. Seat motors won't work without hooking them up to a 12v battery with tiny alligator clips on the contact terminals of the clip in wires. The gauge cluster back lighting won't work, and my battery symbol is always lit up on the gauge gauge cluster as well. I need to change my fluids soon too. Also my air ride suspension is disabled but I like the stiffer ride a lot better. Less body roll for some reason

Also I found out last that obd2 scan tools can't read data. I'm talking a out a professional scan tool, not a cheap bluetooth reader.

An OBD 2 tool should work on your car, check and see if you have any busted wires in your OBD2 connector under the dash (you will have to pull the panel) and when you are scanning be sure the plug is fully inserted.

You can get your own scanner (free download) and dongle (costs money) from www.obd-2.com, that's where I got mine.
Back to top Go down
matt270avian
Expert
matt270avian


Name : Matt
Age : 28
Location : Frederick, MD
Joined : 2012-01-15
Post Count : 2681
Merit : 54

Write up: Tinting your tailights PROFESSIONALLY, Very high res pics Empty
PostSubject: Re: Write up: Tinting your tailights PROFESSIONALLY, Very high res pics   Write up: Tinting your tailights PROFESSIONALLY, Very high res pics EmptyThu Apr 11, 2013 6:51 pm

Here's mine following your guide. I didn't do a final sand, so the finish has a slight matte to it. I didn't go as dark as yours either, don't want to risk getting pulled over.

Flash Off

Write up: Tinting your tailights PROFESSIONALLY, Very high res pics 2013-017

Flash On

Write up: Tinting your tailights PROFESSIONALLY, Very high res pics 2013-018
Back to top Go down
Sponsored content


Write up: Tinting your tailights PROFESSIONALLY, Very high res pics Empty
PostSubject: Re: Write up: Tinting your tailights PROFESSIONALLY, Very high res pics   Write up: Tinting your tailights PROFESSIONALLY, Very high res pics Empty

Back to top Go down
 
Write up: Tinting your tailights PROFESSIONALLY, Very high res pics
Back to top 
Page 1 of 1
 Similar topics
-
» Write up: Starter replacement- VERY high res pics
» Write-Up: Tinting Headlights, Turn Signals, & Tail Lenses
» Tinting behind third brake light?
» Write-Up: Replacing rear rotors and pads. (lots of pics)
» Tinted headlights/tailights

Permissions in this forum:You cannot reply to topics in this forum
Riv Performance ::   General Tech :: Exterior-
Jump to: