Yes, an FSM should be acquired.
Sunroof Glass Panel Replacement Removal Procedure
Caution: When working with any type of glass or sheet metal with exposed or rough edges, wear approved safety glasses and gloves in order to reduce the chance of personal injury.
1. Remove the three screws from the trough and shield assembly.
2. Slide the trough and shield assembly to the rear.
3. Cycle the glass panel to the vent position.
4. Remove the 3 screws (1) from each side of the glass panel.
5. Remove the glass panel.
Sunshade, Lifter Arm, Trough and Shield Replace Sunshade Removal Procedure
1. Remove the glass panel. Refer to Sunroof Glass Panel Replacement.
2. Cycle the unit to the vent position.
3. Slide the trough and shield forward.
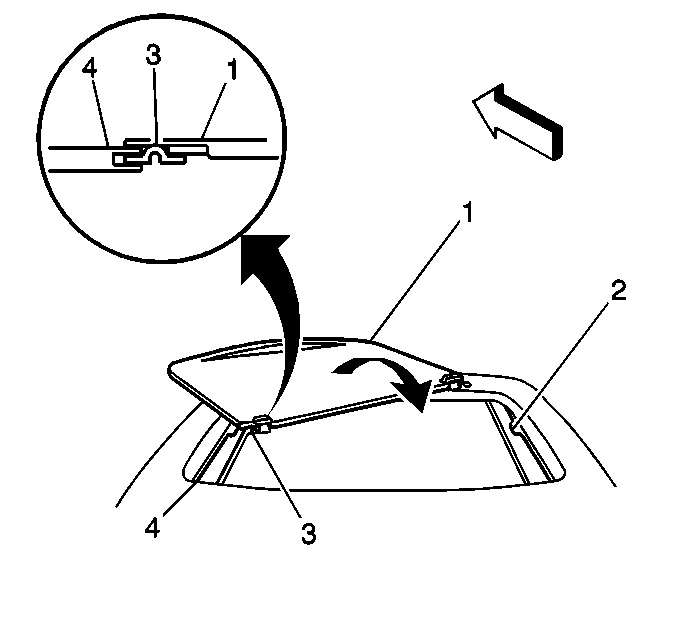
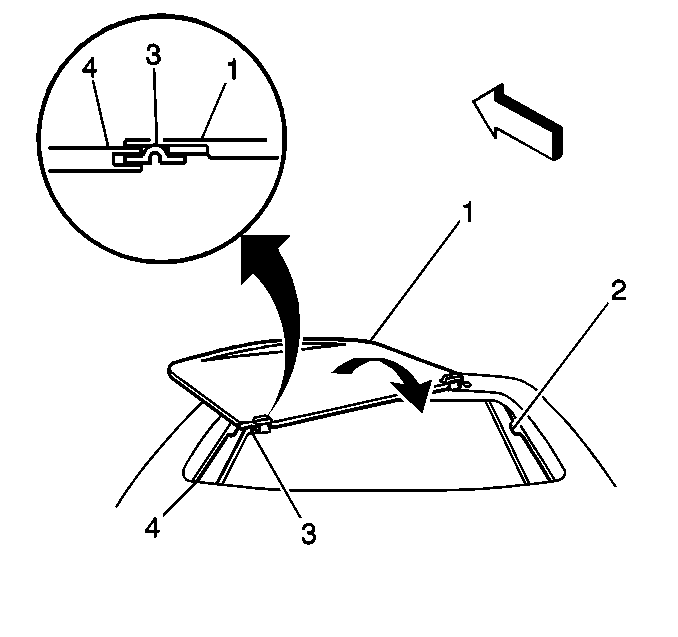
4. Slide the sunshade (1) forward.
5. Lift and turn the front edge of the sunshade (1) in order to disengage the clips (3).
Sunshade Installation Procedure
1. Slide the trough and shield (1) forward.
2. Flex the sunshade (2) in order to clear the stops (3).
3. Keeping the unit centered, slide the sunshade (2) to the rear.
4. Slide the sunshade (2) forward.
5. Install the glass panel. Refer to Sunroof Glass Panel Replacement.
Lifter Arm Removal Procedure**Refer to above callout
1. Remove the glass panel. Refer to Sunroof Glass Panel Replacement.
2. Cycle the unit to the rear until the lift pin is clear.
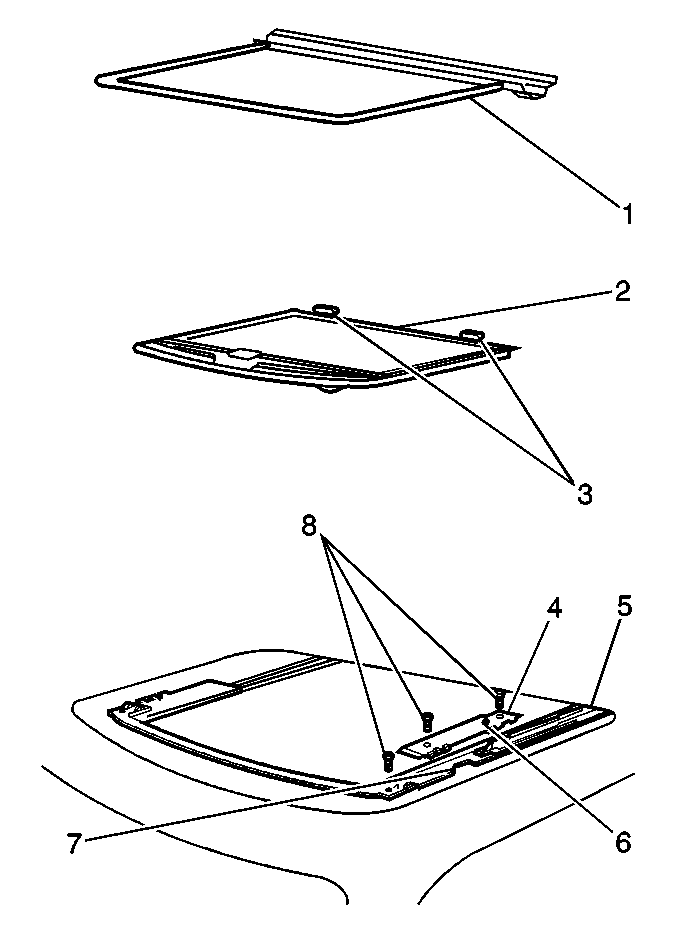
3.Remove the cover plates (4) on each side.
4. Remove the 3 screws (8) on each side.

5. Cycle the unit (1) rearward in order to expose the openings in the track (2).
6. Remove the front lifter guides (3) from the track (4).
7. Cycle the unit forward in order to release the lifter arm from the trolley.
Lifter Arm Installation Procedure1. Install the lifter arms (5).
2. Install the cover plates (4).
3. Install the machined screws (8).
4. Cycle the trough and shield assembly (1) to the full rear travel position.
5. Install the glass panel. Refer to Sunroof Glass Panel Replacement.
Trough and Shield Removal Procedure1. Remove the glass panel. Refer to Sunroof Glass Panel Replacement.
2. Cycle the unit to the rear until the lift pin is clear.
3. Remove the cover plates (4).
4. Cycle the unit forward in order to expose the openings in the track (7).
5. Remove the lifter arms (5) by sliding the arms to the rear.
6. Lift out the arms through the openings in the track (7).
7. Cycle the trolley forward.
Do not disengage the cable from the transmission.
8. Pull the trough and shield assembly (1) forward.
9. Lift out the trough and shield assembly (1) through the opening in the track (7).
Trough and Shield Installation Procedure1. Install the guide shoes of the trough and shield assembly (1) into the opening (7) in the track.
2. Engage the guide shoes of the trough and shield assembly (1) in the slot on the track (7).
3. Center the trough and shield assembly (1).
4. Push the trough and shield assembly (1) into the housing until the assembly is seated.
5. Install the lifter arms (5).
6. Install the machined screws (8) in order to secure the cover plates (4).
7. Cycle the trough and shield assembly (1) to full rear travel.
8. Install the glass panel. Refer to Sunroof Glass Panel Replacement.
All "missing" pictures are the same picture with 8 callouts on it, which is why I didn't bother to post the same pic in all procedures. These are all how to get the glass/rail/lifter assemblies out, and can be done without removing the headliner. The motor/transmission assembly requires headliner removal. If it's grinding, I'd assume there's something wrong with the cable. Maybe later today I'll post that part of it all....


