| | Write-Up: Exterior Mirror Disassembly |  |
|
+12flyineagle96 DEMonte1997 LARRY70GS detroiter91 GMFreak8 Eldo BMD sqrivi Rickw palermocorey90 captshiner 99Rivman 16 posters |
|
| Author | Message |
|---|
99Rivman
Aficionado

Name : Randall
Location : North Carolina
Joined : 2007-01-16
Post Count : 2009
Merit : 89
| | Subject: Write-Up: Exterior Mirror Disassembly Wed Aug 20, 2008 4:26 pm | |
| As requested: MIRROR DISSASEMBLYThe first four pictures just are my starting point and my drivers’ side connector. The fifth and sixth, which is very bad but shows where the screws come through from the upper housing, show the upper and lower housings separated. The seventh and eighth pictures show everything disassembled and then taken apart after removing the connector. The ninth and tenth pictures are the passenger side connector. LEGEND: Orange: holds mirror motor in housing. Blue/ Green: Holds upper housing to lower housing. Red/ Purple: Holds mounting brackets in lower housing. After mirror assembly is removed from car.1) 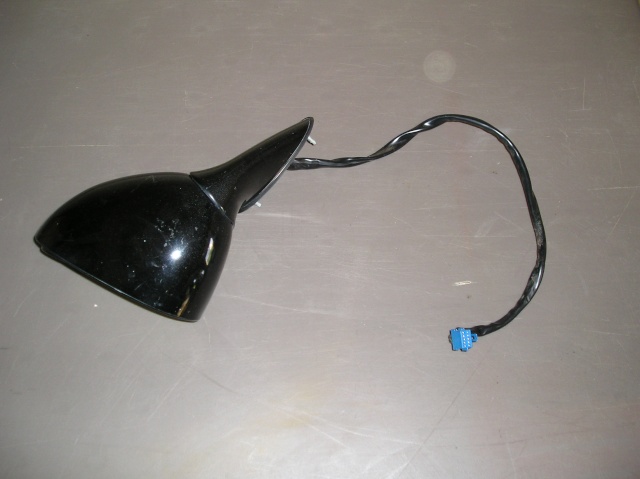 2) 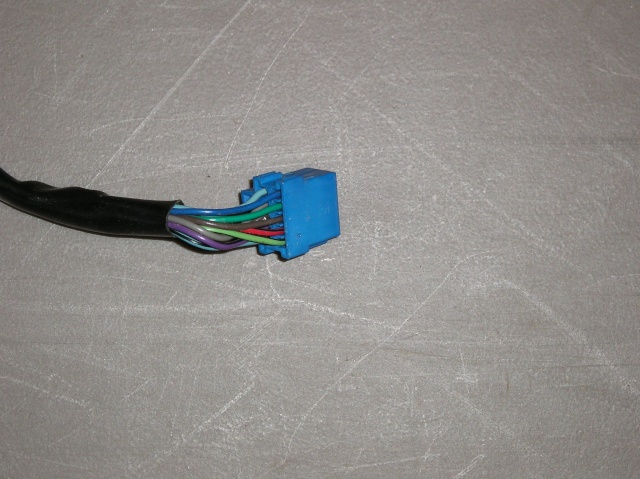 3) 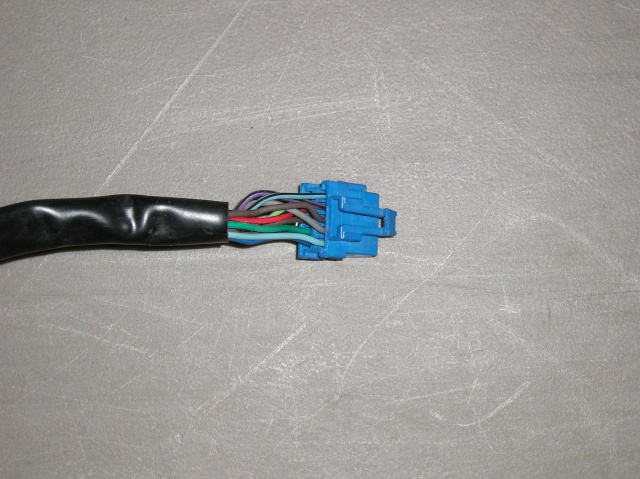 First remove mirror, unplug connector if heated. First remove mirror, unplug connector if heated.4)  Second remove screws (Orange) holding mirror motor in upper housing. SEE EIGHTH PICTUREThird remove nut (Blue) and two screws (Green) that hold upper housing to lower housing. Second remove screws (Orange) holding mirror motor in upper housing. SEE EIGHTH PICTUREThird remove nut (Blue) and two screws (Green) that hold upper housing to lower housing.5) 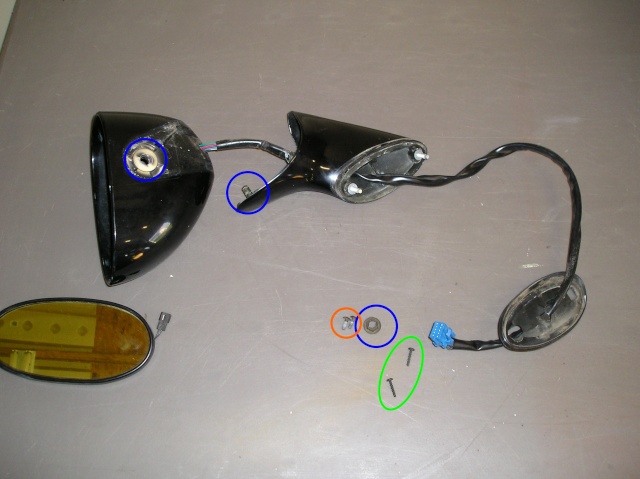 Forth remove bolt (Red) and nut (Purple) that hold the mounting brackets in the lower housing. Forth remove bolt (Red) and nut (Purple) that hold the mounting brackets in the lower housing.6) 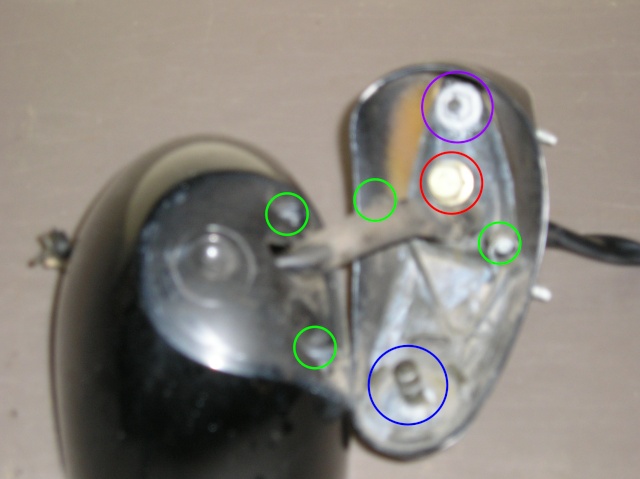 7)  Fifth remove pins from connector, I did it this way instead of cutting and reconnecting the wires, at any rate the connector has to be removed to pull the wires through the brackets and housings. Fifth remove pins from connector, I did it this way instead of cutting and reconnecting the wires, at any rate the connector has to be removed to pull the wires through the brackets and housings.8) 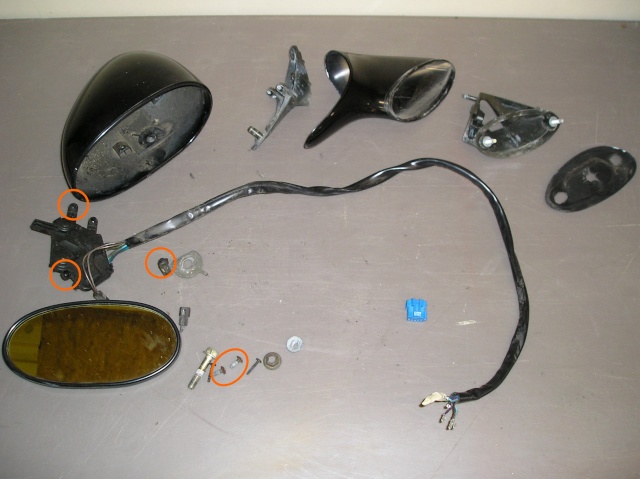 I took pictures of the connectors so I would know exactly how they went back together. These are from my ’95 so your connectors might be set up differently? 9) 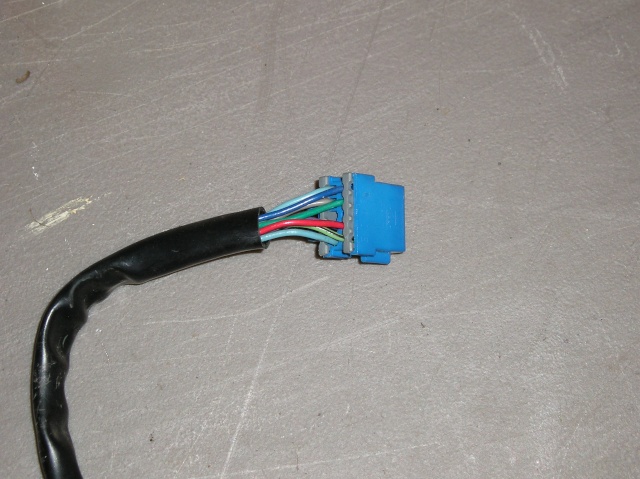 10)  Hope this helps!  | |
|
| | |
captshiner
Junkie

Name : Andrew
Age : 37
Location : Cincinnati, OH
Joined : 2008-07-23
Post Count : 756
Merit : -1
| | Subject: Re: Write-Up: Exterior Mirror Disassembly Wed Aug 20, 2008 4:43 pm | |
| That helps alot, but how did you get if off the door? | |
|
| | |
99Rivman
Aficionado
Name : Randall
Location : North Carolina
Joined : 2007-01-16
Post Count : 2009
Merit : 89
| | Subject: Re: Write-Up: Exterior Mirror Disassembly Wed Aug 20, 2008 7:25 pm | |
| Remove the interior panel.  Unplug the mirror connector. Undo the wire retainer at the front of the door, holds the mirror wires out of the way of the window. Remove two 10MM nuts from mirror mount. Remove mirror. | |
|
| | |
captshiner
Junkie
Name : Andrew
Age : 37
Location : Cincinnati, OH
Joined : 2008-07-23
Post Count : 756
Merit : -1
| | Subject: Re: Write-Up: Exterior Mirror Disassembly Wed Aug 20, 2008 7:28 pm | |
| Now my plan is complete!  | |
|
| | |
99Rivman
Aficionado
Name : Randall
Location : North Carolina
Joined : 2007-01-16
Post Count : 2009
Merit : 89
| | Subject: Re: Write-Up: Exterior Mirror Disassembly Wed Aug 20, 2008 7:33 pm | |
| | |
|
| | |
palermocorey90
Expert

Name : Corey
Age : 34
Location : Rome NY
Joined : 2007-10-03
Post Count : 2968
Merit : -24
| | Subject: Re: Write-Up: Exterior Mirror Disassembly Wed Aug 20, 2008 8:47 pm | |
| great write up man, even tho i dont own a riv anymore. its still a great write up. i think the colored circle will help alot of people | |
|
| | |
Rickw
Guru
Name : Rick
Location : Lancaster, MA
Joined : 2008-09-13
Post Count : 6282
Merit : 119
| | Subject: Re: Write-Up: Exterior Mirror Disassembly Sun Apr 12, 2009 6:45 pm | |
| FYI, mirror shown is not a heated mirror, just auto dimming.
A heated mirror will have noticeable heating elements on back side with two more wires connected to it.
I found this out by taking my drivers side apart to replace the mirror. Mine is heated and auto-dimming. | |
|
| | |
99Rivman
Aficionado
Name : Randall
Location : North Carolina
Joined : 2007-01-16
Post Count : 2009
Merit : 89
| | Subject: Re: Write-Up: Exterior Mirror Disassembly Sun Apr 12, 2009 8:06 pm | |
| You are correct, this is the mirror from my '95, heated wasn't an option on the '95.
EDIT:
My mistake, I did say "heated" in my first step ... sorry about the confusion!?!
Last edited by 99Rivman on Mon Apr 13, 2009 5:16 pm; edited 1 time in total | |
|
| | |
sqrivi
Fanatic
Name : scott
Location : madison, al
Joined : 2008-03-15
Post Count : 375
Merit : 52
| | Subject: Re: Write-Up: Exterior Mirror Disassembly Mon Apr 13, 2009 12:06 am | |
| How is the mirror itself attached to the housing/motor and how is it removed? Is there much room in the housing? I have been wanting to add turn signals to my mirrors. I just haven't taken the time to take apart the mirrors to see if it can be done. | |
|
| | |
99Rivman
Aficionado
Name : Randall
Location : North Carolina
Joined : 2007-01-16
Post Count : 2009
Merit : 89
| | Subject: Re: Write-Up: Exterior Mirror Disassembly Mon Apr 13, 2009 5:19 pm | |
| - sqrivi wrote:
- How is the mirror itself attached to the housing/motor and how is it removed? Is there much room in the housing? I have been wanting to add turn signals to my mirrors. I just haven't taken the time to take apart the mirrors to see if it can be done.
If you look at the forth picture there are kind of slots at the top, pretty large, and at the bottom, not as large, you pry with something in those slots and the morror pops out of the mounts. There is some room in the housing just not sure how much you need? | |
|
| | |
Rickw
Guru
Name : Rick
Location : Lancaster, MA
Joined : 2008-09-13
Post Count : 6282
Merit : 119
| | Subject: Re: Write-Up: Exterior Mirror Disassembly Mon Apr 13, 2009 5:28 pm | |
| I pulled mine out by hand, it is a bit difficult but doable.
When reinstalling make sure you have everything lined up (there are movable ball sockets that the mirror rotates on) and must apply a lot of force.
Be careful as everything is plastic. | |
|
| | |
BMD
Aficionado

Name : BMD
Location : Canada
Joined : 2009-04-28
Post Count : 1161
Merit : 36
| | Subject: Re: Write-Up: Exterior Mirror Disassembly Tue Sep 01, 2009 9:05 pm | |
| My mirror isn't heated but the tint in the mirror has all leaked out and looks like crap. I was going to get a mirror shop to cut one out for me for $40CDN. Randalls' write up is excellent. The only thing he doesn't show in pics, is how the mirror itself is removed. I pulled it off with my hands by holding both sides of the mirror and pulling it towards me. Like Randall and Rick say, "there are movable ball sockets that the mirror rotates on" and when you pull it the "mirror pops out of the mounts. When reinstalling make sure you have everything lined up, and must apply a lot of force. Be careful as everything is plastic." For what its worth, here are some pics I took...  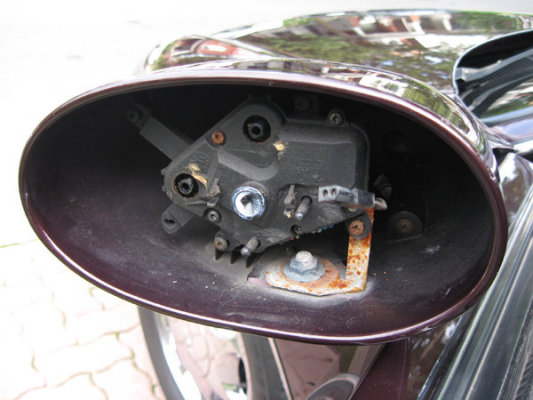 Hope that helps.
Last edited by BMD on Wed Sep 02, 2009 7:42 am; edited 1 time in total | |
|
| | |
Eldo
Expert

Name : Mark
Age : 59
Location : West Salem, Oregon... FINALLY
Joined : 2009-04-09
Post Count : 3140
Merit : 104
| | Subject: Re: Write-Up: Exterior Mirror Disassembly Mon Jan 11, 2010 3:17 am | |
| 1. Remove the mirror and the plastic backing plate by pulling the assembly out of the mirror housing. 2. Verify that the springs on the actuator shafts are not pushed down on the shafts. 3. Ensure that the springs are seated in the grooves. 4. Disconnect the electrical connectors. Installation Procedure 1. Snap the actuator shafts into the power drive unit. 2. Connect the electrical connectors. 3. Rotate the actuator shafts in order to align the ears with the corresponding slots in the back side of the mirror face. 4. Align the swivel on the power drive unit to the pivot points on the mirror backing plate. Notice To avoid damaging mirrors, pressure must not be applied to the center of the mirror. Place a 2 x 3 inch block of wood with its lower-left corner in the center of the mirror face. This will distribute pressure evenly.  Using the block, perform the following procedure: 1. Push in on the block until you hear a snap. 2. Tilt the mirror towards the upper actuator shaft and gently apply pressure on the block until the ratchet sound stops. 3. Tilt the mirror towards the outside actuator shaft and gently apply pressure on the block until the ratchet sound stops. 4. Inspect the mirror for proper operation. 5. If the mirror is not operating properly, inspect the actuator shaft alignments again.
Last edited by Eldo on Tue Mar 06, 2012 4:30 pm; edited 1 time in total | |
|
| | |
GMFreak8
Addict

Name : Kyle
Age : 35
Location : Malone, New York
Joined : 2009-03-15
Post Count : 638
Merit : 15
| | Subject: Re: Write-Up: Exterior Mirror Disassembly Tue Jan 12, 2010 6:52 pm | |
| My drivers side mirror "pod" seems to wobble slightly I can physically move it with my hand and it shakes when I close the door. Is there anyway to tighten that up? | |
|
| | |
Rickw
Guru
Name : Rick
Location : Lancaster, MA
Joined : 2008-09-13
Post Count : 6282
Merit : 119
| | Subject: Re: Write-Up: Exterior Mirror Disassembly Tue Jan 12, 2010 6:58 pm | |
| I would leave it alone while it's very cold out. Everything in there is plastic.
If you have a warm shop to bring it in to and allow it get to room temp then follow the instructions above about removing the mirror from the housing and see what you can see.
Otherwise leave it for now as you will almost certainly break something plastic that is cold and brittle. | |
|
| | |
GMFreak8
Addict
Name : Kyle
Age : 35
Location : Malone, New York
Joined : 2009-03-15
Post Count : 638
Merit : 15
| | Subject: Re: Write-Up: Exterior Mirror Disassembly Tue Jan 12, 2010 7:20 pm | |
| - Rickw wrote:
- I would leave it alone while it's very cold out. Everything in there is plastic.
If you have a warm shop to bring it in to and allow it get to room temp then follow the instructions above about removing the mirror from the housing and see what you can see.
Otherwise leave it for now as you will almost certainly break something plastic that is cold and brittle. It's not the actual part that attaches to the door, it's the pod that attaches to the arm that attaches to the door that is loose. It's almost like it's floating. | |
|
| | |
Rickw
Guru
Name : Rick
Location : Lancaster, MA
Joined : 2008-09-13
Post Count : 6282
Merit : 119
| | Subject: Re: Write-Up: Exterior Mirror Disassembly Tue Jan 12, 2010 8:29 pm | |
| - GMFreak8 wrote:
It's not the actual part that attaches to the door, it's the pod that attaches to the arm that attaches to the door that is loose. It's almost like it's floating. Did you read this thread from the beginning. it shows you the mirror assembly broken down and what you need to do to tighten it up. The only other thing you need to do is find the "Write Up' on removing the door panel to gain access to the mirror housing without breaking any plastic parts. Good Luck and don't hesitate to ask questions. | |
|
| | |
99Rivman
Aficionado
Name : Randall
Location : North Carolina
Joined : 2007-01-16
Post Count : 2009
Merit : 89
| | Subject: Re: Write-Up: Exterior Mirror Disassembly Sat Jan 16, 2010 8:39 am | |
| - GMFreak8 wrote:
- My drivers side mirror "pod" seems to wobble slightly I can physically move it with my hand and it shakes when I close the door. Is there anyway to tighten that up?
- GMFreak8 wrote:
- It's not the actual part that attaches to the door, it's the pod that attaches to the arm that attaches to the door that is loose. It's almost like it's floating.
Since your question was never answered, if you look at BMD's pictures, great addition by the way BMD, the nut that is shown in the bottom of the mirror housing is one of the fasteners that hold the mirror housing to the base that attaches to the door. It is the large nut that is shown under the mirror motor. I think there is another fastener that holds it on also but it has been quite some time since I had mine apart. If you tighten up that nut, even if it is not the only fastener, that should take most/some of the wobble out of your mirror housing. - BMD wrote:
- The only thing he doesn't show in pics, is how the mirror itself is removed. I pulled it off with my hands by holding both sides of the mirror and pulling it towards me. Like Randall and Rick say, "there are movable ball sockets that the mirror rotates on" and when you pull it the "mirror pops out of the mounts. When reinstalling make sure you have everything lined up, and must apply a lot of force. Be careful as everything is plastic."
For what its worth, here are some pics I took...
Hope that helps. | |
|
| | |
GMFreak8
Addict
Name : Kyle
Age : 35
Location : Malone, New York
Joined : 2009-03-15
Post Count : 638
Merit : 15
| | Subject: Re: Write-Up: Exterior Mirror Disassembly Sat Jan 16, 2010 10:52 am | |
| - 99Rivman wrote:
- GMFreak8 wrote:
- My drivers side mirror "pod" seems to wobble slightly I can physically move it with my hand and it shakes when I close the door. Is there anyway to tighten that up?
- GMFreak8 wrote:
- It's not the actual part that attaches to the door, it's the pod that attaches to the arm that attaches to the door that is loose. It's almost like it's floating.
Since your question was never answered, if you look at BMD's pictures, great addition by the way BMD, the nut that is shown in the bottom of the mirror housing is one of the fasteners that hold the mirror housing to the base that attaches to the door. It is the large nut that is shown under the mirror motor. I think there is another fastener that holds it on also but it has been quite some time since I had mine apart. If you tighten up that nut, even if it is not the only fastener, that should take most/some of the wobble out of your mirror housing.
- BMD wrote:
- The only thing he doesn't show in pics, is how the mirror itself is removed. I pulled it off with my hands by holding both sides of the mirror and pulling it towards me. Like Randall and Rick say, "there are movable ball sockets that the mirror rotates on" and when you pull it the "mirror pops out of the mounts. When reinstalling make sure you have everything lined up, and must apply a lot of force. Be careful as everything is plastic."
For what its worth, here are some pics I took...
Hope that helps. Thanks for the clarification. I really appreciate it. I'm almost afraid to remove the mirror though, considering I have the rare hard to find electro-chromatic mirror. | |
|
| | |
detroiter91
Special
Name : Robert
Age : 32
Location : Sterling Heights , MI
Joined : 2011-03-03
Post Count : 2
Merit : 0
| | Subject: driver side mirror Wed May 04, 2011 3:33 am | |
| - Rickw wrote:
- FYI, mirror shown is not a heated mirror, just auto dimming.
A heated mirror will have noticeable heating elements on back side with two more wires connected to it.
I found this out by taking my drivers side apart to replace the mirror. Mine is heated and auto-dimming. where did you get the replacement mirror for the driver side? | |
|
| | |
LARRY70GS
Aficionado

Name : Larry
Age : 67
Location : Oakland Gardens, NY
Joined : 2007-01-23
Post Count : 2186
Merit : 149
| | Subject: Re: Write-Up: Exterior Mirror Disassembly Wed May 04, 2011 12:27 pm | |
| I bought a Burco Redi Cut mirror and used a flexible two part epoxy to glue it to the discolored auto dimming mirror. The heat does transfer through and de ices the mirror in the winter. http://www.wheelskin.com/burcomirrorglass.php?type=Driver%20Side%20Mirror%20Glass&make=BUICK&model=RIVIERA&year=1998  
_________________
98 Riviera SC3800 All stock except gutted air box.
1970 Buick GS455 Stage1, TSP built 470BBB, 602HP/589TQ
Best MPH, 116.06 MPH, Best ET, 11.54
https://www.youtube.com/watch?v=UHCda-t_Jls
https://www.youtube.com/watch?v=sfT2tEO4XcU
| |
|
| | |
DEMonte1997
Aficionado

Name : Rick
Age : 45
Location : CT
Joined : 2009-03-03
Post Count : 1429
Merit : 37
| | Subject: Re: Write-Up: Exterior Mirror Disassembly Wed May 04, 2011 3:36 pm | |
| That's a really good discovery Larry. Thanks for posting!  | |
|
| | |
LARRY70GS
Aficionado
Name : Larry
Age : 67
Location : Oakland Gardens, NY
Joined : 2007-01-23
Post Count : 2186
Merit : 149
| | Subject: Re: Write-Up: Exterior Mirror Disassembly Wed May 04, 2011 4:02 pm | |
| - DEMonte1997 wrote:
- That's a really good discovery Larry. Thanks for posting!
I posted it somewhere else when I did it. Can't remember where.
_________________
98 Riviera SC3800 All stock except gutted air box.
1970 Buick GS455 Stage1, TSP built 470BBB, 602HP/589TQ
Best MPH, 116.06 MPH, Best ET, 11.54
https://www.youtube.com/watch?v=UHCda-t_Jls
https://www.youtube.com/watch?v=sfT2tEO4XcU
| |
|
| | |
flyineagle96
Junkie

Name : James E
Age : 55
Location : Dalton,Mass
Joined : 2009-12-21
Post Count : 915
Merit : 23
| | Subject: Re: Write-Up: Exterior Mirror Disassembly Wed May 04, 2011 4:05 pm | |
| Now there's someone using their head.Smart very smart!!! some mite say that's a cob-job,I'd say that's a done deal,quick,easy,works,job done. | |
|
| | |
BMD
Aficionado
Name : BMD
Location : Canada
Joined : 2009-04-28
Post Count : 1161
Merit : 36
| | Subject: Re: Write-Up: Exterior Mirror Disassembly Wed May 04, 2011 4:17 pm | |
| Looks great Larry, nice find. If you don't want the added thickness, another option is too swipe a mirror from an Aurora with the correct backing plate to pop it into the original housing on the RIv. 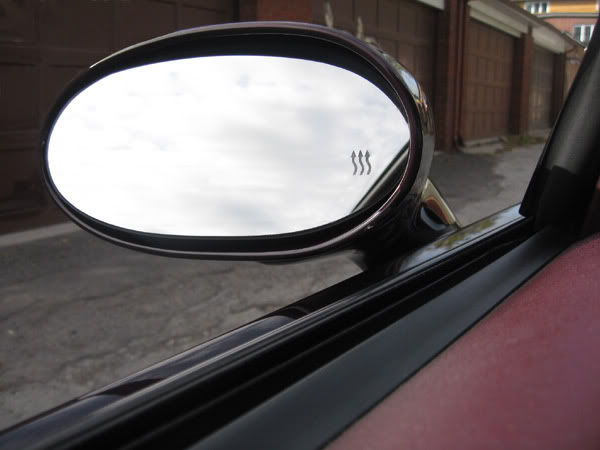 | |
|
| | |
Sponsored content
| | Subject: Re: Write-Up: Exterior Mirror Disassembly | |
| |
|
| | |
| | Write-Up: Exterior Mirror Disassembly | |
|


