| | Write-Up: Thermostat Installation |  |
|
+19robotennis61 steve s Ash DEMonte1997 TonySmooth89 Eldo T Riley curious riv 97rivsc AA Rickw EASHER BillBoost37 Chicken albertj Buapo 1998 Riv deekster_caddy ibmoses 23 posters |
|
| Author | Message |
|---|
ibmoses
Aficionado

Name : Bert
Location : North Alabama
Joined : 2008-02-03
Post Count : 1701
Merit : 32
| | Subject: Write-Up: Thermostat Installation Mon Jun 23, 2008 10:05 pm | |
| See write-up here: https://rivperformance.editboard.com/t3484p15-write-up-thermostat-installation#41776Its not a Riv but its the same engine so I appreciate any info... 95 Park Ave. NASeriesII Engine I pulled the thermostat housing and it has the remains of a black gasket that is going to be tough to remove without scarring up the intake where the water neck attachés. Any tips on getting that crap off without gouging up the aluminum? I know the thermostat has a O ring that goes around it. Does the thermostat housing also need a gasket? Thanks Bert:tavis: | |
|
| | |
deekster_caddy
Master
Name : Derek
Age : 52
Location : Reading, MA
Joined : 2007-01-31
Post Count : 7717
Merit : 109
| | Subject: Re: Write-Up: Thermostat Installation Mon Jun 23, 2008 10:31 pm | |
| A gasket scraper should take care of it.
Some used Gaskets and some used O-rings. Depends on the LIM and housing. Parts books have the answer. I have both hanging on my garage wall...
If it has an O-ring, it shouldn't need a gasket. Some people don't trust the lack of gasket and goop it up with RTV but I've never had to. Just make sure you use a new o-ring if that's what was there. The old one is probably compressed and won't seal anymore. | |
|
| | |
ibmoses
Aficionado
Name : Bert
Location : North Alabama
Joined : 2008-02-03
Post Count : 1701
Merit : 32
| | Subject: Re: Write-Up: Thermostat Installation Mon Jun 23, 2008 10:38 pm | |
| It has a O ring in there now. I will replace with a new O ring and try it without a gasket.
Thanks for the reply.
Bert:tavis: | |
|
| | |
1998 Riv
Expert

Name : Dave
Age : 64
Location : In The AZ Oven
Joined : 2007-01-17
Post Count : 4502
Merit : 44
| | Subject: Re: Write-Up: Thermostat Installation Mon Jun 23, 2008 11:40 pm | |
| I believe the later cars had both. I'm about 100% sure I got a new o-ring and a typical gasket when I swapped thermostats last year. | |
|
| | |
Buapo
Addict

Name : Ben
Age : 39
Location : Eastlake, OH
Joined : 2007-07-17
Post Count : 691
Merit : 2
| | Subject: Re: Write-Up: Thermostat Installation Tue Jun 24, 2008 3:58 am | |
| They have BOTH. The thermostat itself has a gasket that goes around the outside of that middle ring, then there's a paper style gasket that you use to seal up the housing.
Make sure you get both. I don't think you need to use any RTV or anything like that, though. | |
|
| | |
deekster_caddy
Master
Name : Derek
Age : 52
Location : Reading, MA
Joined : 2007-01-31
Post Count : 7717
Merit : 109
| | Subject: Re: Write-Up: Thermostat Installation Tue Jun 24, 2008 6:46 am | |
| The ones I've taken apart with O-rings did NOT have a gasket OEM. It should only take one or the other. | |
|
| | |
albertj
Master

Name :
Location : Finger Lakes of New York State
Joined : 2007-05-31
Post Count : 8687
Merit : 181
| | Subject: Re: Write-Up: Thermostat Installation Tue Jun 24, 2008 9:58 am | |
| Your new thermostat should come with a gasket - but you know, making gaskets is not that tough. You need a sheet of "gasket material" (one 10" x 26" sheet of Fel-Pro 3157 - a neoprene/fiber gasket) that should be about $5 and tax. For small stuff like this it's a lifetime supply; it does not deteriorate if you store it reasonably (cool dry place). And some shop supplies - a scrap of masonite or plywood or such to use as a cutting board (or even a cutting board from the dollar store), an "X-Acto" type knife (easier to maneuver than a box knife or razor) and a marker (a fine point sharpie is nice, often a simple pencil will work).
Put gasket material over cutting board. Take the movable piece from what you're assembling, put it over the gasket material and trace the outline including the bolt holes. For small cast items, you can put the thing down and whack it a couple times with a rubber mallet to make an impression in the gasket if you want. Anyway - use the X-Acto knife to cut out the gasket along the lines of the impression or tracing. You may want to cut from one side then flip the gasket over and cut from the other side to get neat lines. If you do this it might help to poke the knife point through the material enough to give you a tracing of perforations to follow when you flip the gasket. One thing I do, also, to make things easier is that I position the thing I'm gasketing such that it takes up a minimum of gasket material. So if there is a flat edge on it, for instance, I position that flat edge on an edge of the material. Then after I trace it, I cut it away from the big sheet with scissors and finish up the fine cuts with the X-Acto knife.
One benefit of making your own gaskets is that for certain gaskets, the gasket supplied with the item (a thermostat for instance, or certain mechanical fuel pumps) may be universal and may not fit that well - it may be too big or may not have holes in the right places for *your* application. If you cut the gasket yourself, you'll get it right.
For some applications you may prefer a cork and rubber gasket, it will be thicker and a buck or so more per 10x26 sheet and you'll probably want to use a black, blue, or silver Sharpie or Vis-a-Vis (temporary transparency) marker to do the tracing.
Albertj | |
|
| | |
ibmoses
Aficionado
Name : Bert
Location : North Alabama
Joined : 2008-02-03
Post Count : 1701
Merit : 32
| | Subject: Re: Write-Up: Thermostat Installation Tue Jun 24, 2008 10:09 pm | |
| Thanks for all the replies.
I ended up using the O ring and a Fel Pro gasket for the thermo. housing.
The gasket the factory had installed was hard as a rock so I used some Permatex gasket remover to soften it up. After soaking it with the gasket remover the gasket came off a lot easier.
I mixed distilled water with Dex Cool and refilled the radiator, bled the air.
Replaced all the factory spring clamps with traditional clamps for convenience.
Just now got finished and its dark outside so I will check again tomorrow to make sure its full and verify there are no leaks...
Found time to do some reading today about Dex Cool. From what I could tell it seems like GM has decided part of the problem is nobody ever takes the cap off anymore and checks the radiator to be sure its full. They just eyeball the reservoir and if looks correct, drive it.
I pulled the reservoir and in the very bottom of it where the drain tube is placed there was about a 1/4" of crud. The crud would probably keep the coolant from flowing through the tube between the reservoir and the radiator.
Bert:tavis: | |
|
| | |
albertj
Master
Name :
Location : Finger Lakes of New York State
Joined : 2007-05-31
Post Count : 8687
Merit : 181
| | Subject: Re: Write-Up: Thermostat Installation Fri Jun 27, 2008 11:03 am | |
| What do you want to bet that the "Crud" is the factory fill of radiator stop leak (crushed walnut shells)?  Albertj | |
|
| | |
ibmoses
Aficionado
Name : Bert
Location : North Alabama
Joined : 2008-02-03
Post Count : 1701
Merit : 32
| | Subject: Re: Write-Up: Thermostat Installation Fri Jun 27, 2008 9:14 pm | |
| - albertj wrote:
- What do you want to bet that the "Crud" is the factory fill of radiator stop leak (crushed walnut shells)?
Albertj You are probably correct. I got it all back together and no leaks. But, the temperature never gets past 170*-180*... The thermostat is a 192* from NAPA. Im thinking of getting another thermostat, this time from Advance and swapping it out to see if the car will run closer to the "normal" operating temp. Bert | |
|
| | |
ibmoses
Aficionado
Name : Bert
Location : North Alabama
Joined : 2008-02-03
Post Count : 1701
Merit : 32
| | Subject: Re: Write-Up: Thermostat Installation Sat Jun 28, 2008 3:30 pm | |
| Sure enough, the dumbass:shout: NAPA parts schmuck gave me a 180* thermostat.  I just got through swapping it. Bert:tavis: | |
|
| | |
Chicken
Aficionado

Name : Mark
Age : 58
Location : Montana
Joined : 2008-06-13
Post Count : 1296
Merit : 8
| | Subject: Re: Write-Up: Thermostat Installation Thu Jul 03, 2008 5:59 pm | |
| I'm about to install a 180* thermo from Intense. It did not come with a gasket or an O-Ring...before I remove the old stock one, is there a gasket or oring I should buy prior? | |
|
| | |
deekster_caddy
Master
Name : Derek
Age : 52
Location : Reading, MA
Joined : 2007-01-31
Post Count : 7717
Merit : 109
| | Subject: Re: Write-Up: Thermostat Installation Thu Jul 03, 2008 6:09 pm | |
| have the parts store look up your car. I can't recall when they changed from gasket to o-ring, and I don't think it's consistent across different models. | |
|
| | |
Chicken
Aficionado
Name : Mark
Age : 58
Location : Montana
Joined : 2008-06-13
Post Count : 1296
Merit : 8
| | Subject: Re: Write-Up: Thermostat Installation Thu Jul 03, 2008 6:17 pm | |
| | |
|
| | |
ibmoses
Aficionado
Name : Bert
Location : North Alabama
Joined : 2008-02-03
Post Count : 1701
Merit : 32
| | Subject: Re: Write-Up: Thermostat Installation Thu Jul 03, 2008 8:40 pm | |
| Advance listed and stocked a Fel Pro gasket that appeared to be identical to what was left of the gasket that the factory installed.
I used the O ring(required) around the thermostat, AND the gasket between the waterneck(thermostat housing), and the intake.
Bert:tavis:
Last edited by ibmoses on Thu Jul 03, 2008 9:18 pm; edited 1 time in total | |
|
| | |
Buapo
Addict
Name : Ben
Age : 39
Location : Eastlake, OH
Joined : 2007-07-17
Post Count : 691
Merit : 2
| | Subject: Re: Write-Up: Thermostat Installation Thu Jul 03, 2008 9:15 pm | |
| I could see the metal-to-metal thermostat housing on the engine block developing a leak if a proper seal could not be created due to lack of a gasket. It's cheap and safe just to do both of them. | |
|
| | |
Chicken
Aficionado
Name : Mark
Age : 58
Location : Montana
Joined : 2008-06-13
Post Count : 1296
Merit : 8
| | Subject: Write-Up: Thermostat Installation Fri Jul 04, 2008 7:44 pm | |
| Images and additional comments (in blue) added by AA, 01/08/12Tools Required: 10mm wrench or socket Materials needed:Thermostat (180* recommended) - Intense P/N TST-180 or other brand Thermostat seal - Fel-Pro P/N 35666 or other brand Thermostat Housing Gasket - Fel-Pro P/N 35595 or other brand Difficulty:*****Instructions:*first read albertj & BillBoost37's post below before proceeding*(1) Locate Thermostat Housing AA: right side of engine, near intake/throttle body, connected to upper coolant hose.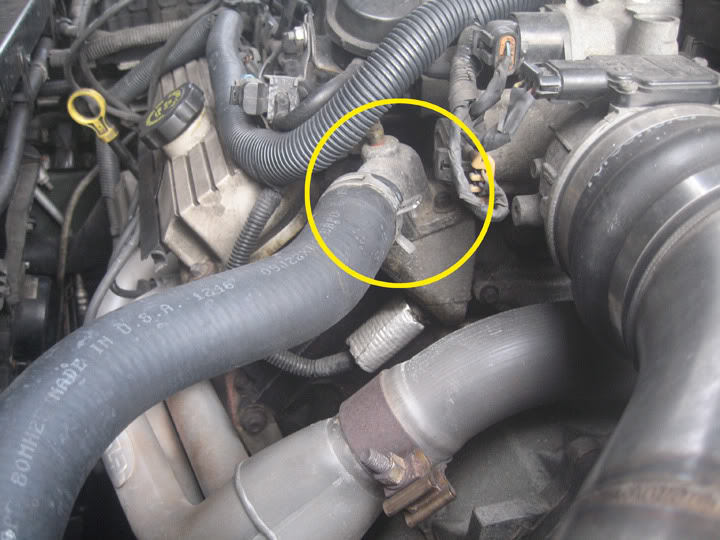 AA: for less mess, place a drain pan under the area. A flex funnel can be used to direct spilled coolant into the pan. 3-4 shop towels placed around the housing area will catch the rest. AA: for less mess, place a drain pan under the area. A flex funnel can be used to direct spilled coolant into the pan. 3-4 shop towels placed around the housing area will catch the rest. (2) Carefully unplug any vacuum lines obscuring your access to the 10mm bolts on the upper Thermostat housing AA: you may not need to remove any lines. I was able to find access for a socket at both screws. 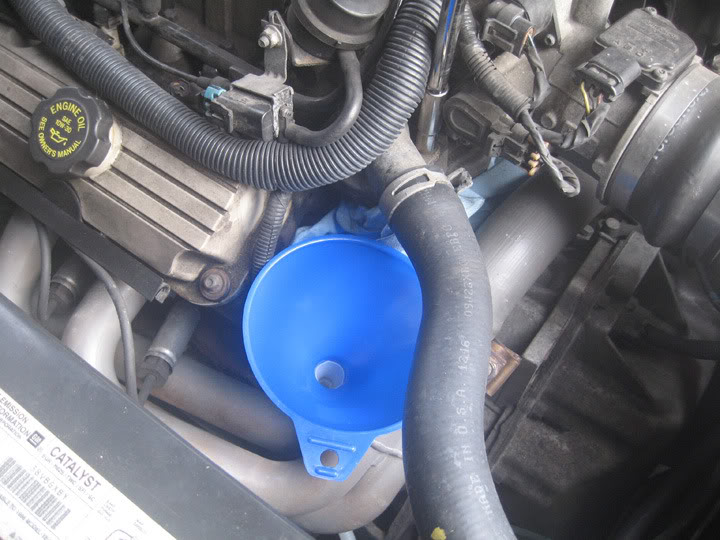 (3) Remove the Thermostat Housing Bolts and loosen the upper housing (4) Move the Upper Thermostat Housing Body attached to the hose out of your way.  (5) Remove the old gasket and clean the ends of both the upper and lower Thermostat housing (Scraping maybe required to remove the old gasket from both the lower & upper Thermostat Housing.) AA: if the old gasket remains intact on the upper housing, it is possible to reuse. Inspect the gasket and replace if it appears deteriorated, or has been leaking.(6) Remove the old Thermostat 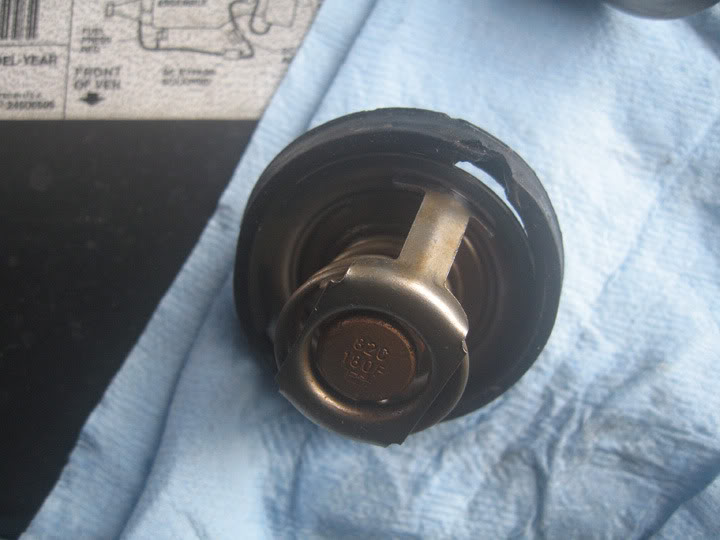 (7) Place the new Thermostat seal around the new Thermostat. (Look at your old Thermostat to correctly install the seal right end up) AA: note damage to seal in previous image.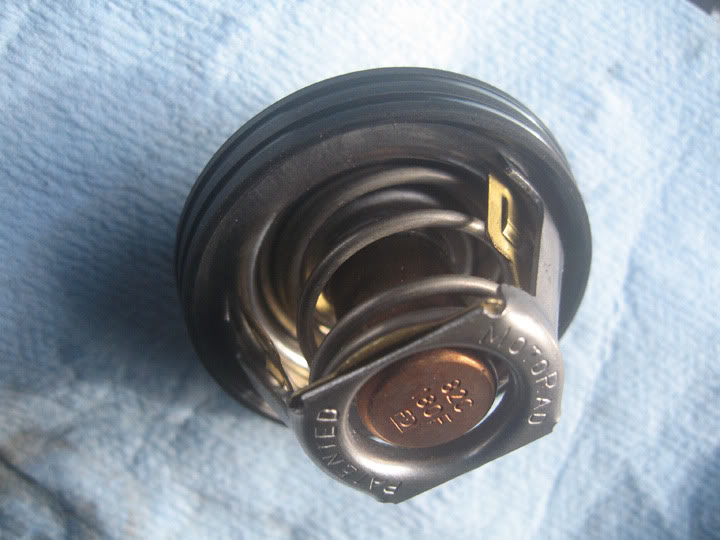 (8) Install the new Thermostat with seal, spring side down 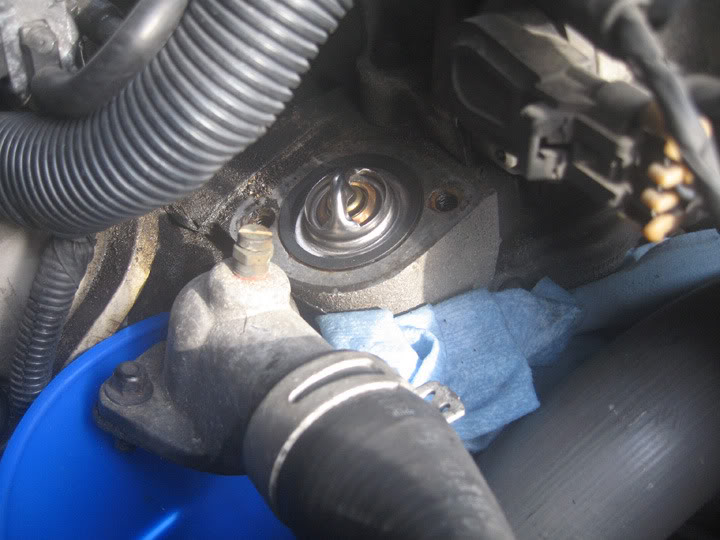 (9) Place the new Thermostat gasket on the lower housing AA: (if necessary)(10) Replace the Upper Thermostat Housing Body and finger tighten both bolts  (11) Tighten both bolts on the housing equally using the 10mm wrench or socket, making sure the bolts are tightened evenly. AA: tighten screws to 20 ft-lb.(12) Replug any vacuum lines you removed (13) Start the engine and let the temperature on your gauge reach 180* plus. Check for leaks around the housing.
Last edited by Chicken on Mon Jul 07, 2008 1:49 pm; edited 7 times in total | |
|
| | |
ibmoses
Aficionado
Name : Bert
Location : North Alabama
Joined : 2008-02-03
Post Count : 1701
Merit : 32
| | Subject: Good work! Sun Jul 06, 2008 12:00 pm | |
| Nice job!
The wifes 99 Riv has a "bleeder" screw on the thermostat housing.
Bert:tavis: | |
|
| | |
Chicken
Aficionado
Name : Mark
Age : 58
Location : Montana
Joined : 2008-06-13
Post Count : 1296
Merit : 8
| | Subject: Re: Write-Up: Thermostat Installation Sun Jul 06, 2008 5:01 pm | |
| mine does too.....what's that for? Releasing the pressure before you remove the upper housing? I guess if you needed to change the thermostat while the engine was still hot that would make sense.... | |
|
| | |
albertj
Master
Name :
Location : Finger Lakes of New York State
Joined : 2007-05-31
Post Count : 8687
Merit : 181
| | Subject: Re: Write-Up: Thermostat Installation Sun Jul 06, 2008 5:42 pm | |
| Hi, Mark
The bleeder screw on the thermostat housing is for releasing air trapped in cooling system if and when it's the case that the radiator cap is not the high point when you open the cooling system and close it back up. It just let's you bleed off trapped air.
You definitely have to open the bleeder when you fill coolant after a compete drain and flush. And it is good practice to check it after replacing a cooling component.
Albertj | |
|
| | |
BillBoost37
Junkie
Location : Enfield CT
Joined : 2007-11-28
Post Count : 769
Merit : 26
| | Subject: Re: Write-Up: Thermostat Installation Mon Jul 07, 2008 7:05 am | |
| I would suggest adding removing 3/4 of a gallon of coolant and adding it back in to the procedures along with the burping process.
Looks great. | |
|
| | |
EASHER
Member

Name : ERIK M. ASHER
Age : 56
Location : BLOUNTSTOWN, FL
Joined : 2008-10-24
Post Count : 85
Merit : 0
| | Subject: Replacing my thermostat Thu Nov 13, 2008 2:25 pm | |
| I ordered a 180deg. thermostat from ZZP. It came with rubber o-ring instead of a regular gasket.
Do I need to get a gasket or is this o-ring all I need to use?
Any issues I need to know about with this replacement? | |
|
| | |
Rickw
Guru
Name : Rick
Location : Lancaster, MA
Joined : 2008-09-13
Post Count : 6282
Merit : 119
| | Subject: Re: Write-Up: Thermostat Installation Thu Nov 13, 2008 2:45 pm | |
| There is both an O-Ring type seal (look closely at it. It wraps around the thermostat. There is a groove in the middle of the seal.) and a gasket.
You can pick up the gasket at the local auto parts store before you do the job. I always replace both, no sealant required. Other than that it is a straight forward thermostat R&R job. | |
|
| | |
1998 Riv
Expert
Name : Dave
Age : 64
Location : In The AZ Oven
Joined : 2007-01-17
Post Count : 4502
Merit : 44
| | Subject: Re: Write-Up: Thermostat Installation Thu Nov 13, 2008 4:13 pm | |
| Yes, get the regular flat gasket from local parts store, FOR SURE. | |
|
| | |
AA
Administrator

Name : Aaron
Age : 47
Location : C-bus, Ohio
Joined : 2007-01-13
Post Count : 18452
Merit : 252
| | Subject: Re: Write-Up: Thermostat Installation Thu Nov 13, 2008 4:29 pm | |
| You might be able to reuse the gasket (flat paper) that's on the car. I have changed my T-stat about 6 times, but only used a new gasket once. I do not use silicone RTV to install, never had a leak yet. _________________ '05 GTO 6.0L • 6-spd • 95k miles • 0-60: 4.8s • 16.9 avg MPG • Nelson Ledges Lap: 1:26'95 Celica GT 2.2L • 5-spd • 165k miles • 0-60: yes'98 SC Riviera • 281k miles • 298 HP/370 TQ • 0-60: 5.79s • ET: 13.97 @ 99.28 • 4087 lb • 20.1 avg MPG • Nelson Ledges Lap: 1:30
3.4" pulley • AL104 plugs • 180º t-stat • FWI w/K&N • 1.9:1 rockers • OR pushrods • LS6 valve springs • SLP headers • ZZP fuel rails
KYB GR2 struts • MaxAir shocks • Addco sway bars • UMI bushings • GM STB • Enkei 18" EV5s w/ Dunlop DZ101s • F-body calipers
EBC bluestuff/Hawk HP plus • SS lines • Brembo slotted discs • DHP tuned • Aeroforce • Hidden Hitch^^^ SOLD ^^^  '70 Ninety-Eight Holiday Coupe 455cid • 116k miles '70 Ninety-Eight Holiday Coupe 455cid • 116k miles^^^ SOLD ^^^ | |
|
| | |
Sponsored content
| | Subject: Re: Write-Up: Thermostat Installation | |
| |
|
| | |
| | Write-Up: Thermostat Installation | |
|


