Installing Rocker Arms, Valve Springs, and Push Rods (Part I)If you've dropped to a 3.4" supercharger pulley and upgraded the intake, you've got a bit of extra air coming in. Boost numbers are higher now, and if you've tuned your PCM for extra fuel, you've probably seen a good power increase. But what's next?
Boost numbers aren't everything. If you want to make power and not just torque, the air/fuel mix needs to move through and out of the engine just as easily as it was taken in. Opening the exhaust helps somewhat, but for this to be effective, the air/fuel needs a way into and out of the combustion chambers, through the intake/exhaust valves. Pushing more air into the cylinders and allowing more exhaust gas flow will open up your engine, allowing it to breath and creating extra horsepower.
There are different ways to accomplish this, one being a performance cam or a set of high-flow heads, both of which are fairly involved installations. Certainly the gains with either option is impressive (50 hp+ possible), but not everyone wants to take things this far. If your goal is to build a drag car, or the most powerful street engine you can, a cam and heads are both great breathing mods for building large amounts of horsepower.
However, if you want to make your car a bit faster with minimal effort and expense, high-lift roller rocker arms could be the way to go. A popular lift ratio that's currently available is 1.9:1. With this ratio, you'll see a noticeable increase in upper RPM response with little or no negative effect on fuel economy during regular driving. With exhaust mods,
rockers may also help to lower engine knock levels. Horsepower gains are typically 25-30 crank, with some extra torque shifted above 4k RPM. The
rockers work by moving the intake and exhaust valves about 20% higher than stock, increasing flow significantly. Total cost for all parts is about $700 in the case of a INTENSE Gen III (HS) kit, and some newer packages, including modified stock
rockers, are available at a lower price. Lower ratios of 1.85:1 and 1.80:1 are also available.
Why run a lower lift ratio? Two reasons: ease of install, and less stress on the valve train. There is debate on whether higher lift ratios are bad for your engine. In theory, the higher spring pressures produced from making very high lift and using stiffer valve springs can cause wear to your timing chain and dampener. In reality, many have used 1.9:1
rockers and ran them for tens of thousands of miles with no problems (I've personally run mine daily for over 150k miles, original timing chain and dampener, with no problems so far). If your car already has high miles, or you are concerned about this, it wouldn't hurt to replace the timing chain with a higher performance version such as a Rollmaster. A good article on high-ratio
rockers can be found here.
If you choose a lower ratio such as 1.8:1, you may keep the OEM valve springs and push rods, making the installation easier. In this case, all you really need to do is remove the stock
rockers and replace with the new
rockers and bolts. Probably a 2 hour job.
The higher ratio 1.9:1 and 1.95:1 rocker arms require supportive mods to run safely, the most important being higher load (90# or 105#) valve springs. While you're at it, might as well throw in oil-restricted push rods due to the fact that they're very easy to change during the rocker install. The purpose for the higher-load valve springs, according to INTENSE racing, is:
"to help reduce the chance of valve float in your motor." And although not absolutely necessary, INTENSE feels it's a good idea to use restricted flow push rods for the following reason:
"oil metering works to keep the lifter 'pumped up', and allows the engine to operate at higher speeds with less chance of a failure. These are the best choice for customers with full roller rocker arms."This installation uses LS6 90# valve springs, requiring special LS6 valve caps. Order a quantity of 12 at your local Chevy parts counter. They may take a few days to arrive.
Here are the parts I bought for my install:
- INTENSE 3rd gen 1.9:1 roller rocker arms....$369.99
- INTENSE oil-restricted push rods...................$99.99
- GM (INTENSE) LS6 90# valve springs...........$99.99
- GM LS6 valve caps.......................................$26.00
- GM (INTENSE) valve cover gaskets...............$26.99
- GM (dealer) fuel injector seal kit...................$59.99
- lever-style valve spring compressor (online)..$12.00
- compression tester gauge (AutoZone)..........$26.99
The above combination of parts has been tested to 150k+ miles operation in more than one SC 3800 engine.
It should be noted that as of 2010, INTENSE 3rd Gen rockers are no longer available, but there are several other comparable options.Replacing the valve cover gaskets and fuel injector O-rings are a good idea while you're doing a this job. The GM shop manual puts it this way:
"Fuel injector O-rings should always be replaced whenever fuel injectors are serviced." Interestingly, the dealership charges 59.99 for a set of 12 O-rings with new seals for the fuel pressure regulator. I asked them why the high price; they say the factory O-rings are treated with a special coating that protects the rubber from exposure to gasoline. While visiting the ZZ Performance website I found sets of 6 O-rings for $4.99, but they weren't yet in stock. One has to wonder if this low-cost alternative is safe and reliable, and since I was unable to wait around or take chances, I spent the $59.99 for OEM parts. Rockauto sells the rings at
this link for a wide range in price. Is this a really good deal, or a case of "You get what you pay for?" It's your engine - you make the call!
If installing new springs, you'll need a valve spring compressor tool. There are different types available to buy, or you can rent one from your local auto parts store. I prefer the lever-style, which can be found online for ten dollars + shipping. You'll also need a compression tester, mainly for the air fitting that comes with it. This tool will allow you to pressurize your cylinders for the valve spring installation, as well as determine when cylinders are TDC. INTENSE sells a complete tool kit (spring compressor + tester) for around $80 if you want to make things easy. I also have these tools, and would be happy to lend or sell to anyone willing to pay shipping charges.
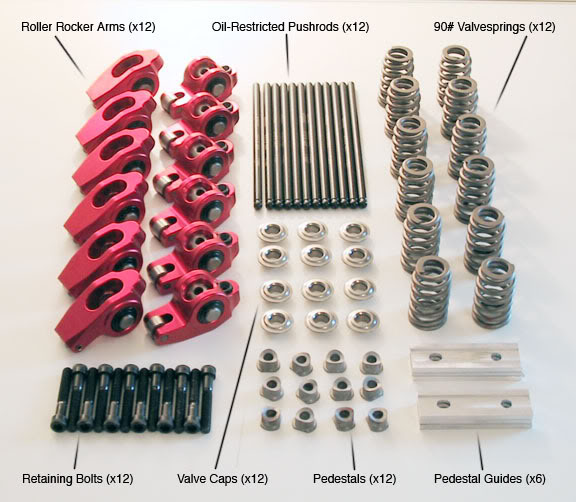
Below is a picture of the parts (excluding gaskets, seals, and tools):
Before the install, make sure you have a good set of mechanic's tools, an air compressor, and a few drinks on hand. You really don't need a second set of hands, but it's a good idea to have another ride available, as you may forget something and need to take a trip to the store. Also, it's a good idea to let the car cool down for an hour or two beforehand so you don't burn yourself trying to work.
Give yourself a good 6 hours to spend on this project, though it could go faster than that. It really depends on how prepared you are, and how good you are at working on cars in general. If installing 1.8:1 or lower ratio
rockers, you may skip steps #3 and #7-11. All right, here we go:
STEP 1: Disconnect the battery. It's under the rear seat cushion. Just lift it up, loosen the negative terminal, and get it over with. If you skip this step, don't say I didn't warn you...
STEP 2: Remove the engine cover and oil filler neck.
STEP 3: Disconnect the front plug wires from plugs #1, 3, and 5. Pull plug #5 and test the air fitting that came with your compression tester. You want to make sure it threads securely into the spark plug hole and seals well - before you start taking things apart. Attach a hose (I found that using a swivel joint fitting makes this easier) to the fitting and apply 20-30 lbs of air pressure. There should be no or very little air leakage from the fitting. Remove the hose and fitting - you'll see later why this step is important:

STEP 4: Reroute the wiring harness so that it is clear of the front valve cover. You'll need to unfasten it from the fuel rail and a few other spots. Remove the black plastic piece that holds the plug wires and you should then have access to the front valve cover bolts:
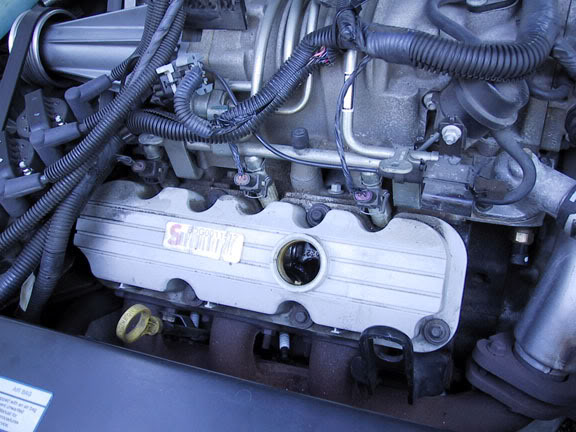
STEP 5: Unscrew the valve cover bolts and remove the cover and gasket. Might as well disconnect the plug wires from the coil packs so they don't get in the way. Now it's time to get dirty:

STEP 6: At this point, you can unbolt the
rockers and remove them. Once they're all off, you can lift out the pedestal. The push rods just slide out.
Tip: it's a good idea to remove the
rockers quickly and wipe excess oil away from the retaining bolt holes. I also used Q-tips to blot up excess oil that got into the threads. This will help ensure the new retaining bolts receive proper torque:

STEP 7: Connect the compression tester to the plug hole of cylinder #5. Use a ratchet or breaker bar to turn the engine via the crankshaft balancer bolt (24mm socket). When the gauge reaches its peak reading, the piston is at top-dead-center. Leave the piston in this position for each cylinder you work on, as this will prevent a valve from being dropped into the cylinder should you lose pressure while compressing the valve springs.
NOTE: DROPPING A VALVE IS A BIG DEAL AND WILL RUIN YOUR WEEK - DO NOT NOT RISK IT. MAKE SURE THE PISTON OF THE CYLINDER YOU ARE WORKING ON IS AT TDC SO YOU WON'T HAVE TO PAY BIG $$$ FOR REMOVING THE HEAD TO RETRIEVE A LOST VALVE.Before proceeding further, check that your valve spring compressor tool does not have any clearance issues with the fuel rail or the injectors. If you aren't sure, you may need to complete steps 8 and 9 to find out. I didn't have much of a problem, but it was close. As you can see in the pictures, I didn't unplug the fuel injector connectors, but I probably should have to prevent any damage to them or the injectors. Some valve spring compressor designs may actually hit the fuel rail and you might have to remove it before moving on. If this seems to be the case, skip ahead to step 15 for instruction on removing the rail.
STEP 8: Disconnect the compression tester and apply 60 psi air pressure to cylinder #5. Watch the pulleys to be sure the engine doesn't turn:

STEP 9: With air pressure still applied, position the valve spring compressor tool so that its tongue contacts the valve cap, and its hole aligns with the retaining bolt hole. Insert a stock retaining bolt to form a fulcrum, then tighten the bolt as needed to put leverage on the cap and spring. Before fully compressing the spring, wiggle the tool side-to-side as you apply force. The cap and keys can stick to the valve - this helps to "unstick" them.
Tip: use a magnet to catch the valve keys. The keys are very small and will fall out when the valve spring is compressed, so be careful not to lose them:
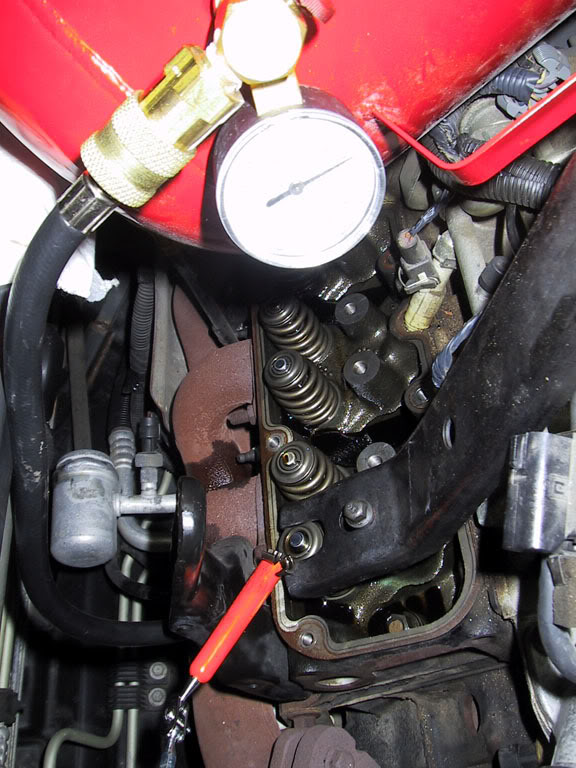
STEP 10: Release valve spring compression and loosen the retaining bolt so the valve spring and cap can be removed. With the cylinder still pressurized with air, repeat step 9 to remove the 2nd spring and cap. Being cautious at first, I looped the valves with twist ties for the added assurance they wouldn't drop, but as it turns out there's nothing to worry about with the cylinder at TDC.
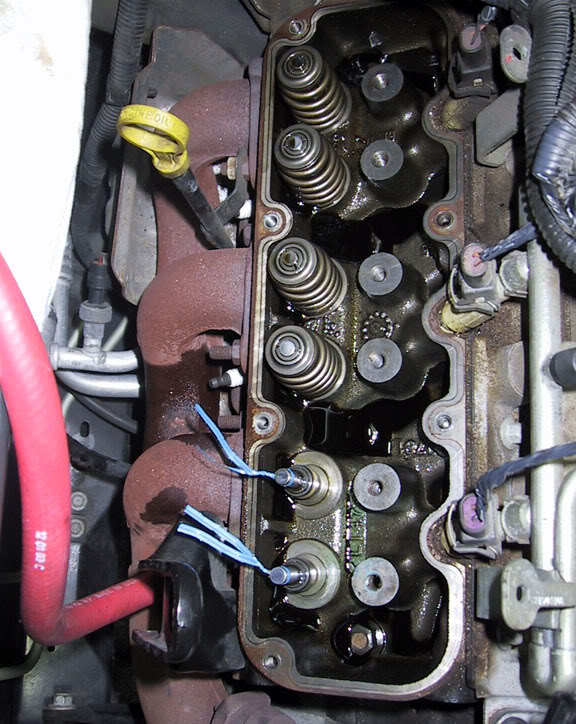
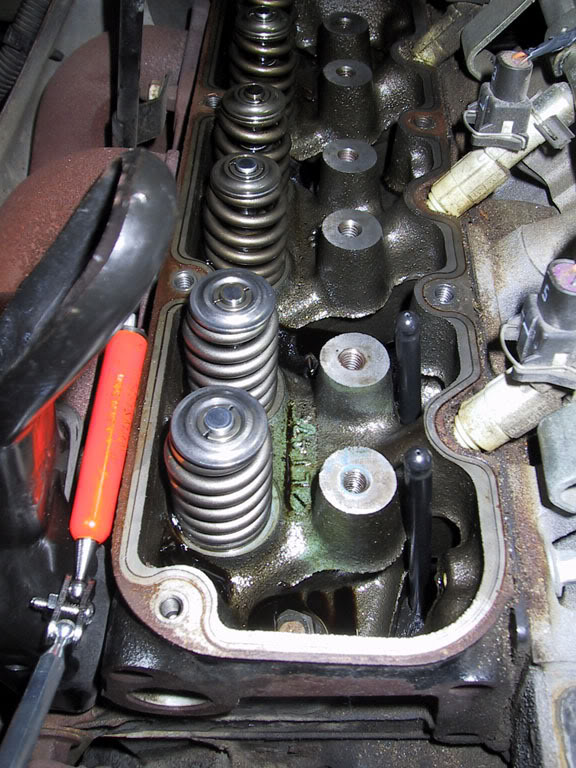
STEP 11: Install the new valve springs and caps using the stock keys. It's a little tricky at first getting the keys to fit, but by shifting the compressor tool left or right they will slide right in. Keep the magnet close by to catch any accidental key drops. Coat the new rods in motor oil and slide them into place, ball end up:
Continued below...


