 |
The 8th Gen Riviera Resource
|
|
| | My first full custom subwoofer |  |
| | |
| Author | Message |
|---|
c0reyl
Addict

Name : Corey
Age : 33
Location : JMU virginia
Joined : 2011-07-25
Post Count : 569
Merit : 2
 |  Subject: How much trunk space in cu ft does the riv have? Subject: How much trunk space in cu ft does the riv have?  Sat Oct 13, 2012 10:53 pm Sat Oct 13, 2012 10:53 pm | |
| Okay, I'm going to make a subwoofer setup based on theory, and I have a feeling that many people will call me retarded for it.  Right now, I have 4 drivers in a 2 ohm setup which is louder than my vented box and more musical. That's a bandpass box. It's about a 2 cu ft dealed box chamber, with a vented chamber on the other side (probably tuned to 50Hz for competitions) The thing is, I noticed that with the vented box, face to the back of the car, it's twice as loud as the vent facing any other way. This means that with a vented box, it's using the actual trunk as a bandpass. So even with the ports directly muffled by the top of the trunk plus the other sub, with only 100 watts per driver, it is louder and more musical than my sloppy ass vented box. not only that but just by moving the ports to the back of the sub and turning it around, I would gain much more sound. Now what I plan on doing, is cutting two 10 inch holes in the plexi, then take those super stiff pioneer 10" drivers and reverse mount them in the plexi. then I'm going to wire the alpines in 180 degree phase, and wire the pioneers normal. I'm going to then take out the ports, seal the current port holes, then use a holesaw to make new portholes in the back of the sub and turn it around. The reverse mounted pioneers will have slightly better power handling because the Alpine's are taking some thermal load off the voice coils of the pioneers. Not only that, but the pioneers are punchier than the Alpine and will be closer to the hole to the cabin. The alpines will essentially be having a 2 stage bandpass while the pioneers will have a slightly less effective bandpass, but the acoustic punch will be effective so close to the air hole, which is what I want. This will essentially be a hybrid sealed bandpass sub with bandpass inception with a two stage port tune. The competition bandpass will be ported to hopefully 40Hz or less, and I plan on making a custom port going from the trunk to inside the cabin itself, tuning the ENTIRE TRUNK as low as I possibly can (I'm going for 20Hz or less if I can) This will make it so that the higher tuned competition bandpass box no longer changes the db slope too bad, and will dramatically enhance low frequency response while maintaining punchy-ness from the pioneers. Then I will fix my Soundstream amp as soon as possible, wire them all into a 1 ohm load into the Soundstream, and push as much power as I can into this box without having distortion. Oh yeah, did I mention that all those drivers combined will take 900watts RMS, and 3100 watts peak power? The pioneers alone will take 1600 watts peak, and the diaphragm is made of fiberglass, and the surround is made of a fiber woven super stiff foam material, so it's super hard to push those woofers. This configuration also doesn't make the driver itself wast any cubic space inside the sealed chamber. This is essentially in theory why Bose subwoofers put out so much sound from two little 6 inch crappy drivers. 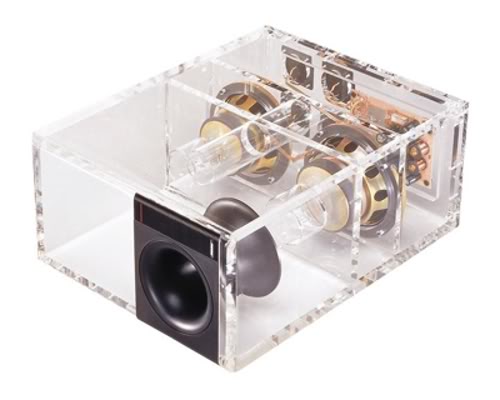 The only difference is that my trunk doesn't have a perfect seal, and a slightly different setup is involved, think of my pioneer drivers as those bose woofers, then there are two more drivers in the same sealed box, bandpassing off of the same chamer that they are already in. this is LITERALLY bandpass inception. Edit: Here's a retarded paint diagram I drew of my plans so far  Edit: I can tune the primary bandpass enclosure to 30Hz by using four 6 inch long tubes 1 inch in diameter on each side of the box (8 total), this will make the sub even deeper!  | |
|   | | RiverUPnGO
Amateur

Name : Brady
Location : Rockford,IL
Joined : 2011-09-04
Post Count : 47
Merit : 0
 |  Subject: Re: My first full custom subwoofer Subject: Re: My first full custom subwoofer  Mon Oct 15, 2012 1:11 pm Mon Oct 15, 2012 1:11 pm | |
| You are looking at 17.4 cubic feet of space in the trunk. Not a guess either, its exact. | |
|   | | AA
Administrator

Name : Aaron
Age : 47
Location : C-bus, Ohio
Joined : 2007-01-13
Post Count : 18452
Merit : 252
 |  Subject: Re: My first full custom subwoofer Subject: Re: My first full custom subwoofer  Mon Oct 15, 2012 2:49 pm Mon Oct 15, 2012 2:49 pm | |
| I would stop and think about this a bit more before you go cutting up the acrylic. If you don't, it could end up with a pile of junk that doesn't perform as you expected. There are a few things to consider before you try something that ultimately won't work. Also, are you willing to sacrifice your current system in case the experiment goes south?
First, the definition of the term "musical" doesn't fit well with the idea of a bandpass enclosure in a car. I'll explain, but first some terminology. Generally speaking, there are two factors that tend to make a sub sound accurate, which is what most consider to be musical (the opposite being loud or boomy).
The first is transient response, or how quickly the driver will respond to electrical input. Most people think the drivers themselves are "fast" or "tight" or "punchy", but it's more a function of the enclosure, actually. Transient response is also called "Q" or Qtc. Lower Q means very accurate (or damped), not as loud, but plays very deep. Higher Q is less accurate (or loose), and tends to boom, and rolls off sooner & more steeply (doesn't go as low). The enclosure size and design plays the biggest part in Q, but certain speakers can achieve good transient response in different sized enclosures compared to others. Typically less efficient, power hungry subs tend to offer good transient response in smaller air volumes - if supplied adequate power. Lower Qs tend to offer deeper, flatter, and quicker frequency response in a car, which most consider to sound more musical.
The second factor is called group delay, or the difference in milliseconds that different bass frequencies arrive at the ear. Group delay is almost entirely dependent on the enclosure design, not the driver itself. Sloppy group delay results in bass that sounds muddy, unfocused. Tight group delay means all of the bass wave arrives at about the same time. Tight group delay = better sound quality, a more musical sound.
How do different enclosures stack up? Sealed boxes usually offer the lowest Q and the tightest group delay, or more accurate musical sound. Certain vented enclosure alignments can give very good Q and tolerable group delay, but these are only when planned in accordance with the speaker's specs and the listening environment. There is no guessing at enclosure dimensions, or retrofitting drivers to existing boxes, hoping it will sound perfect. It almost certainly won't.
Bandpass enclosures always have the MOST group delay and WORST transient response characteristics. They just sound bad unless you like one-note bass. I've built a few and can confirm this to be true. Usually a peaky response, without good definition, and severely limited lows. In a home listening environment, it can work when coupled with properly tuned satellite speakers like Bose, but in a car it's usually bad news, because the bass peak is further amplified by cabin gain from the car's interior resonance.
Another point - mounting 2 more subs in the acrylic window that was only designed to handle the pressure wave of two original speakers = severe nonlinear behavior. The compromised acrylic will flex and possibly crack. Even if it doesn't, the walls will resonate uncontrollably using any real power.
If you want a real test, plan out 3 enclosures. Build all to fit one speaker. Make them from MDF, unfinished. Brace and seal the boxes. Install your sub, put in your car and listen. Try aiming the box different directions. Take notes. Use a sound level meter and play test tones. Try each box and you may appreciate the role of the enclosure with regard to sound quality. _________________ '05 GTO 6.0L • 6-spd • 95k miles • 0-60: 4.8s • 16.9 avg MPG • Nelson Ledges Lap: 1:26'95 Celica GT 2.2L • 5-spd • 165k miles • 0-60: yes'98 SC Riviera • 281k miles • 298 HP/370 TQ • 0-60: 5.79s • ET: 13.97 @ 99.28 • 4087 lb • 20.1 avg MPG • Nelson Ledges Lap: 1:30
3.4" pulley • AL104 plugs • 180º t-stat • FWI w/K&N • 1.9:1 rockers • OR pushrods • LS6 valve springs • SLP headers • ZZP fuel rails
KYB GR2 struts • MaxAir shocks • Addco sway bars • UMI bushings • GM STB • Enkei 18" EV5s w/ Dunlop DZ101s • F-body calipers
EBC bluestuff/Hawk HP plus • SS lines • Brembo slotted discs • DHP tuned • Aeroforce • Hidden Hitch^^^ SOLD ^^^  '70 Ninety-Eight Holiday Coupe 455cid • 116k miles '70 Ninety-Eight Holiday Coupe 455cid • 116k miles^^^ SOLD ^^^  | |
|   | | c0reyl
Addict

Name : Corey
Age : 33
Location : JMU virginia
Joined : 2011-07-25
Post Count : 569
Merit : 2
 |  Subject: Re: My first full custom subwoofer Subject: Re: My first full custom subwoofer  Tue Oct 16, 2012 1:25 am Tue Oct 16, 2012 1:25 am | |
| - AA wrote:
- I would stop and think about this a bit more before you go cutting up the acrylic. If you don't, it could end up with a pile of junk that doesn't perform as you expected. There are a few things to consider before you try something that ultimately won't work. Also, are you willing to sacrifice your current system in case the experiment goes south?
First, the definition of the term "musical" doesn't fit well with the idea of a bandpass enclosure in a car. I'll explain, but first some terminology. Generally speaking, there are two factors that tend to make a sub sound accurate, which is what most consider to be musical (the opposite being loud or boomy).
The first is transient response, or how quickly the driver will respond to electrical input. Most people think the drivers themselves are "fast" or "tight" or "punchy", but it's more a function of the enclosure, actually. Transient response is also called "Q" or Qtc. Lower Q means very accurate (or damped), not as loud, but plays very deep. Higher Q is less accurate (or loose), and tends to boom, and rolls off sooner & more steeply (doesn't go as low). The enclosure size and design plays the biggest part in Q, but certain speakers can achieve good transient response in different sized enclosures compared to others. Typically less efficient, power hungry subs tend to offer good transient response in smaller air volumes - if supplied adequate power. Lower Qs tend to offer deeper, flatter, and quicker frequency response in a car, which most consider to sound more musical.
The second factor is called group delay, or the difference in milliseconds that different bass frequencies arrive at the ear. Group delay is almost entirely dependent on the enclosure design, not the driver itself. Sloppy group delay results in bass that sounds muddy, unfocused. Tight group delay means all of the bass wave arrives at about the same time. Tight group delay = better sound quality, a more musical sound.
How do different enclosures stack up? Sealed boxes usually offer the lowest Q and the tightest group delay, or more accurate musical sound. Certain vented enclosure alignments can give very good Q and tolerable group delay, but these are only when planned in accordance with the speaker's specs and the listening environment. There is no guessing at enclosure dimensions, or retrofitting drivers to existing boxes, hoping it will sound perfect. It almost certainly won't.
Bandpass enclosures always have the MOST group delay and WORST transient response characteristics. They just sound bad unless you like one-note bass. I've built a few and can confirm this to be true. Usually a peaky response, without good definition, and severely limited lows. In a home listening environment, it can work when coupled with properly tuned satellite speakers like Bose, but in a car it's usually bad news, because the bass peak is further amplified by cabin gain from the car's interior resonance.
Another point - mounting 2 more subs in the acrylic window that was only designed to handle the pressure wave of two original speakers = severe nonlinear behavior. The compromised acrylic will flex and possibly crack. Even if it doesn't, the walls will resonate uncontrollably using any real power.
If you want a real test, plan out 3 enclosures. Build all to fit one speaker. Make them from MDF, unfinished. Brace and seal the boxes. Install your sub, put in your car and listen. Try aiming the box different directions. Take notes. Use a sound level meter and play test tones. Try each box and you may appreciate the role of the enclosure with regard to sound quality. Yeah, I ended up making a plot of the best possible theoretical response that can come from the mechanical suspension parameters of my subs, and decided that the best/easiest response would come from a vented box. in theory, it's actually possible to have a -3db cutoff from my alpine from just one driver at just under 17Hz, but that seems almost impossible, so maybe I screwed up somehow, but I put in all the right driver specs, from the manufacture user manuals. Alpine driver is on the left, and the pioneer is on the right  Wouldn't a second driver add about 3db of output response or so though, assuming the box size is doubled from two 12"s surface area equal to one driver @ 17" or so? I still can't get my head around how it's actually possible to get a -3db cutoff from my Alpine's at under 17Hz..Doesn't make sense  | |
|   | | albertj
Master

Name :
Location : Finger Lakes of New York State
Joined : 2007-05-31
Post Count : 8687
Merit : 181
 |  Subject: Re: My first full custom subwoofer Subject: Re: My first full custom subwoofer  Tue Oct 16, 2012 5:59 am Tue Oct 16, 2012 5:59 am | |
| The math looks impressive but is probably semi-BS because the sub is vented into the trunk not free air. You might want to reread AA's response. | |
|   | | AA
Administrator

Name : Aaron
Age : 47
Location : C-bus, Ohio
Joined : 2007-01-13
Post Count : 18452
Merit : 252
 |  Subject: Re: My first full custom subwoofer Subject: Re: My first full custom subwoofer  Tue Oct 16, 2012 10:41 am Tue Oct 16, 2012 10:41 am | |
| Corey, those graphs predict speaker outputs on an open field, not in a car. Even though it looks like a sealed enclosure drops off earlier, pay attention to what happens around 15-20Hz. The sealed enclosure will actually play near flat in the cabin with a Qtc of .6 or even .5 all the way down to 15Hz, even 10Hz if the driver has enough excursion capability. That's how you can get 17 Hz. I can get a solid 25Hz in car with just a single eight. But not vented, only sealed. Because of the effect of cabin gain, vented and bandpass alignments tend to gain dB as they drop in frequency, which results in non-flat response in car, and you still have the sharp drop-off in the lowest frequencies. This cut-off is the primary reason transient response is compromised. Another thing - the graphs don't show relative efficiencies for sealed vs. vented vs. bandpass. The vented should be +3 dB above the sealed, and the bandpass should be +6 or even +9dB over sealed, depending on the chosen alignment. It's a trade off between SPL and SQ usually. The way you get both is to build really big boxes, and/or supply lots of power to very robust drivers with big Xmax. Here is a graph I found online, showing relative response curves for sealed, vented and bandpass. The thin pink line is sealed, the gold is vented, and blue is bandpass. The heavier curves I created (using same colors) to show how cabin gain would influence the responses of all three systems. Notice how sealed flattens out, while vented and bandpass offer very extreme bumps in certain octaves. Note this graph represents equal gain settings from the amplifier: 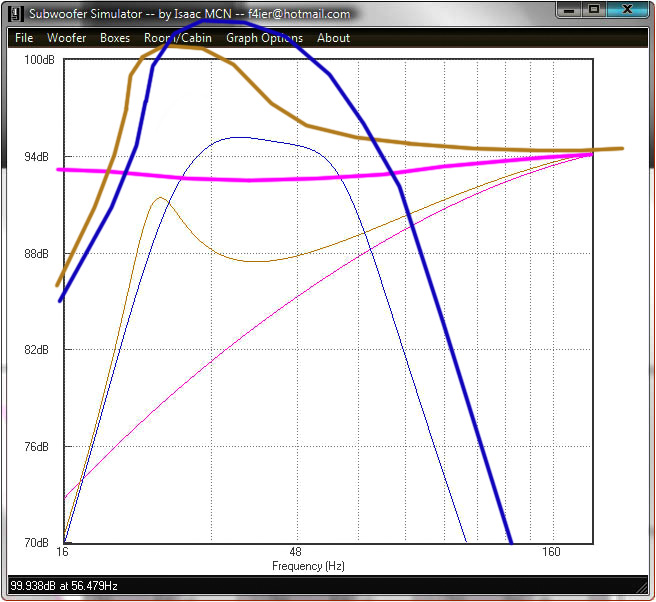 Now, here's a graph showing how adjusting gains would affect the response. The vented and bandpass curves are turned down to match the reference 94dB level. Notice how non-flat these are compared to the sealed:  You can use EQ to bring up the midbass void, or the front speakers can take over here, but you cannot replace the lack of very deep bass using EQ, because this is where the vented/bandpass enclosures unload the driver (free air = potential mechanical damage). Here is where sealed really shines, even though you don't get super high SPL. To me, that's musical in it's purest form. I know it would seem the program can predict the sound you get, but it's misleading because everything changes once inside the car. If you want the most accurate, most musical, deepest bass, I say try a sealed alignment and supply enough power to get the SPL level you need. It's a trade off, because sealed won't be as loud, but it will sound better technically and musically if you can blend it in with the rest of the system. I advise against mixing sub driver brands. Just choose the most capable subs and use them. Simple is better for sound quality. _________________ '05 GTO 6.0L • 6-spd • 95k miles • 0-60: 4.8s • 16.9 avg MPG • Nelson Ledges Lap: 1:26'95 Celica GT 2.2L • 5-spd • 165k miles • 0-60: yes'98 SC Riviera • 281k miles • 298 HP/370 TQ • 0-60: 5.79s • ET: 13.97 @ 99.28 • 4087 lb • 20.1 avg MPG • Nelson Ledges Lap: 1:30
3.4" pulley • AL104 plugs • 180º t-stat • FWI w/K&N • 1.9:1 rockers • OR pushrods • LS6 valve springs • SLP headers • ZZP fuel rails
KYB GR2 struts • MaxAir shocks • Addco sway bars • UMI bushings • GM STB • Enkei 18" EV5s w/ Dunlop DZ101s • F-body calipers
EBC bluestuff/Hawk HP plus • SS lines • Brembo slotted discs • DHP tuned • Aeroforce • Hidden Hitch^^^ SOLD ^^^  '70 Ninety-Eight Holiday Coupe 455cid • 116k miles '70 Ninety-Eight Holiday Coupe 455cid • 116k miles^^^ SOLD ^^^  | |
|   | | c0reyl
Addict

Name : Corey
Age : 33
Location : JMU virginia
Joined : 2011-07-25
Post Count : 569
Merit : 2
 |  Subject: Re: My first full custom subwoofer Subject: Re: My first full custom subwoofer  Wed Oct 17, 2012 12:00 am Wed Oct 17, 2012 12:00 am | |
| - AA wrote:
- Corey, those graphs predict speaker outputs on an open field, not in a car. Even though it looks like a sealed enclosure drops off earlier, pay attention to what happens around 15-20Hz. The sealed enclosure will actually play near flat in the cabin with a Qtc of .6 or even .5 all the way down to 15Hz, even 10Hz if the driver has enough excursion capability. That's how you can get 17 Hz. I can get a solid 25Hz in car with just a single eight. But not vented, only sealed.
Because of the effect of cabin gain, vented and bandpass alignments tend to gain dB as they drop in frequency, which results in non-flat response in car, and you still have the sharp drop-off in the lowest frequencies. This cut-off is the primary reason transient response is compromised.
Another thing - the graphs don't show relative efficiencies for sealed vs. vented vs. bandpass. The vented should be +3 dB above the sealed, and the bandpass should be +6 or even +9dB over sealed, depending on the chosen alignment. It's a trade off between SPL and SQ usually. The way you get both is to build really big boxes, and/or supply lots of power to very robust drivers with big Xmax.
Here is a graph I found online, showing relative response curves for sealed, vented and bandpass. The thin pink line is sealed, the gold is vented, and blue is bandpass. The heavier curves I created (using same colors) to show how cabin gain would influence the responses of all three systems. Notice how sealed flattens out, while vented and bandpass offer very extreme bumps in certain octaves. Note this graph represents equal gain settings from the amplifier:

Now, here's a graph showing how adjusting gains would affect the response. The vented and bandpass curves are turned down to match the reference 94dB level. Notice how non-flat these are compared to the sealed:

You can use EQ to bring up the midbass void, or the front speakers can take over here, but you cannot replace the lack of very deep bass using EQ, because this is where the vented/bandpass enclosures unload the driver (free air = potential mechanical damage). Here is where sealed really shines, even though you don't get super high SPL. To me, that's musical in it's purest form.
I know it would seem the program can predict the sound you get, but it's misleading because everything changes once inside the car. If you want the most accurate, most musical, deepest bass, I say try a sealed alignment and supply enough power to get the SPL level you need. It's a trade off, because sealed won't be as loud, but it will sound better technically and musically if you can blend it in with the rest of the system. I advise against mixing sub driver brands. Just choose the most capable subs and use them. Simple is better for sound quality. Iv'e been trying to find the best sound quality possible, and I'm pretty sure I hit the mark, after about 12 hours of online research and speaker box modeling, and realizing what I need to do to make it work. I'm going to fabricate my own 12" passive radiator to pretty much cancel out any frequency spikes due to cabin gain. I almost did this by accident. At first, I was trying to use a passive radiator to tune my box instead of a vent, because they are much better sounding than a vent usually. I ended up trying to manipulate the parameters by looking at some 12" passive radiators on Partsexpress. I then looked at my spare 12" blown sub driver I had laying around, and realized I can simply take out the motor assembly and use it as a passive radiator, maniplate, and refabricate it to my needs once I figure out the best possible flat response curve, I realized that once I understand the Theil-parameters of the speaker itself and how they work, I can basically engineer my own passive radiator to tune the sub to a more flat response curve. I ended up researching for hours online about how all the parameters work, then looked at dozens of existing 12" radiators, plotted in the data and looked at how it changed the response curve. In between looking at driver parameters and 12" radiators online, I was trying to also figure out how to properly get the acoustics of my car right, so that the graph would actually look right once plotted. I looked online for a couple hours seeing every possible subwoofer placement in relation to how it affects the sound wave. people were saying that the best possible sub location. Forum search results indicated that the two best possible locations are: in a hatchback behind the back seat with woofer facing trunk (produces the sound waves nearly on point with phase), or woofers facing up in a hatchback facing the rear window and using it as a horn (15db cabin gain in an acura integra hatchback) since I know for a vact, my factory premade vented box got a much better result with facing the back of the trunk, I figured there's no way in hell I'm going to use a vented box, or a bandpass, so I decided I'm going either sealed, or passive radiator. The funny thing is, I had an extra blown 12" driver as well, and it wasn't in pieces (other blown driver had a torn out spider). Basically, I ended up figuring out that I'll use the best of both driver assemblies, and figure out what to do. I then realized after a while that I'd need to remove either the magnet or the voice coil because the coil vs magnet will cause inductive resistance. Then I looked at the garbage pioneer driver, to get model info to try to combine any best specs possible to get a flat response. The thing that was throwing me off so much, was the RMS of the pioneer driver was rated at newton meters per second while the partsexpress 12" radiators are KG/s. I thought at first that my conversions were wrong, then I accepted the fact that the spider of the pioneer driver happens to have over 30 times more mechanical resistance than the passive radiators do. I then thought that this must be do to the voice coil vs the magnet, and since I couldn't find detialed info by researching it, I looked at the spider, pushed on it, noticed it was indeed pretty stiff, then looked at the picturs of the passive radiators and noticed that the structure of the actual spiders were pretty different, so the number was actually right. So I plugged in the RMS number of what I finally figured out to be true in the pioneer driver, and tweaked a few things, realized that I'm going to want the same diaphragm mass and surround material as the other radiators and about the same surface area. The software calculated everything else I'd need and it's response for me, and my passive radiator box is slightly bigger resulting. Funny thing is, this worked about 50 times better than I thought it ever would. 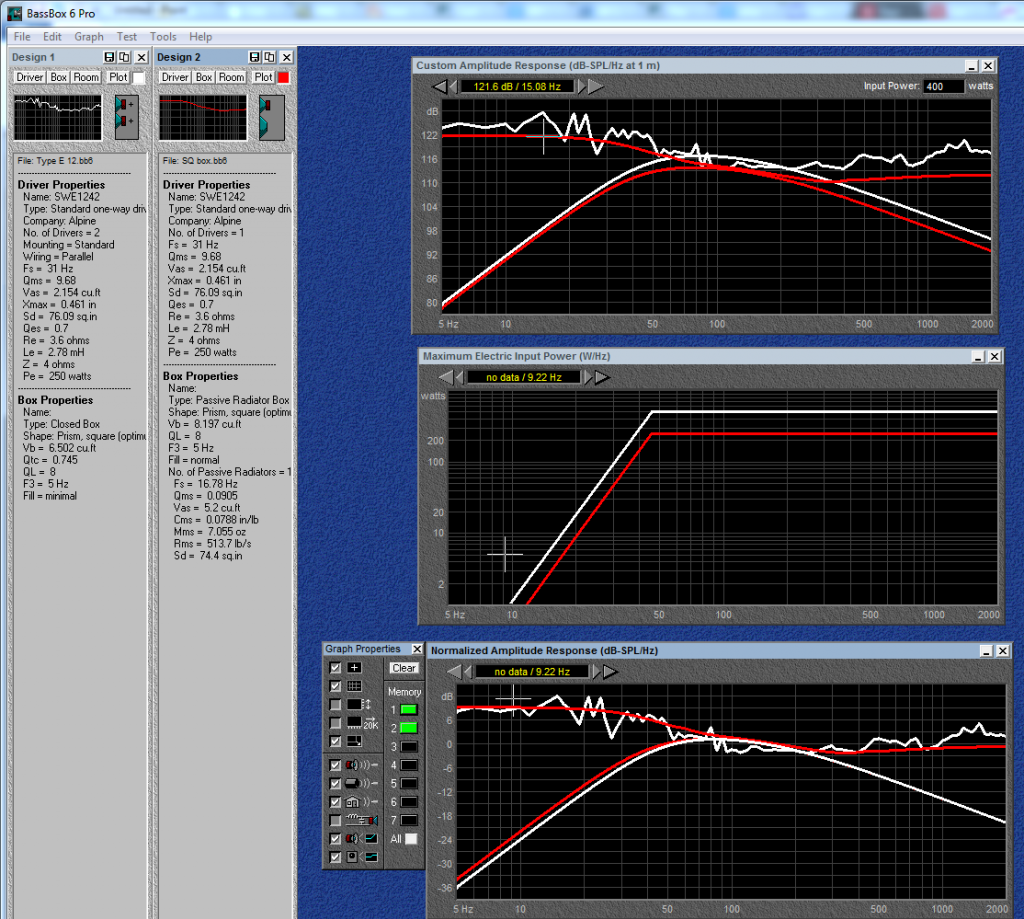 This this will be my output power with 400 watts RMS (actually slightly more since the coils on the Alpines are 3.6ohms, and not 4) and it also has maximum acoustical output as well graphed under it for free air response and other useful info. I graphed it factoring in the cabin gain relative to my woofer position, axis response as well as box diffraction (most of that is eliminated by the woofer position and cabin gain resulting) Basically, this is as flat as I'll ever get my Alpine subs. Pretty much, this works so well because the driver parameters of the woofer I'm going to fabricate essentially tune the box perfectly, better than any vent in a car ever could. The stiffness of the spider on the radiator, diaphragm mass and surface area are the most important factors here. They basically tune out all that frequency spiking that I'd have to try to either DSP out, or compansate by using my midbass as a crutch. Honestly with this design, I don't think I ever even need to upgrade from these subs. It's going to be nearly impossible to get much more flat in a car. All I have to do is refabricate my basket by chopping out the motor, then glue my pulp cone diaphragm to the spider, and glue in a pretty dust cap with a cool logo. and I also modeled what I'll get when get the Soundstream amp repaired:  The soundstream amp will be extremely useful with Hawkins bass controll that basically will shut any signal off to the subs under 13Hz, keeping amperage down, which gives me more RMS potential, has a cleaner signal as well, with more power. so basically, I'm going to work on building this box soon while I finish the car. I guess a lot of people that have read my posts might have thought I was retarded, but then again, I'm JUST learning how to design my own subwoofers for a car. I'd say this is a pretty good value for the drivers and amp have gotten for $150  Oh and by the way, it's nearly impossible for my sub to be clipping while this flat. (I believe) This passive radiator design seems to completely eliminate those frequency spikes you were talking about | |
|   | | AA
Administrator

Name : Aaron
Age : 47
Location : C-bus, Ohio
Joined : 2007-01-13
Post Count : 18452
Merit : 252
 |  Subject: Re: My first full custom subwoofer Subject: Re: My first full custom subwoofer  Wed Oct 17, 2012 12:22 am Wed Oct 17, 2012 12:22 am | |
| I don't understand the fascination with using a passive radiator. It does the same thing as a vent except it's more difficult to tune. My understanding is PRs are used mainly for small enclosures requiring very deep tuning (ultra long ducts and/or port turbulence). Do you have this need? If not, just use a vent. It's the same as a radiator and offers better transient response, also will play a little deeper. _________________ '05 GTO 6.0L • 6-spd • 95k miles • 0-60: 4.8s • 16.9 avg MPG • Nelson Ledges Lap: 1:26'95 Celica GT 2.2L • 5-spd • 165k miles • 0-60: yes'98 SC Riviera • 281k miles • 298 HP/370 TQ • 0-60: 5.79s • ET: 13.97 @ 99.28 • 4087 lb • 20.1 avg MPG • Nelson Ledges Lap: 1:30
3.4" pulley • AL104 plugs • 180º t-stat • FWI w/K&N • 1.9:1 rockers • OR pushrods • LS6 valve springs • SLP headers • ZZP fuel rails
KYB GR2 struts • MaxAir shocks • Addco sway bars • UMI bushings • GM STB • Enkei 18" EV5s w/ Dunlop DZ101s • F-body calipers
EBC bluestuff/Hawk HP plus • SS lines • Brembo slotted discs • DHP tuned • Aeroforce • Hidden Hitch^^^ SOLD ^^^  '70 Ninety-Eight Holiday Coupe 455cid • 116k miles '70 Ninety-Eight Holiday Coupe 455cid • 116k miles^^^ SOLD ^^^  | |
|   | | c0reyl
Addict

Name : Corey
Age : 33
Location : JMU virginia
Joined : 2011-07-25
Post Count : 569
Merit : 2
 |  Subject: Re: My first full custom subwoofer Subject: Re: My first full custom subwoofer  Wed Oct 17, 2012 1:03 am Wed Oct 17, 2012 1:03 am | |
| - AA wrote:
- I don't understand the fascination with using a passive radiator. It does the same thing as a vent except it's more difficult to tune. My understanding is PRs are used mainly for small enclosures requiring very deep tuning (ultra long ducts and/or port turbulence). Do you have this need? If not, just use a vent. It's the same as a radiator and offers better transient response, also will play a little deeper.
I was trying to get the response as flat as I possibly could. I wouldn't have bothered, if I didn't realize how much the sealed box spikes if I input cabin gain equivalent to me firing the subs at the rear window to act as a loading horn, with the rear decked removed and back seats installed. By the way, the white line on the graph, is the SEALED box, not the passive radiator. The whole point, was me spending 12 hours making and designing both, a sub box, then I designed a passive radiator that I'm going to fabricate our of pretty much free parts to tune it and get the flattest possible response out of my subwoofers. Actually, the passive radiator has slightly less output than sealed because of how stiff the spider is on my radiator design (It's 30 TIMES stiffer than the average 12" passive radiator for home audio). The suspension stiffness in conjunction with diaphragm surface area and weight is what tunes it. It's basically using the mechanical resistance of the suspension to function as a mechanical ohm dependent acoustic frequency stepping transformer to decrease the higher spl of certain frequencies, because of the mass of the diaphragm, which in turn is then converted to that midbass you were talking about. Basically, I'm saying that the Alpines were not nearly 100% flat on that plot until I used the radiator to tune it. And, in order to use a vent to achieve a 3db cutoff of about 10Hz in a ported box for one of these drivers, I'd need a 41cu ft box, and i'd need even bigger for two drivers and a -3db cutoff of 5Hz. I don't get how by barely losing output, the fact I completely tuned it dead flat with a passive radiator of my own design, that I can fabricate myself is a bad thing? The end result won't be 100% accurate to this graph, but it will be pretty close. | |
|   | | c0reyl
Addict

Name : Corey
Age : 33
Location : JMU virginia
Joined : 2011-07-25
Post Count : 569
Merit : 2
 |  Subject: Re: My first full custom subwoofer Subject: Re: My first full custom subwoofer  Wed Oct 17, 2012 5:34 am Wed Oct 17, 2012 5:34 am | |
| by the way, I just realized that the passive radiator design never had both my sub drivers modeled, because my keyboard is failing and num lock is going retarded.  Basically, it's even better with both Alpines modeled in the passive radiator. The red line is the passive radiator and the grey line is the sealed sub box. For comparison.. The LMS ultra was designed for home audio. Apparently, my subwoofer design has more output at any point in the graph than the LMS ultra, 1.000 watts when I'm using only 400. Not only that, but even at 5000 watts, for it's designed enviroment, the LMS ultra barely puts out more than my design. - Quote :
- Designed to be absolutely precise, and absolutely loud is the LMS Ultra 5400. The TC Sounds flagship transducer is the most linear lowest distortion highest displacement low frequency driver in the world. Nothing, and we mean nothing, will outperform this driver for low-end displacement, ultra-low distortion, or SPL. The TC Sounds LMS Ultra 5400 is used in some of the best recording studios and high-end audio systems.
I'm pretty sure the alpines will definitely have more distortion at the same decibels, no doubt about that, but I'm betting they will still sound clean in this design. I'm still trying to wrap my head around the fact that with the right cabin gain in my car, this is the most linear SPL graph I have ever seen for a subwoofer, and has the best subsonic bass response out of any subwoofer SPL graph @1w, 1m than any other graph Iv'e seen. seriously, I checked all the parameters about 20 times to make sure they are right, and the only thing I caught was the fact I didn't have 2 drivers.. Edit: I also realize, that with the right cabin gain, the LMS will be far more linear, but it seems that finding the right cabin gain might involve firing the woofer facing the back seats, close to them to get the most linear possible on the LMS but I'm not sure on that | |
|   | | c0reyl
Addict

Name : Corey
Age : 33
Location : JMU virginia
Joined : 2011-07-25
Post Count : 569
Merit : 2
 |  Subject: Re: My first full custom subwoofer Subject: Re: My first full custom subwoofer  Thu Oct 18, 2012 10:21 pm Thu Oct 18, 2012 10:21 pm | |
| I chose this design because I don't care about SPL as much as being flat as possible. I spent about an hour in the trunk of my car today to see what the biggest box I could fit inside the trunk could be with shoehorning in, using my Big bandpass box as a reference. It turns out that if I make the box 25 inches deep by 39 inches wide by 15 inches tall, then it would be the tightest fit possible and still fit. And, I went to lowes, and got the sheets cut and some supplies. Can't bring it inside yet because it started pouring driving on the way home, and I am NOT going to get MDF wet. Cost me $30 for the MDF (including having them cut the sheets perfectly for me and another $20 in supplies. They couldn't fit all the sheets on a single board of MDF so I settled for 24 inches deep instead. I'm guestimating that the resonance frequency of my car will be about 53Hz given that it will be set up almost exactly like a hatchback sub firing at the window, and calculated with a 10 ft distance using 1/2 waves and the speed of sound to guestimate the resonance of the whole cabin of my car not including my trunk as it's a 6.5cu ft box.  since I couldn't find a 3d model of a Riv, or a sealed box that looked like mine, I found ones somewhat close. The difference is that the Riv is a coupe and has more empty space in the cabin than this, but the oldsmobille aura is built on the same G-body platform. These sub boxes aren't the same exact shape in the model as mine, but it illustrates how I plan to delete my rear deck (keeping the crossmember, so no streangth is lost in chassis), and I'm going to seal up the sapce between the edges of the rear deck crossbeam and the sub box (will be stronger with the sub box sealed up against it than the garbage deck top I used to have. I will seal the inside edge of the hole in the deck to the sub box face, and have all 3 drivers facing my rear windshield (with more visibility now, actually) at about a 45 degree angle. The two outside drivers will be the sub drivers and the middle will be the passive radiator. I will cross the subs over at about 90-110 Hz depending on how I like the sound the best, if I get any 1/4 generation at all from trying to horn load off my windshield, if not, then I'll cross it over at 80Hz. I estimated a 12db gain, I could be off on that number, but I think it's about right, since I saw the SPL plots a while ago off a Acura Integra with the same exact sub placement as mine without the sub even being sealed from the trunk/cabin, and he got a 15db gabin gain, and my interior is a little bigger, but has a lower resonance frequency as well.  This is a free air response graph I plotted in BBP. The grey line is the same box without any cabin gain, and the red line is with cabin gain. I wanted the most flat response and the most transient bass I could possibly get, with minimal cost. Obviously, I'll have cabin distortion, but I'll have a lot less than if the subs were firing in my trunk with a hole in my deck. In this setup, the windshield is TRYING to generate quarter waves, but more importantly, it's a wave guide for the subs itself. You can't argue that this setup will have the least amount of distortion. The only reason my vented sub box will be louder with the drivers facing the trunk than up, is because of the group delay. The group delay on the vented box was about 5 times as much as this box design, so firing at the license plate basically helped correct the group delay a little bit, which needs more space at a cost of a LOT of distortion. With my setup, the sound waves from the sub have about an 8ms group delay at 80Hz or less, and the best part is the lower the frequency gets, the MORE TRANSIENT AND ACCURATE my sub will be. 8ms is more than acceptable for a SQ subwoofer, but it will end up only sounding better as my ears adjust. without group delay all over the place and unpredictable, the brain can compensate much more easily. I might be being nit-picky, but for 99% of people, they will never even notice an 8ms group delay @ 80Hz from 9-10 feet away, even if they pay attention, but I might end up getting an active EQ setup and tuning the component speakers to also have an 8ms delay, and the tweeters mounted at ear level for about a 10ms delay or so for high frequency compensation. Anyway, there's no way in my opinion, that any vented box in my car will have more accurate bass than this type of setup. This setup will be closer to flat than any other sub position in my car by using the rear windshield as a wave guide. Manufactures list mechanical resonance, mechanical resistance in many drivers, and if you set Bass Box Pro to "Expert Mode", then you can get the software to calculate suspension resistance, as well as many other useful driver parameters. Luckily, Pioneer listed the mechanical resistance of the spider on the spider I'm fabricated into a passive radiator, and I took that, and the weight of the cone from the blown Alpine, and it's surface area and modeled that as a passive radiator. I'm also going to fiberglass over the pulp cone, because added weight and woofer stiffness only helps make this box more flat, which I checked by adding in values with more weight and more stiff diaphragms. I'm going to try and figure out how heavy adding a concave fiberglass reinforcement to the pulp cone will be, as well as how stiff fiberglass actually is soon. Edit: oops. I just realized I was thinking about this the wrong way on the group delay. I used a sound wave calculator and it tells me that an 8ms is a 9 ft delay in sound. This is just about the length from the person to the subwoofer, meaning I will actually have an 8ms delay on the subsonic, which no one will ever notice for sound quality, ever. Also, I just plotted in the parameters for adding fiberglass reinforcement to my existing pulp cone and figured the added fiberglass plus the pulp cone would weigh at least 400 grams, and with the mechanical compliance of the diaphragm updated to the same as a fiberglass diaphragm, the heavier the diaphragm, the more flat it gets, even with a 500 gram diaphragm. I'm basically going to take a little bit of fleese and glue it as a dust cap to my diaphragm and staple it to the convex shape to closely match my Apine drivers, then fiberglass over it, then fiberglass underneath the cone to the spider itself, making the overall diaphragm much more rigid than it was, and less air leakage through the cone itself. | |
|   | | AA
Administrator

Name : Aaron
Age : 47
Location : C-bus, Ohio
Joined : 2007-01-13
Post Count : 18452
Merit : 252
 |  Subject: Re: My first full custom subwoofer Subject: Re: My first full custom subwoofer  Fri Oct 19, 2012 11:03 am Fri Oct 19, 2012 11:03 am | |
| - Quote :
- I chose this design because I don't care about SPL as much as being flat as possible.
Maybe too late to suggest this, but if you are looking for ultimate flatness and transient response, I'd go with an IB (infinite baffle) set-up, which uses the truck as a large, sealed enclosure. Obviously you will need to build a baffle board and seal the trunk from the front cabin, but this is a recipe for ruler flat bass in the car. Only trouble is, SPL is limited because the driver is playing in free-air at all times. The solution is to use very long throw drivers with suspensions optimized for IB applications. It's an unpopular option because no one really wants flat bass in the car, but I've considered doing it. There is also the option of using an aperiodic membrane in combination with IB. If you read around, there have been some very high-end aperiodic set-ups that do well in competition. I've listened to well-executed IB systems - most use 4 or more drivers across the rear seat or deck, firing into the cabin. The bass extension is unbelievable, and the SPL is enough for me. But no, you won't win any SPL contests. Another plus, you don't need as much power to push IB drivers to their limits. Very efficient at producing low bass. _________________ '05 GTO 6.0L • 6-spd • 95k miles • 0-60: 4.8s • 16.9 avg MPG • Nelson Ledges Lap: 1:26'95 Celica GT 2.2L • 5-spd • 165k miles • 0-60: yes'98 SC Riviera • 281k miles • 298 HP/370 TQ • 0-60: 5.79s • ET: 13.97 @ 99.28 • 4087 lb • 20.1 avg MPG • Nelson Ledges Lap: 1:30
3.4" pulley • AL104 plugs • 180º t-stat • FWI w/K&N • 1.9:1 rockers • OR pushrods • LS6 valve springs • SLP headers • ZZP fuel rails
KYB GR2 struts • MaxAir shocks • Addco sway bars • UMI bushings • GM STB • Enkei 18" EV5s w/ Dunlop DZ101s • F-body calipers
EBC bluestuff/Hawk HP plus • SS lines • Brembo slotted discs • DHP tuned • Aeroforce • Hidden Hitch^^^ SOLD ^^^  '70 Ninety-Eight Holiday Coupe 455cid • 116k miles '70 Ninety-Eight Holiday Coupe 455cid • 116k miles^^^ SOLD ^^^  | |
|   | | c0reyl
Addict

Name : Corey
Age : 33
Location : JMU virginia
Joined : 2011-07-25
Post Count : 569
Merit : 2
 |  Subject: Re: My first full custom subwoofer Subject: Re: My first full custom subwoofer  Fri Oct 19, 2012 3:25 pm Fri Oct 19, 2012 3:25 pm | |
| - AA wrote:
-
- Quote :
- I chose this design because I don't care about SPL as much as being flat as possible.
Maybe too late to suggest this, but if you are looking for ultimate flatness and transient response, I'd go with an IB (infinite baffle) set-up, which uses the truck as a large, sealed enclosure. Obviously you will need to build a baffle board and seal the trunk from the front cabin, but this is a recipe for ruler flat bass in the car.
Only trouble is, SPL is limited because the driver is playing in free-air at all times. The solution is to use very long throw drivers with suspensions optimized for IB applications. It's an unpopular option because no one really wants flat bass in the car, but I've considered doing it. There is also the option of using an aperiodic membrane in combination with IB. If you read around, there have been some very high-end aperiodic set-ups that do well in competition.
I've listened to well-executed IB systems - most use 4 or more drivers across the rear seat or deck, firing into the cabin. The bass extension is unbelievable, and the SPL is enough for me. But no, you won't win any SPL contests. Another plus, you don't need as much power to push IB drivers to their limits. Very efficient at producing low bass. Well, I designed this setup with me having everything I need other than the MDF to build the box. This sound system total so far is like, $400 total spent. To really get a proper IB build, I'd need to spend a lot more money on proper long throw drivers, I'd need a better amp (fixing Soundstream would be ideal for multiple driver setups due to it being 1/4ohm stable), and I'd need to do a huge amount of work with sound deadening. Luckily, this design does most of the sound deadening for me, by having the sealed box sealed from trunk and cabin, and the drivers firing into the rear windshield using it as a wave guide. This means that a good amount of the resonant frequency of the car will be absorbed by the windshield vibrating, which won't make a lot of noise due to low wattage drivers as well as the weather stripping. Now if I was starting with everything from scratch, I'f definitely be considering that, but it would be nearly impossible to model anywhere near accurate response and would be mostly theory, trial, and error  | |
|   | | AA
Administrator

Name : Aaron
Age : 47
Location : C-bus, Ohio
Joined : 2007-01-13
Post Count : 18452
Merit : 252
 |  Subject: Re: My first full custom subwoofer Subject: Re: My first full custom subwoofer  Fri Oct 19, 2012 3:38 pm Fri Oct 19, 2012 3:38 pm | |
| I think the up-firing wave guide idea is equally experimental. Hope it works as expected. Although you're putting a lot of thought into this design (maybe too much  ), much of the box positioning will come down to trial and error experimenting. You could use your existing subs for IB, although buying one or two more in addition would be optimum. Most modern drivers are rugged enough to survice IB operation, if you tune it correctly. And the more drivers you have, the more your trunk will function as acoustic suspension. Excursion is minimized, power better distributed, and really the construction is not that costly or complicated. In many ways, IB is very simple. I say that not having ever done one. Someday though. _________________ '05 GTO 6.0L • 6-spd • 95k miles • 0-60: 4.8s • 16.9 avg MPG • Nelson Ledges Lap: 1:26'95 Celica GT 2.2L • 5-spd • 165k miles • 0-60: yes'98 SC Riviera • 281k miles • 298 HP/370 TQ • 0-60: 5.79s • ET: 13.97 @ 99.28 • 4087 lb • 20.1 avg MPG • Nelson Ledges Lap: 1:30
3.4" pulley • AL104 plugs • 180º t-stat • FWI w/K&N • 1.9:1 rockers • OR pushrods • LS6 valve springs • SLP headers • ZZP fuel rails
KYB GR2 struts • MaxAir shocks • Addco sway bars • UMI bushings • GM STB • Enkei 18" EV5s w/ Dunlop DZ101s • F-body calipers
EBC bluestuff/Hawk HP plus • SS lines • Brembo slotted discs • DHP tuned • Aeroforce • Hidden Hitch^^^ SOLD ^^^  '70 Ninety-Eight Holiday Coupe 455cid • 116k miles '70 Ninety-Eight Holiday Coupe 455cid • 116k miles^^^ SOLD ^^^  | |
|   | | c0reyl
Addict

Name : Corey
Age : 33
Location : JMU virginia
Joined : 2011-07-25
Post Count : 569
Merit : 2
 |  Subject: Re: My first full custom subwoofer Subject: Re: My first full custom subwoofer  Thu Oct 25, 2012 8:20 am Thu Oct 25, 2012 8:20 am | |
| - AA wrote:
- I think the up-firing wave guide idea is equally experimental. Hope it works as expected. Although you're putting a lot of thought into this design (maybe too much
 ), much of the box positioning will come down to trial and error experimenting. ), much of the box positioning will come down to trial and error experimenting.
You could use your existing subs for IB, although buying one or two more in addition would be optimum. Most modern drivers are rugged enough to survice IB operation, if you tune it correctly. And the more drivers you have, the more your trunk will function as acoustic suspension. Excursion is minimized, power better distributed, and really the construction is not that costly or complicated. In many ways, IB is very simple. I say that not having ever done one. Someday though. The main problem with IB is that modeling my existing drivers for a response curve is nearly impossible, also I'd have to at least get more of my existing drivers and probably better ones anyway. Not to mention the fact that the amount of sound deadening I'd have to put in the trunk alone for an actual proper install would cost at LEAST $200, if not more for quality stuff like dynomat. Also, it's a lot easier when/if I upgrade subs to model in new sub drivers into my box I build  | |
|   | | c0reyl
Addict

Name : Corey
Age : 33
Location : JMU virginia
Joined : 2011-07-25
Post Count : 569
Merit : 2
 |  Subject: My first full custom subwoofer Subject: My first full custom subwoofer  Thu Oct 25, 2012 8:25 am Thu Oct 25, 2012 8:25 am | |
| I got tired of my retarded thread with 300+ some odd replies, and decided to post a thread because this is gunna be my first full custom box. I have a limted selection of tools which is why I never tried making a box in the past. So, let's see if I can make a non crappy subwoofer, out of lots of materials, and my two Alpine SWE1242 Type E subwoofers. My entire sound system so far was only $400, and i'm a broke 21 year old who barely graduated highschool with a 1.2 GPA, so don't expect a super awesome box  Anyway, here's the model I made of my sub with a 12db cabin gain with the resonance frequency of my car being about 53Hz and no random acoustics generated since I don't have an accurate acoustic import file of my car. I'm also going to have to fabricate my own passive radiator which I designed myself with existing subwoofer parts, which I modeled in the graphs using the weight and stiffness of fiberglass because I'm going to fiberglass reinforce my pulp cone diaphragm with a convex design. The 3D model I threw together is the sedan version of my car and that will be the subwoofer placement, using the rear windshield as a semi retarded quarter wave generator, and more importantly a wave guide for the subs. The subs will be placed 9ft back from the front seats right under my windshield (my car is huge, 17.5ft long)I will eventually fiberglass some custom panels for my door panels and I deleted the 6x9 in the back, but I'm going to fiberglass in my Alpine 6.5" component set with the swivel mount silk domes in the rear panels near the back seat angling towards the front of the car. I will use my Polk Audio swivel mount silk dome tweeters and mount them in the rear pillars, because that will add depth to the sound and reduce hearing fatigue. I will fiberglass a panel in the front (all panels will be sealed if possible) with a 5.25 mount and I'll also mount my coaxial Alpine 6x9's in the front, angling up, and disperse my swivel mount silk domes towards the back (eventually the back will be set up in mono somehow, and phased, with everything delayed to the sub plus near field setup because trying to make it sound like the music comes from your windshield is retarded imo) My sub box will also be fiberglassed, it's around 6.5 cu ft but since Lowes screwed me over on the cuts, I lost about an inch a side, and had to use a hobby arts/crafts tiny tin foil saw to trim the excess MDF. I'm going to paint/seal the interior of the sub box with white latex paint mixed with some silver paint for looks. I'm going to put in a 1/4 inch poly-carbonate window, and interior lighting, etch my own logo I just spent a few hours designing in the glass which will glow with the blue lighting. I still have a ton of work to do but it's coming along, here's some pics. I'll update later  The box so far is almost completely done wood wise aside from cutting out the window hole, and one last trimming (this hand saw sucks so bad), but basically it's 3/4 MDF which I will fiberglass over. So far, it's been put together by me having to use a hand saw to fit the faces together since Lowes employees are too retarded to use a table saw. I screwed and glued it together by making jigs out of random heavy nearby cube-like objects to better align it, using expanding foaming Gorilla Glue which is stronger than superglue, 2.5 in aggressive thread drywall screws threadlocked with the expanding glue, 3/4in round edge triangular prism braces which I screwd and glued in, threadlocking it and angling each screw at a 45 degree angle from the other screw for added strength using geometry of the triangle. Each face is also screwed into other faces as well as the braces using both compression and tension strength of the wood, and each corner is fiberglass reinforced as well. One of the faces was warped from the retards not cutting it right at lowes, and I planed it out flat and smooth (more than it was), with a chisel. I wouldn't have done that normally, but I'm going to fiberglass over it anyway. I got about 45 sq feet of fiberglass mat and 16sq ft of fiberglass weave cloth, 2 qts of resin, some bodyfiller, hardener and all that good stuff and hopefully tomorrow I can start glassing.   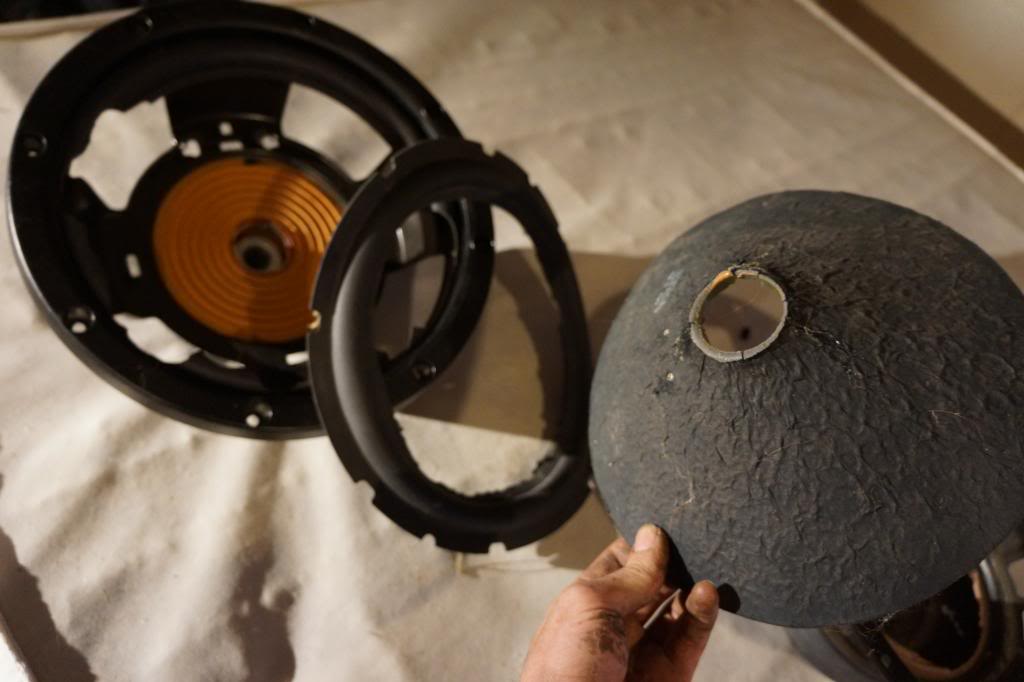 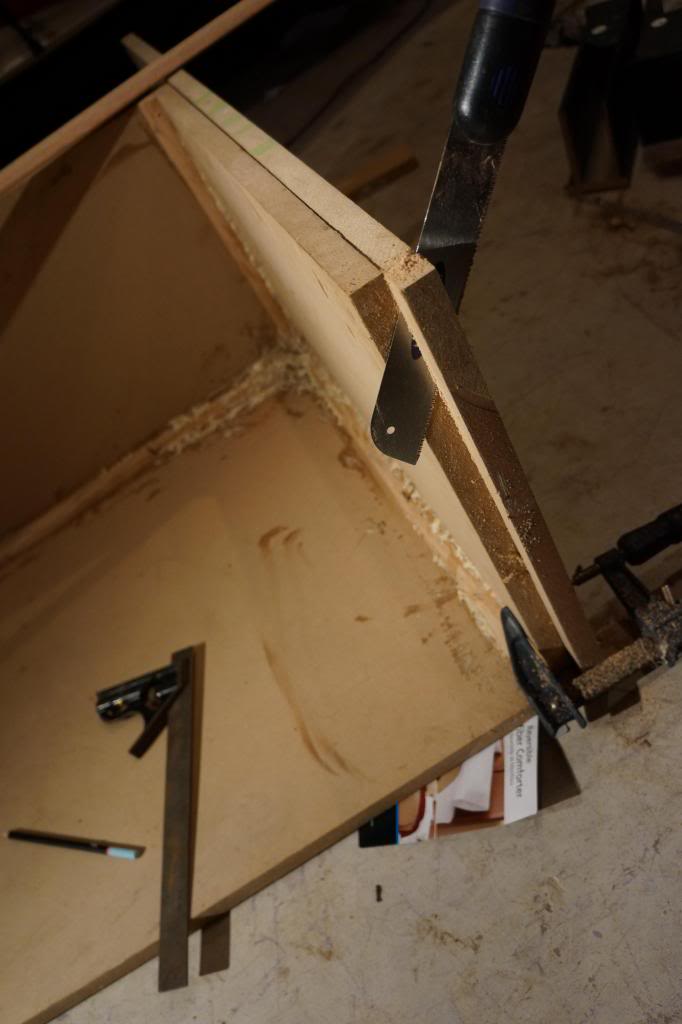 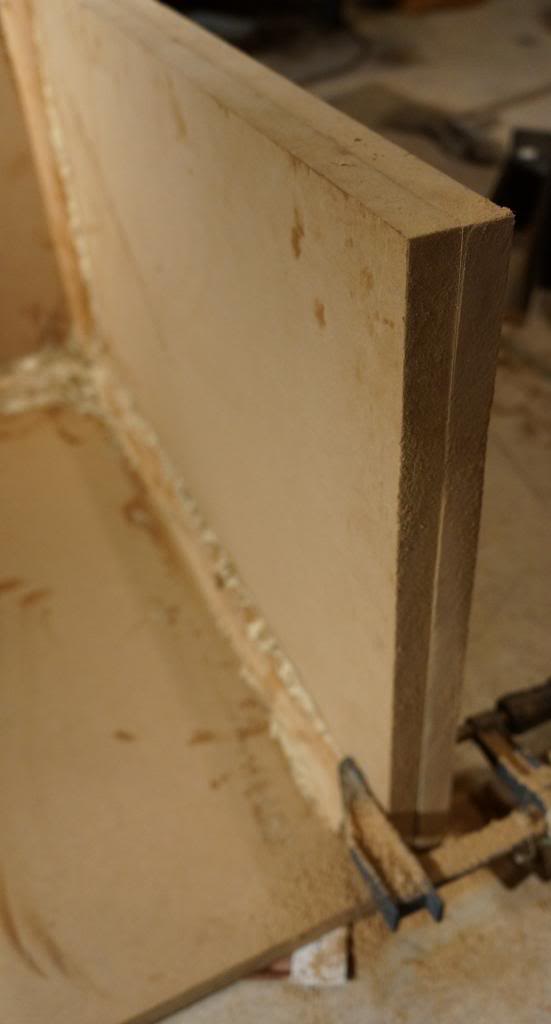 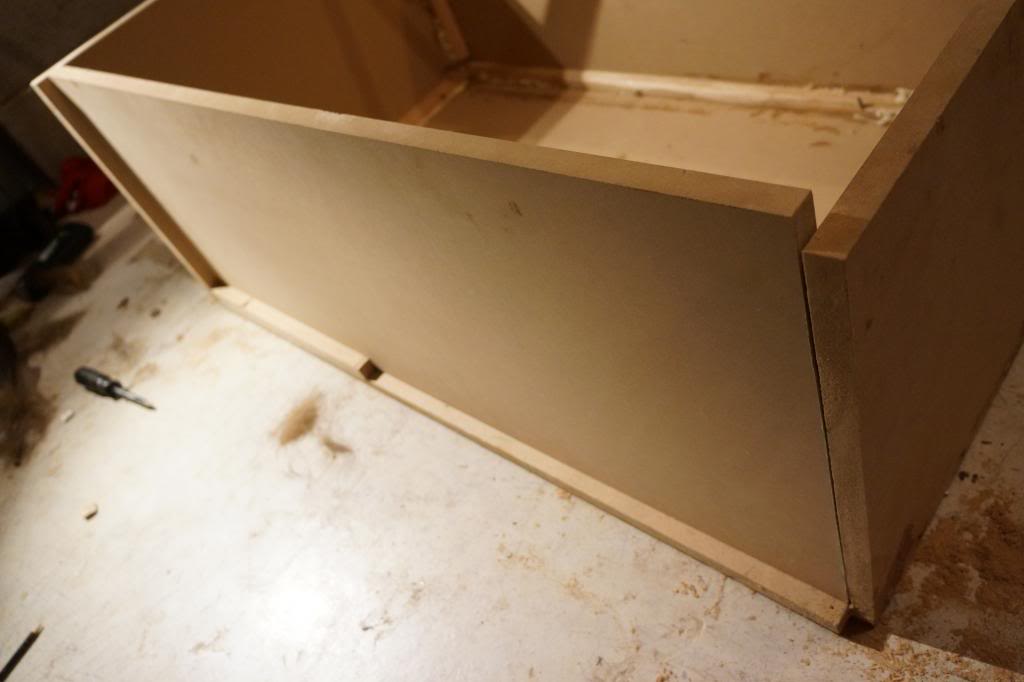 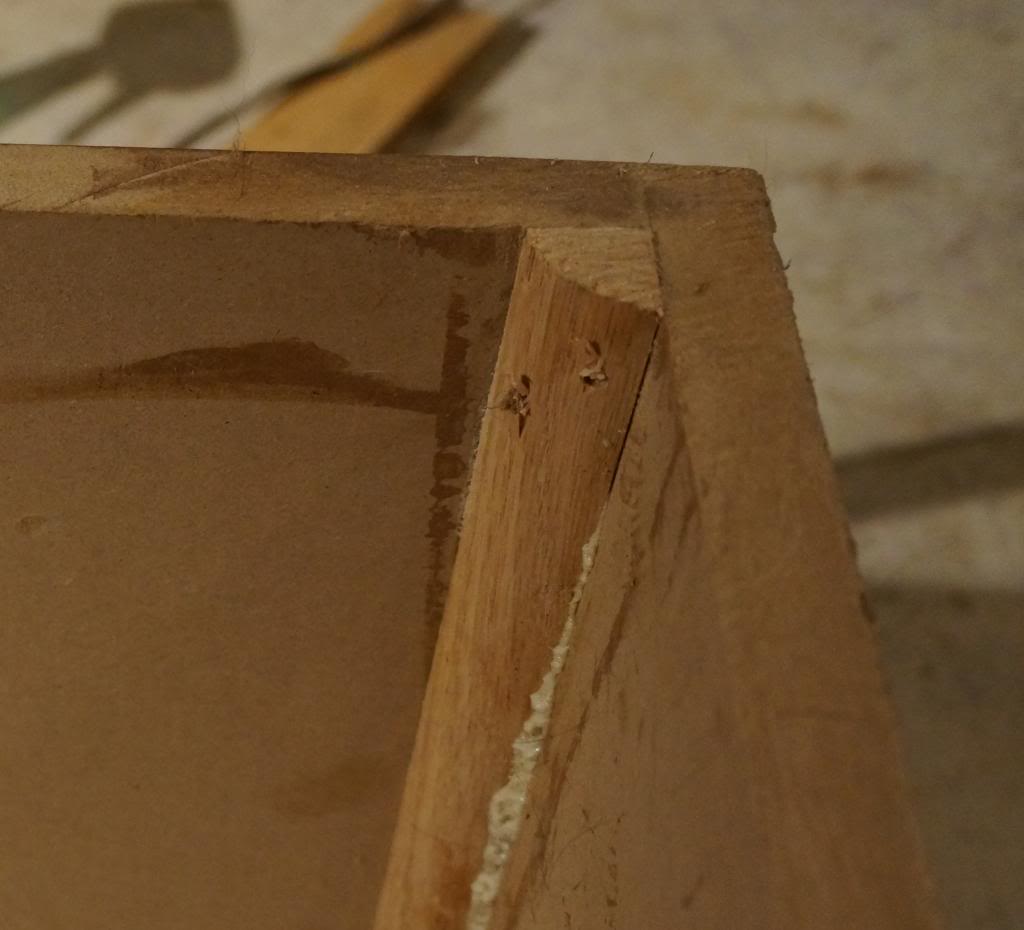  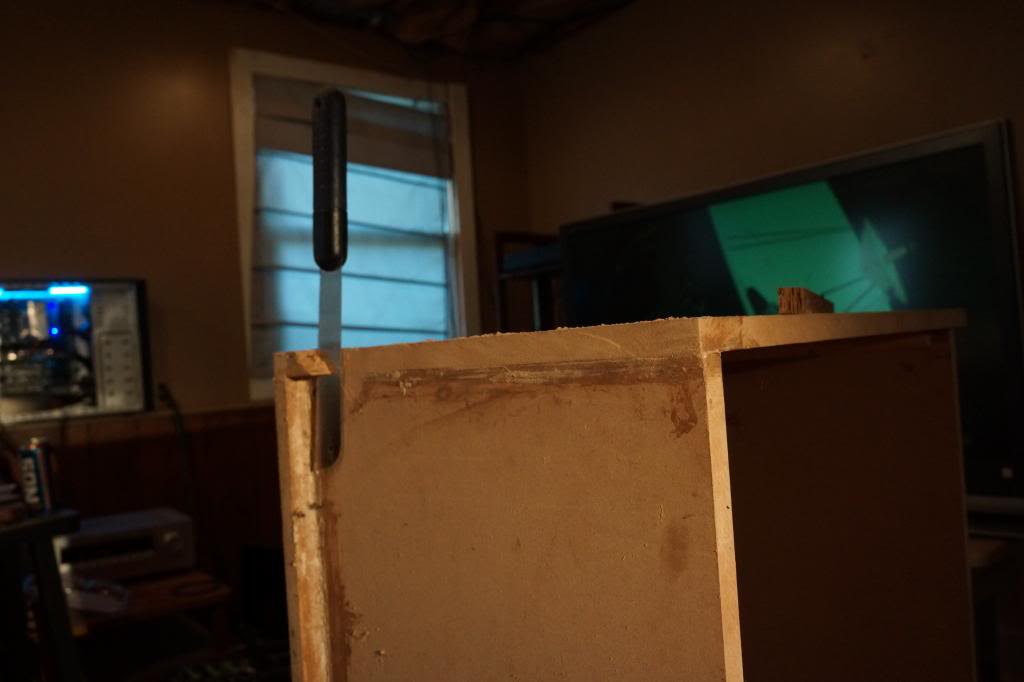  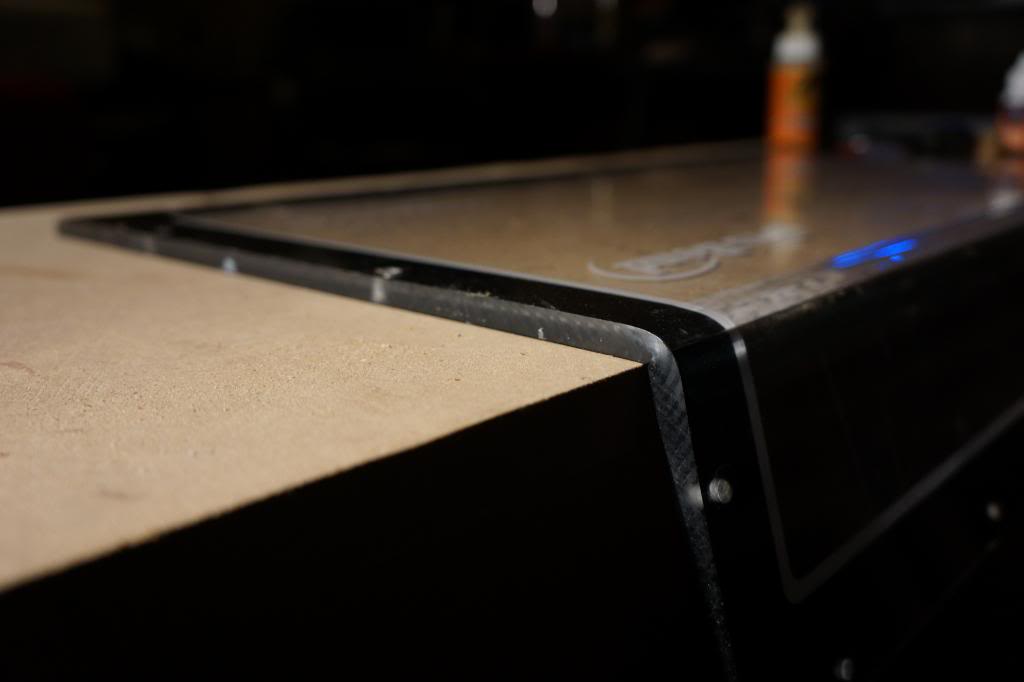  Making that logo was totally worth the time IMO  Update: It's been going a little slower than I wanted, but I'm still going at it  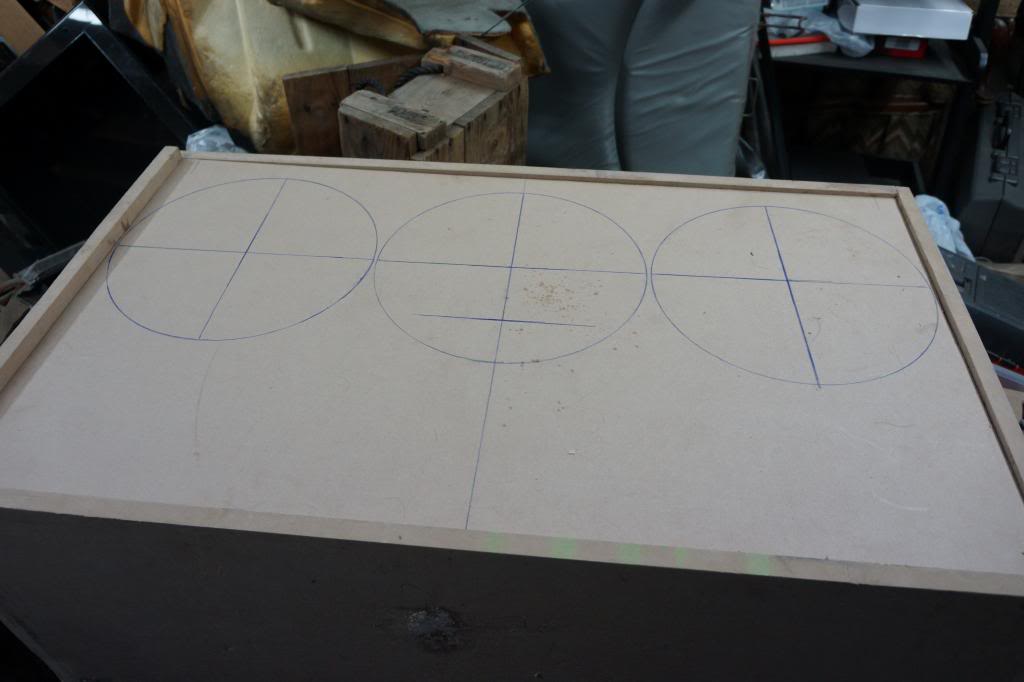 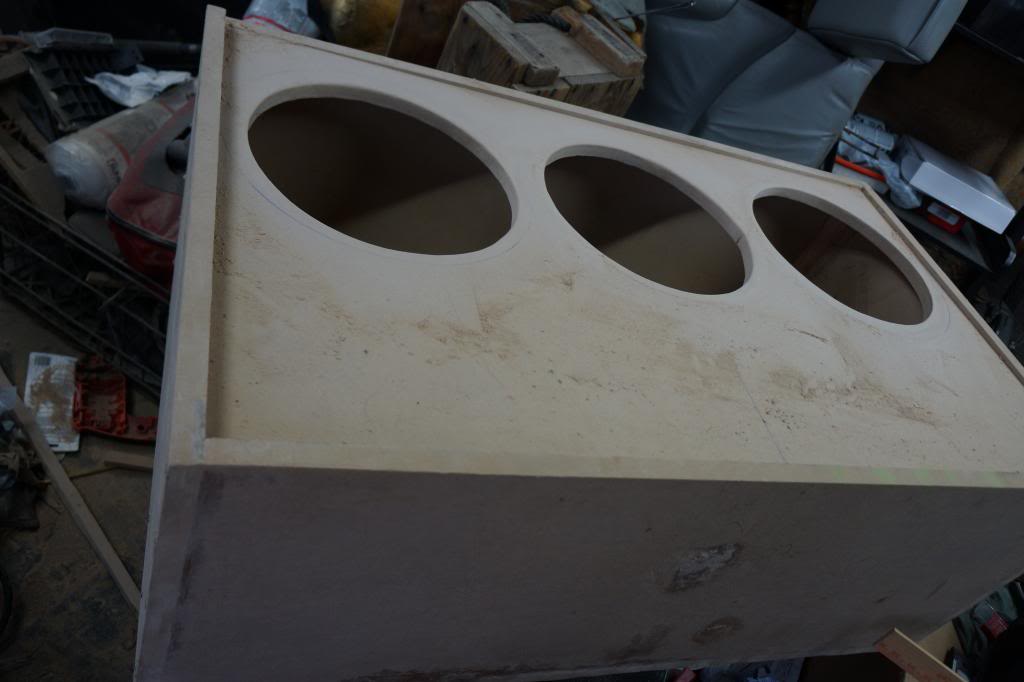  Since this is my first full box build, don't laugh too hard at my crappy cutout holes  Also, the edge isn't trimmed up yet, I am NOT looking forward to doing that with the world's shittiest hobby/craft handsaw  and I'm gunna have a hard time shoehorning this in the trunk, but the inside of the trunk is definitely bigger than the box  | |
|   | | AA
Administrator

Name : Aaron
Age : 47
Location : C-bus, Ohio
Joined : 2007-01-13
Post Count : 18452
Merit : 252
 |  Subject: Re: My first full custom subwoofer Subject: Re: My first full custom subwoofer  Thu Oct 25, 2012 12:10 pm Thu Oct 25, 2012 12:10 pm | |
| Will be interesting to see if it will fit in the trunk. Always, always, always before you build, make a test mule from cardboard and tape to see if it will fit. Kitchen appliance boxes, or even pizza boxes will work. Nice job on the box so far. Hole cut-outs don't need to be perfect, they just need to be round. Yours are fine. Assuming it will fit in the car, you will want to brace the inside of the box between drivers, something like this: 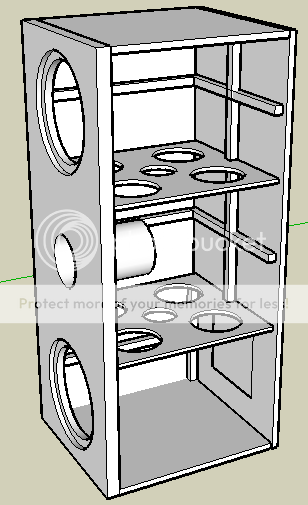 At minimum, use some thick dowels or boards to link the opposite sides of the enclosure, so it's more rigid:  If you don't do this, the box walls will flex, which will create distortion and noise. It could even fracture in the thin spots between the drivers. Also, on the inside edges, run a bead of silicone caulk over all the seams and corners to make sure the box is air-tight. It will ensure there there are no unintentional "vents" in the system. Best of luck! _________________ '05 GTO 6.0L • 6-spd • 95k miles • 0-60: 4.8s • 16.9 avg MPG • Nelson Ledges Lap: 1:26'95 Celica GT 2.2L • 5-spd • 165k miles • 0-60: yes'98 SC Riviera • 281k miles • 298 HP/370 TQ • 0-60: 5.79s • ET: 13.97 @ 99.28 • 4087 lb • 20.1 avg MPG • Nelson Ledges Lap: 1:30
3.4" pulley • AL104 plugs • 180º t-stat • FWI w/K&N • 1.9:1 rockers • OR pushrods • LS6 valve springs • SLP headers • ZZP fuel rails
KYB GR2 struts • MaxAir shocks • Addco sway bars • UMI bushings • GM STB • Enkei 18" EV5s w/ Dunlop DZ101s • F-body calipers
EBC bluestuff/Hawk HP plus • SS lines • Brembo slotted discs • DHP tuned • Aeroforce • Hidden Hitch^^^ SOLD ^^^  '70 Ninety-Eight Holiday Coupe 455cid • 116k miles '70 Ninety-Eight Holiday Coupe 455cid • 116k miles^^^ SOLD ^^^  | |
|   | | c0reyl
Addict

Name : Corey
Age : 33
Location : JMU virginia
Joined : 2011-07-25
Post Count : 569
Merit : 2
 |  Subject: Re: My first full custom subwoofer Subject: Re: My first full custom subwoofer  Thu Oct 25, 2012 3:45 pm Thu Oct 25, 2012 3:45 pm | |
| Thanks for tips  I'm going to fiberglass over the entire box soon, and I'm going to paint the inside with letex paint to seal everything up. I assume with a good amount of fiberglass matting on the outside of the enclosure in layers, that I won't need to brace in between the drivers? Box already has braces on edges and corners are already braced and fiberglass reinforced  | |
|   | | AA
Administrator

Name : Aaron
Age : 47
Location : C-bus, Ohio
Joined : 2007-01-13
Post Count : 18452
Merit : 252
 |  Subject: Re: My first full custom subwoofer Subject: Re: My first full custom subwoofer  Thu Oct 25, 2012 4:47 pm Thu Oct 25, 2012 4:47 pm | |
| Braces in the corners hold the corners together, but they don't do anything to keep the larger surface areas from resonating. Take your fist or a rubber hammer, tap on the outside of the back (bottom) wall near the center and listen. You'll hear a hollow "bonk" sound. As you move out to the edges and corners, it will sound more dead, less hollow. This is your corner bracing doing their job. If you don't brace the middle, the box walls will react to the driver outputs, resonate, becoming an additional output source. The enclosure walls will become speakers, and we don't want that! Seriously, this is one of the biggest mistakes people make with sub boxes. Your box should be acoustically dead, like it was carved from a slab of granite. If you tap on any of the enclosure walls, there should be no low frequency energy produced. I don't believe fiberglass is the answer, unless you lay up something like carbon fiber. But now you're talking about a $1500 box. Here's a link showing a properly braced enclosure should look inside. You can get away with less, but generally the higher number of drivers you put on one panel, the weaker that panel becomes, and so the more bracing that's required. http://redspade-audio.blogspot.com/2010/06/subwoofer-bracing-primer.html  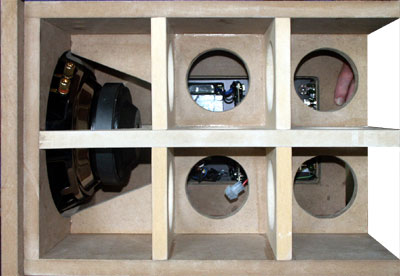 _________________ '05 GTO 6.0L • 6-spd • 95k miles • 0-60: 4.8s • 16.9 avg MPG • Nelson Ledges Lap: 1:26'95 Celica GT 2.2L • 5-spd • 165k miles • 0-60: yes'98 SC Riviera • 281k miles • 298 HP/370 TQ • 0-60: 5.79s • ET: 13.97 @ 99.28 • 4087 lb • 20.1 avg MPG • Nelson Ledges Lap: 1:30
3.4" pulley • AL104 plugs • 180º t-stat • FWI w/K&N • 1.9:1 rockers • OR pushrods • LS6 valve springs • SLP headers • ZZP fuel rails
KYB GR2 struts • MaxAir shocks • Addco sway bars • UMI bushings • GM STB • Enkei 18" EV5s w/ Dunlop DZ101s • F-body calipers
EBC bluestuff/Hawk HP plus • SS lines • Brembo slotted discs • DHP tuned • Aeroforce • Hidden Hitch^^^ SOLD ^^^  '70 Ninety-Eight Holiday Coupe 455cid • 116k miles '70 Ninety-Eight Holiday Coupe 455cid • 116k miles^^^ SOLD ^^^  | |
|   | | c0reyl
Addict

Name : Corey
Age : 33
Location : JMU virginia
Joined : 2011-07-25
Post Count : 569
Merit : 2
 |  Subject: Re: My first full custom subwoofer Subject: Re: My first full custom subwoofer  Fri Oct 26, 2012 6:53 pm Fri Oct 26, 2012 6:53 pm | |
| - AA wrote:
- Braces in the corners hold the corners together, but they don't do anything to keep the larger surface areas from resonating. Take your fist or a rubber hammer, tap on the outside of the back (bottom) wall near the center and listen. You'll hear a hollow "bonk" sound. As you move out to the edges and corners, it will sound more dead, less hollow. This is your corner bracing doing their job.
If you don't brace the middle, the box walls will react to the driver outputs, resonate, becoming an additional output source. The enclosure walls will become speakers, and we don't want that! Seriously, this is one of the biggest mistakes people make with sub boxes. Your box should be acoustically dead, like it was carved from a slab of granite. If you tap on any of the enclosure walls, there should be no low frequency energy produced. I don't believe fiberglass is the answer, unless you lay up something like carbon fiber. But now you're talking about a $1500 box.
Here's a link showing a properly braced enclosure should look inside. You can get away with less, but generally the higher number of drivers you put on one panel, the weaker that panel becomes, and so the more bracing that's required.
http://redspade-audio.blogspot.com/2010/06/subwoofer-bracing-primer.html

 Acctually it doesn't emit as much noise as I thought by knocking on it, but I already had the face glued and screwed in before I saw your reply  But hopefully I can wedge some braces in by using the giant window cutout  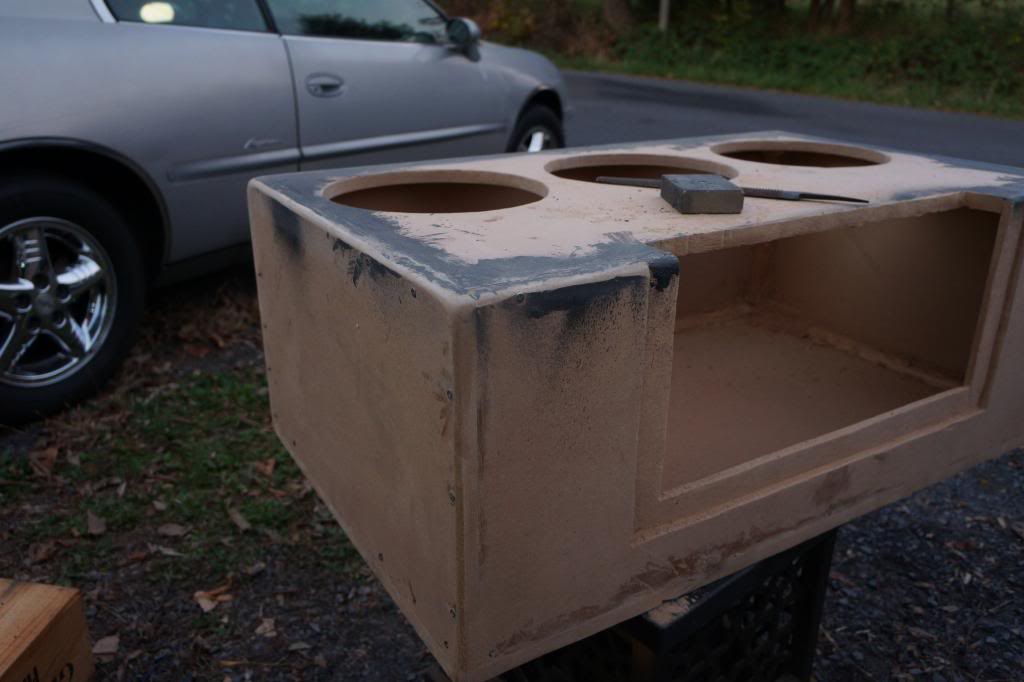 I'm not done round edging the corners, and so you know I'm going to put multiple laters of fiberglass on the outside of the enclosure, and even more layers around the window cutout, but I think I'm going to use some MDF and fabricate 1.5"thick doubled up MFD cross braces in between the drivers at least and see if I can manage to make some braces across the box as well, and also reinforce the braces with fiberglass, you think that will help? Not sure on the design of the braces yet but they have to at least look good, and I think I'll need less bracing with the outside being fiberglass as well. The window is coming right off my pro bend competition bandpass box which I will sand and refinish the window smooth and clear, then etch my own logo on the inside  | |
|   | | AA
Administrator

Name : Aaron
Age : 47
Location : C-bus, Ohio
Joined : 2007-01-13
Post Count : 18452
Merit : 252
 |  Subject: Re: My first full custom subwoofer Subject: Re: My first full custom subwoofer  Sat Oct 27, 2012 12:38 pm Sat Oct 27, 2012 12:38 pm | |
| I understand not wanting to see the braces through the window, I forgot about that. Keep in mind the window itself is a flexible material, and unfortunately not very rigid unless braced. What is the thickness? I built a box similar to yours a while back. It used a 1/2" thick piece of acrylic, smaller area than what yours seems to be, and I could see the reflection vibrating like a kick-drum under extreme output. In your case, the fact the window is bent helps a lot, but I think it will still resonate. It's no big deal for band pass box, because the objective is making boom. For a sealed SQ box, thin windows are not ideally suited. I know you're going to use it, but I would make every attempt to brace the inside at least enough that you can stand to look at.
When you screw the acrylic down to the enclosure, be careful not to over tighten. Apply a weather strip between the window and the box. Don't use wood screws with tapered heads. Use flat head machine screws with rubber cushioned washers, and secure with nuts from the inside (work through the sub cut outs). This will give you a good seal, and reduce the likelihood of cracking. _________________ '05 GTO 6.0L • 6-spd • 95k miles • 0-60: 4.8s • 16.9 avg MPG • Nelson Ledges Lap: 1:26'95 Celica GT 2.2L • 5-spd • 165k miles • 0-60: yes'98 SC Riviera • 281k miles • 298 HP/370 TQ • 0-60: 5.79s • ET: 13.97 @ 99.28 • 4087 lb • 20.1 avg MPG • Nelson Ledges Lap: 1:30
3.4" pulley • AL104 plugs • 180º t-stat • FWI w/K&N • 1.9:1 rockers • OR pushrods • LS6 valve springs • SLP headers • ZZP fuel rails
KYB GR2 struts • MaxAir shocks • Addco sway bars • UMI bushings • GM STB • Enkei 18" EV5s w/ Dunlop DZ101s • F-body calipers
EBC bluestuff/Hawk HP plus • SS lines • Brembo slotted discs • DHP tuned • Aeroforce • Hidden Hitch^^^ SOLD ^^^  '70 Ninety-Eight Holiday Coupe 455cid • 116k miles '70 Ninety-Eight Holiday Coupe 455cid • 116k miles^^^ SOLD ^^^  | |
|   | | c0reyl
Addict

Name : Corey
Age : 33
Location : JMU virginia
Joined : 2011-07-25
Post Count : 569
Merit : 2
 |  Subject: Re: My first full custom subwoofer Subject: Re: My first full custom subwoofer  Sat Oct 27, 2012 1:59 pm Sat Oct 27, 2012 1:59 pm | |
| - AA wrote:
- I understand not wanting to see the braces through the window, I forgot about that. Keep in mind the window itself is a flexible material, and unfortunately not very rigid unless braced. What is the thickness? I built a box similar to yours a while back. It used a 1/2" thick piece of acrylic, smaller area than what yours seems to be, and I could see the reflection vibrating like a kick-drum under extreme output. In your case, the fact the window is bent helps a lot, but I think it will still resonate. It's no big deal for band pass box, because the objective is making boom. For a sealed SQ box, thin windows are not ideally suited. I know you're going to use it, but I would make every attempt to brace the inside at least enough that you can stand to look at.
When you screw the acrylic down to the enclosure, be careful not to over tighten. Apply a weather strip between the window and the box. Don't use wood screws with tapered heads. Use flat head machine screws with rubber cushioned washers, and secure with nuts from the inside (work through the sub cut outs). This will give you a good seal, and reduce the likelihood of cracking. I think it's 1/4 inch Polycarbonate My subs are only 250 watts RMS each and it will only have 400 watts. My plan was that if I ever upgraded my subs to more wattage then I'd either fabricate in a 1" thick window, or if the plexi was gaurenteed to flex I could just fabricate an MDF fiberglass reinforced panel that can be removable. I really liked the window idea to be able to acess subwoofer wiring without taking the giant box out of the trunk. Also, this window never flexed with the same subs in the bandpass box which had a smaller sealed chamber and silicone sealant between the window and box Also I got an idea for the braces. Would using long threaded metal rods cross bracing it with insulated nuts screwed from the inside to apply tension on the MDF be a good idea? Inside of box will be painted with white latex paint mixed with silver for a sealant by the way. My plan was to drill holes slightly too small for the metal rods and apply a bit of sealant on the rod so that it's air tight before I fiberglass over it. I was thinking maybe a rod in between each driver, two going across the box, and two on each side of the window. It would be much easier to do than wood and be stronger, and still look good, right? not sure how much the rod costs though | |
|   | | albertj
Master

Name :
Location : Finger Lakes of New York State
Joined : 2007-05-31
Post Count : 8687
Merit : 181
 |  Subject: Re: My first full custom subwoofer Subject: Re: My first full custom subwoofer  Sun Oct 28, 2012 10:33 pm Sun Oct 28, 2012 10:33 pm | |
| For reference: might have been a good idea to build this subwoofer out of Homasote instead of wood/MDF to deal with the resonance issues. Your real problem, though, is Homasote does not merely swell like MDF but actually turns to mush when soaking wet. You could still successfully chamfer and 'glass it.
Albertj
| |
|   | | c0reyl
Addict

Name : Corey
Age : 33
Location : JMU virginia
Joined : 2011-07-25
Post Count : 569
Merit : 2
 |  Subject: Re: My first full custom subwoofer Subject: Re: My first full custom subwoofer  Thu Nov 01, 2012 2:22 pm Thu Nov 01, 2012 2:22 pm | |
| - albertj wrote:
- For reference: might have been a good idea to build this subwoofer out of Homasote instead of wood/MDF to deal with the resonance issues. Your real problem, though, is Homasote does not merely swell like MDF but actually turns to mush when soaking wet. You could still successfully chamfer and 'glass it.
Albertj
Funilly enough, I wasn't originally planning on fiberglassing over the sub lol. I was going to have a crappy looking carpet glued over it and originally acually planned on crossbracing it much like AA said originally, but then I got ridiculous ideas of the window, interior lighting, latex silver interior painting and such. I have some All-Thread 3/8", about 12 feet of it now. I plan on cross bracing it soon. Stupid Whore-icane Sandy has been messing with my project   Although I'm not sure how resonance should be much an issue with MDF. I know plywood has it, but I'm no expert. My box has an FB of around 23Hz according to calculations if that helps  Update: 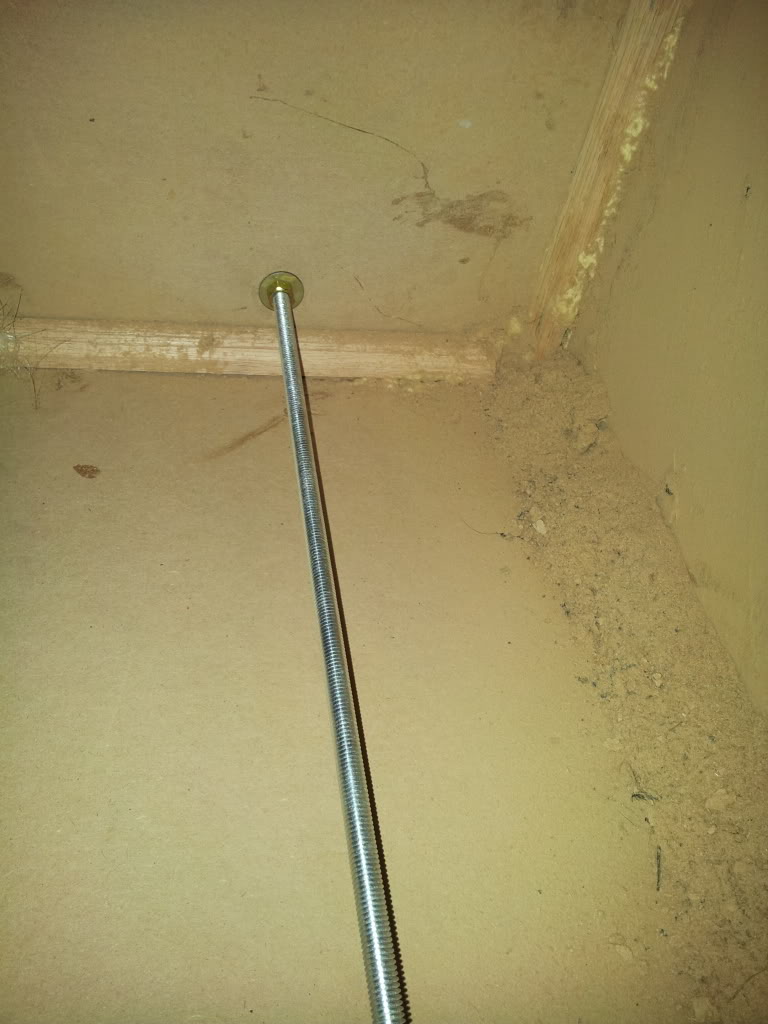 Here's one of the braces in place and I only got 2 in so far. I cut them using a jigsaw clamping the bar to a workbench and the table nearly fell apart from the damn saw, half the crap fell off the table, and then the clamp retention parts on the closer clamp exploded and nearly hit my face  Then I had to cut the rest in my lap, with a jigsaw, and I decided after the second piece to give up. I'm gunna go get heavy duty cutoff wheels for the dremel tomorrow to finish the cuts, and those are 3/8inch steel rods with 1700+ pound breaking force on the tag so I figure they will be strong enough if I fiberglass over the box as well. I'm going to crossbrace every opposing face with them, and they are loose at the moment and I won't tighten them until I paint the inside of the box with latex to act as threadlock/delete any possible vibrations. If crossbracing with this isn't enough with corner bracing with fiberglass reinforcements, edge bracing on every edge which is glued and screwed with all the screws forming triangles using gorilla glue which is expanding wood glue stronger than superglue, thread locking every screw with the expanding glue as well, using very agressive thread drywall screws made for tight screwing of far more cumbly material, PLUS the fiberglass won't work, then I'll probably just give up on this box all together  If the window prooves to flex when I build the box then I'll grab more MDF and shave off the top part, then apply more fiberglass on the top, then make an MDF removable panel reinforced with fiberglass so I won't have to take this thing out of the trunk every time to access internal wiring until I can actually get a hold of 1inch thick lexan which is retarded expensive, but with these crappy 250watt RMS drivers, I doubt that's going to be an issue especially because the polycarbonate piece I had is from a the pro bend competition bandpass box made for subs much stronger than my crappy subs, and it's curved, and it never flexed while I used the bandpass box either. | |
|   | | AA
Administrator

Name : Aaron
Age : 47
Location : C-bus, Ohio
Joined : 2007-01-13
Post Count : 18452
Merit : 252
 |  Subject: Re: My first full custom subwoofer Subject: Re: My first full custom subwoofer  Sat Nov 03, 2012 12:10 pm Sat Nov 03, 2012 12:10 pm | |
| Resonance, wall flex, whatever you like to call it, it's baffle movement, which contributes to the sound. The perfect enclosure doesn't move, vibrate, or otherwise add to what the speaker drivers are doing. MDF flexes, just tap the enclosure and you'll hear it.
I like the threaded rod idea. Another way to build a rigid box is to double your wall thickness with a 2nd layer of MDF, glued together as a sandwich. There are also pre-fab enclosure materials from companies like Dynomat, but they do cost. _________________ '05 GTO 6.0L • 6-spd • 95k miles • 0-60: 4.8s • 16.9 avg MPG • Nelson Ledges Lap: 1:26'95 Celica GT 2.2L • 5-spd • 165k miles • 0-60: yes'98 SC Riviera • 281k miles • 298 HP/370 TQ • 0-60: 5.79s • ET: 13.97 @ 99.28 • 4087 lb • 20.1 avg MPG • Nelson Ledges Lap: 1:30
3.4" pulley • AL104 plugs • 180º t-stat • FWI w/K&N • 1.9:1 rockers • OR pushrods • LS6 valve springs • SLP headers • ZZP fuel rails
KYB GR2 struts • MaxAir shocks • Addco sway bars • UMI bushings • GM STB • Enkei 18" EV5s w/ Dunlop DZ101s • F-body calipers
EBC bluestuff/Hawk HP plus • SS lines • Brembo slotted discs • DHP tuned • Aeroforce • Hidden Hitch^^^ SOLD ^^^  '70 Ninety-Eight Holiday Coupe 455cid • 116k miles '70 Ninety-Eight Holiday Coupe 455cid • 116k miles^^^ SOLD ^^^  | |
|   | | Sponsored content
 |  Subject: Re: My first full custom subwoofer Subject: Re: My first full custom subwoofer  | |
| |
|   | | | | My first full custom subwoofer |  |
|
Similar topics |  |
|
| | Permissions in this forum: | You cannot reply to topics in this forum
| |
| |
| |
|


