Subject: Re: Write-Up: HVAC Assembly Wed Dec 02, 2020 11:15 am
Look what I found in module #3 -
A split gear, as predicted.
If plastic replacements are available online, I'll grab a few and replace it. It lasted 22 years, that's not bad.
edit -
It's this one isn't it? - Link
A little high for what it is!
Here's an even more expensive one that may be the best option -
Link
Quote :
This item comes with a full LIFETIME WARRANTY Made from virgin polymer which is self lubricating - no need for extra messy grease CNC machined from solid stock - no small air inclusions as in other 3d printed designs nor cast original gear Custom design which does not rely on "press" fit Simple replacement - slide old broken brittle gear off and slide new solid gear on 100% Made in Michigan USA! - both material and finished product! The factory gearbox doesn't last as the factory gear is made from a brittle material which cracks rendering the gear useless. The cracked gear just spins on its shaft. This constant spinning creates the "clicking" noise from the factory gearbox as the open or closed status is "searched" for. Our design is CNC machined for exact fit without any chance of cracking. When the gear is replaced on the stock shaft there is no slipping and no more annoying clicking sound.
Replacement gearboxes are cheap but you will just need to replace the gear again and again.
This gear is a simple solution to a very common and yet very annoying problem for a PERMANENT solution!
I'm giving that one a try.
98inWPB likes this post
Jack the R Master
Joined : 2007-01-16Post Count : 8057 Merit : 105
Subject: Re: Write-Up: HVAC Assembly Sat Dec 12, 2020 8:10 pm
albertj wrote:
grounded the positive terminal for about a minute
How did you ground it? You took the positive cable off the battery and let it sit on the floor pan?
albertj Master
Name : Location : Finger Lakes of New York State Joined : 2007-05-31Post Count : 8598 Merit : 180
Subject: Re: Write-Up: HVAC Assembly Sat Dec 12, 2020 9:56 pm
Jack the R wrote:
albertj wrote:
grounded the positive terminal for about a minute
How did you ground it? You took the positive cable off the battery and let it sit on the floor pan?
I disconnect the positive terminal then touch the positive cable to a nearby ground (I think the seat belt bolt). Pretty much all the electronics reset - the radio et cetera.
KenBluder Amateur
Name : KenBluder Age : 62 Location : Palatine, IL Joined : 2014-02-23Post Count : 39 Merit : 2
In the category, "If in Doubt, Reboot", I have fully functional HVAC.
I had cold only on the driver's side but everything else worked as it should. With the HVAC set to "off" (and ignition off), I pulled #7 and #9 fuses for for a couple minutes, re-installed them, then started the car. Success! Well, for about two minutes and then only heat on the driver's side. But things had changed so I was encouraged.
Turned the system off, turned the engine off and pulled the fuses again for about (40) minutes. Re-installed the fuses and turned the ignition on but did not start the car. Let it sit for about (3) minutes. Turned the ignition off, waited about (20) seconds and started the car. Turned the system on and all good! Ran it up and down in all modes for several minutes, shut the car off and re-started and all is working.
I can't say this was the perfect sequence of events but it worked without having to pull the dash apart and pretend to be a contortionist. Incidentally, the car sits for long periods and the battery drains. I know, I know, tender. Apparently when the voltage dropped, it confused the system. But we're back to functional. Perhaps this will help someone. You all have certainly helped me!
albertj Master
Name : Location : Finger Lakes of New York State Joined : 2007-05-31Post Count : 8598 Merit : 180
In the category, "If in Doubt, Reboot", I have fully functional HVAC.
I had cold only on the driver's side but everything else worked as it should. With the HVAC set to "off" (and ignition off), I pulled #7 and #9 fuses for for a couple minutes, re-installed them, then started the car. Success! Well, for about two minutes and then only heat on the driver's side. But things had changed so I was encouraged.
Turned the system off, turned the engine off and pulled the fuses again for about (40) minutes. Re-installed the fuses and turned the ignition on but did not start the car. Let it sit for about (3) minutes. Turned the ignition off, waited about (20) seconds and started the car. Turned the system on and all good! Ran it up and down in all modes for several minutes, shut the car off and re-started and all is working.
I can't say this was the perfect sequence of events but it worked without having to pull the dash apart and pretend to be a contortionist. Incidentally, the car sits for long periods and the battery drains. I know, I know, tender. Apparently when the voltage dropped, it confused the system. But we're back to functional. Perhaps this will help someone. You all have certainly helped me!
on a warm spring day check your refrigerant charge and make sure it's adequate...
KenBluder Amateur
Name : KenBluder Age : 62 Location : Palatine, IL Joined : 2014-02-23Post Count : 39 Merit : 2
In the category, "If in Doubt, Reboot", I have fully functional HVAC.
I had cold only on the driver's side but everything else worked as it should. With the HVAC set to "off" (and ignition off), I pulled #7 and #9 fuses for for a couple minutes, re-installed them, then started the car. Success! Well, for about two minutes and then only heat on the driver's side. But things had changed so I was encouraged.
Turned the system off, turned the engine off and pulled the fuses again for about (40) minutes. Re-installed the fuses and turned the ignition on but did not start the car. Let it sit for about (3) minutes. Turned the ignition off, waited about (20) seconds and started the car. Turned the system on and all good! Ran it up and down in all modes for several minutes, shut the car off and re-started and all is working.
I can't say this was the perfect sequence of events but it worked without having to pull the dash apart and pretend to be a contortionist. Incidentally, the car sits for long periods and the battery drains. I know, I know, tender. Apparently when the voltage dropped, it confused the system. But we're back to functional. Perhaps this will help someone. You all have certainly helped me!
on a warm spring day check your refrigerant charge and make sure it's adequate...
Albert - plenty of cold air in the summer! It was definitely a "confused" actuator.
98RivOwner Member
Name : 98RivOwner Location : Lakesite, TN Joined : 2014-07-19Post Count : 70 Merit : 6
If plastic replacements are available online, I'll grab a few and replace it. It lasted 22 years, that's not bad.
edit -
It's this one isn't it? - Link
A little high for what it is!
Here's an even more expensive one that may be the best option -
Link
Quote :
This item comes with a full LIFETIME WARRANTY Made from virgin polymer which is self lubricating - no need for extra messy grease CNC machined from solid stock - no small air inclusions as in other 3d printed designs nor cast original gear Custom design which does not rely on "press" fit Simple replacement - slide old broken brittle gear off and slide new solid gear on 100% Made in Michigan USA! - both material and finished product! The factory gearbox doesn't last as the factory gear is made from a brittle material which cracks rendering the gear useless. The cracked gear just spins on its shaft. This constant spinning creates the "clicking" noise from the factory gearbox as the open or closed status is "searched" for. Our design is CNC machined for exact fit without any chance of cracking. When the gear is replaced on the stock shaft there is no slipping and no more annoying clicking sound.
Replacement gearboxes are cheap but you will just need to replace the gear again and again.
This gear is a simple solution to a very common and yet very annoying problem for a PERMANENT solution!
I'm giving that one a try.
Jack R, did the replacement gear work?
the first link still works, but the 2nd link to the metal gear does Not work.
I need one for a 1614972 actuator...the Largest gear is cracked in the blend door actuator on the driver's side . Any feedback you or anyone else can give would be appreciated
I've had no problems with the replacement gear. My HVAC is currently fully functional (knock on wood).
I don't recall the metal gear, probably came up while I was searching on eBay. All this plastic will turn to dust in time, so don't worry much about getting a metal gear.
Last edited by Jack the R on Fri Sep 01, 2023 6:40 pm; edited 1 time in total
98RivOwner Member
Name : 98RivOwner Location : Lakesite, TN Joined : 2014-07-19Post Count : 70 Merit : 6
I don't know if the gears are the same size or not. When I did my #5, I replaced it with a used unit from Ed Morad. That was a long time ago and I doubt he's had a Riv come through in ages - and if he did, it would have the same old plastic issues that ours do.
98RivOwner Member
Name : 98RivOwner Location : Lakesite, TN Joined : 2014-07-19Post Count : 70 Merit : 6
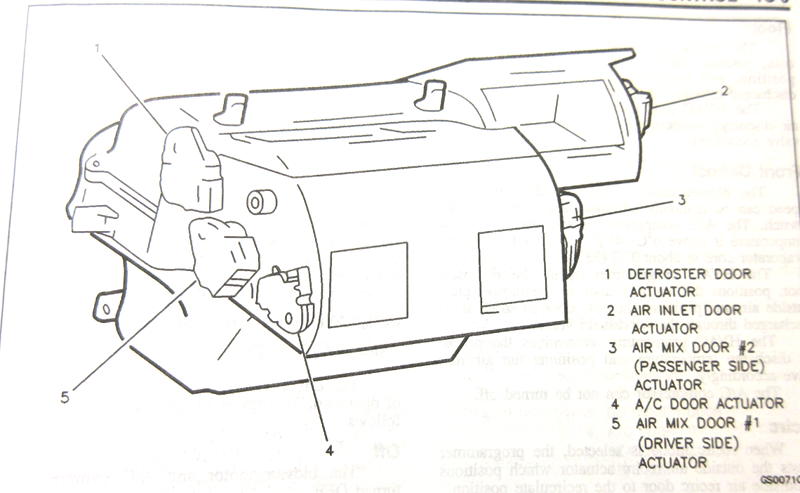
I replaced hub gear in #5 this weekend. #5 is the DS air blend door. My symptom was a medium air temperature on the DS during winter months when I wanted heat, everything else worked fine. I removed: 1. sound insulator on DS 2. IP upper trim 3. IP trim 4. DS knee bolster 5. LH Fuse Panel Trim 6. RH Trim panel 7. Center vent carrier 8. upper center console trim 9. shifter knob 10 ashtray 11. CD holder 12. center console 11. RH side intermediate knee bolster just left of the glovebox 12. removed the piece of ductwork everyone complains about removing(mine was easy because I had the entire dash about apart) 13. removed subject actuator
replaced broken gear with Amazon plastic replacement.
Tried my best to maintain original gear "timing" but I believe I "moved" the blue gear a few teeth by mistake.
Reinstalled actuator and gave it a try....no dice...still same symptom.
Now I could see the #5 mix door hub and it would NOT rotate as I commanded temperature changes.
Then I got a flashing ext. temperature value on the HVAC display...some sort of code I believe, never counted the flash count or sequence.
I eventually cycled the ignitgion and messed with the temperature settings a few times and it begin to work.
I could see the #5 door hub and I could tell its full range of motion is approximately 80-85 degrees of rotation on my Riviera, from full hot to full cold. At full hot the hub slots(180 degrees apart) were facing at 12 and 6 o'clock, at full cold the slots were at approximately 3:30 and 9:30. The rotation from full cold to full hot is from 3:30 to 6:00, so not a full 1/4 turn.
I broke a few trim piece mounting hole ears. I had to Gorilla epoxy them back.
I'm also having trouble with the IP upper trim retainers...can't get the retainers back in and lined up properly, dealing with 25yr old plastic is difficult. I will need to order some, if anyone knows part number post it here.
Also, I noticed my Riviera does NOT cool as well as I remember it cooling, but I haven't used the A/C in a long time, but the last time I did it would run you out of the cabin, not as cool today...I will see about a refrigerant performance check.
I've been " living" with the no heat on the DS issue for some time, glad I decided to fix it.
All told, this job took me about 10hrs.
BTW, I unbolted the DS seat and bugee corded it to t he back seat belt restraint to hold it out of the way.
I also took the opportunity to do a good vacuum job and clean all of the exposed interior trim pieces with everything dis assembled.
Also, just had my crank sensor and cam sensor replaced about a week ago on a no start symptom in the heat of the day. I didn't do this job myself, I hired it out....$945 parts and labor..I was floored.
Glad to know the replacement gear fit! That's how I'll do mine when it goes.
Go to YouTube and search for "plastic welding." There's better ways to fix plastic parts than Gorilla Glue. Of course all our plastic parts will eventually de-plasticize and crumble into dust. One of the reasons new cars are worthless.
I don't remember what the retainers on the instrument panel look like. It sounds like you took far more apart than you need to, but it's been many years since I've done this job.
I replaced the trim clips on the gray door plastic. Found where a body shop had popped a dent in that area and used clips that didn't hold the plastic tight against the door. If you get on eBay you can search for plastic clips and see if anything like yours comes up. They're often sold in miscellaneous grab bags with hundreds of clips of different types.
IIRC the seats have airbag sensors in them and it's a good idea to pull the airbag fuse before messing with the seats.
I'm not surprised at the cost of the cam and crankshaft sensor job. I did those a couple years ago and the sensors are buried under a couple layers of parts. IIRC I had to take the passenger side motor mount off to get the water pump off to get the camshaft position sensor off. And the crankshaft position sensor is behind the harmonic dampener, which has to come off. The bolt for he harmonic dampener is a torque-to-yield bolt, can't be reused (hope your shop knew that), I think it was only available from the dealer (NAPA has long since stopped carrying it and recycled the part number - I bought from them first and they sold me the wrong bolt). The harmonic dampener bolt takes some immense torque to install and I ended up buying a $300 electric impact wrench to finish the job. And my first set of impact sockets. I wasn't very happy at the time, but I've used the crap out of that stuff and I've gotten over the pain of buying it.
98RivOwner Member
Name : 98RivOwner Location : Lakesite, TN Joined : 2014-07-19Post Count : 70 Merit : 6
Yes JackR, I did pull the airbag fuse BEFORE i tampered with the DS. I saw that on a previous post of yours I believe. I decided better safe than sorry, and easy to do.
I'm glad you pulled the airbag fuse. If the airbag went off, it might only give you a nasty surprise and raise your repair bill; but for all I know it could break your neck if it caught you from the side (while messing with the seat).
Good luck finding your retainers. I too am searching for retainers ATM - although mine is a hairpin type cotter pin for an even older vehicle.
The research part of car repair gets a little old.
98RivOwner Member
Name : 98RivOwner Location : Lakesite, TN Joined : 2014-07-19Post Count : 70 Merit : 6
The blend-air door motors are quite cheap on eBay. In fact, the only problem I had on my passenger-side motor was that the Chinese packed waayyyy too much grease into the gears... Thus, the tiny little copper brushes for the sensor were isolated by the grease - other than that, I now have an extra RH motor.
98RivOwner Member
Name : 98RivOwner Location : Lakesite, TN Joined : 2014-07-19Post Count : 70 Merit : 6
Subject: Re: Write-Up: HVAC Assembly Sun Feb 04, 2024 3:32 pm
Well, my PS begin blowing ice cold air on 1-30-24 with heat set to 90 deg. F. Yesterday I removed the glove box, dropped the PCM and cradle, then put the HVAC through a temperature change sequence, PS temperature blend door actuator was NOT moving. Removed actuator, took it a part and noticed cracked gear as occurred previously on my DS temperature blend door actuator. Ordered same replacement gear from Amazon, will arrive 2-9-24. Will install after I receive it.
treasureoak likes this post
treasureoak Special
Name : Allan Browning Age : 64 Location : West Tennessee Joined : 2011-04-17Post Count : 8 Merit : 0
Had same problem on my '98. I got an actuator from the junkyard for about $8. Think it was from a 2000 Seville/STS...Problem fixed! If the same symptoms return I will spring for a new one now that I know I can replace it myself. So you're just replacing the plastic gears?
98RivOwner Member
Name : 98RivOwner Location : Lakesite, TN Joined : 2014-07-19Post Count : 70 Merit : 6
Subject: Re: Write-Up: HVAC Assembly Tue Feb 06, 2024 8:38 am
Yes, plastic hub gear cracked per picture in my post on 9-1-23 @3:10pm