Tajis, so what are the exact tools you used? A thumb wheel ratchet? what size? and the wobble socket extension with a 7/32 adapter connects to the ratchet? Time for me to upgrade the tool box!
Please let me know so I know what to go shopping for, thank you!
Tajis Amateur
Name : Tajis Age : 38 Joined : 2012-08-24Post Count : 28 Merit : 3
Tajis, so what are the exact tools you used? A thumb wheel ratchet? what size? and the wobble socket extension with a 7/32 adapter connects to the ratchet? Time for me to upgrade the tool box!
Please let me know so I know what to go shopping for, thank you!
The thumbwheel ratchet I bought was a quarter inch Craftsman. Sears carries them and they aren't too expensive. It made my life a lot easier.
I used a generic wobble socket extension kit, quarter inch, with the 7/32 bit. You can use this either with a standard ratchet or the thumbwheel ratchet, but I found it easier to use with the thumbwheel ratchet due to lack of space. Keep in mind there's barely any room to get a grip on the bolt. I plan on replacing the standard bolts with bolts that have a screwdriver notch in them for future ease of access.
96riv Fanatic
Name : Dennis Location : Phoenix Joined : 2007-03-08Post Count : 390 Merit : 8
I just replaced #2 actuator. It must have been replaced before me because only 2 bolts were in place. It was a bit of a pain but no harder than working on my 87. Special thanks to Morad for fast shipping to Phoenix, ordered on Friday the 18th and received Tuesday 22nd.
rk0ehn Enthusiast
Name : Christian Rolf Köhn Age : 34 Location : CD Juarez, MX Joined : 2011-08-11Post Count : 148 Merit : 14
It's been a long time I have posted anything. Anyway here a leave you with a video I made when I adjusted one of the actuators, this is in the far left side of the instrument panel, the Air Inlet Door Actuator.
Hope it helps
Karma Aficionado
Name : Andrew Age : 39 Location : Ontario, Canada Joined : 2008-01-14Post Count : 1949 Merit : 123
I'd like to get some advice as a follow up on this thread:
I have a 1997 Riv SC which is blowing hot air on the drivers side and center vents while the AC is set to cool. This has happened for about 8 months off and on. It has self corrected in the past. Now it is happening full time.
With the help of the pictures and messages found here I was able to locate and remove the actuator controlling the blend door mixer on the passenger side. After removing the actuator and reconnecting the power to it I saw that it appeared to work sporadically. I reinstalled it but it wouldn't control the blend door as it was supposed to. I removed it and with the help of a small wrench I was able to easily move the shaft to open the blend door as needed. (I couldn't turn it by hand as I couldn't get a good enough grip with my fingers.
Here is my plan - I am going to drive the car with the actuator removed and set the blend door on the drivers side to full AC as it is nearly AC weather all the time here in Tampa. I hate to purchase a new actuator if it isn't the problem but if any of you can provide an educated guess as to the the actuator being the problem I will do so. (since I'm capable of easily replacing the old one)
I've read the comments on the blend door sticking and was wondering how much effort it should normally take to turn the shaft. Is it so free that I should be able to turn it with my fingers easily. Or is turning it with a wrench "easily" the way it would normally work. If I feel the blend door is OK I'll buy the new actuator and install it.
Thanks to all the help on this thread. Appreciate any advice or help you can provide. Atteboy1
Last edited by atteboy1 on Mon Apr 22, 2013 4:23 pm; edited 1 time in total
atteboy1 Special
Name : Bob Atteberry Location : Florida Joined : 2011-08-13Post Count : 6 Merit : 0
You can adjust the potentiometer as shown in the vid, I think you have a gear broken from the main gear(wheel), I have this issue in almost all of my actuators and most of them (if not all of them) only work in from one side of the Main Gear I have adjusted those already, here is how you should set the main gear after adjustments:
I want to say that with the new scan tool (OTC Genisys 5.0) I recently acquired this task is MUCH MUCH easier as the PCM tells you the "count numbers" of the potentiometer and the "desired counts" when opened or closed. whenever I have the chance I can show you this.
rk0ehn Enthusiast
Name : Christian Rolf Köhn Age : 34 Location : CD Juarez, MX Joined : 2011-08-11Post Count : 148 Merit : 14
Anyway, I took out the center actuator and found out the big gear was cracked.
This is what I meant, the broken gear will pass the blue gear and mess the functionality of the actuator this will just try to go back and forth and eventually stop self-adjusting in the incorrect position.
charlieRobinson Expert
Name : Charlie Age : 38 Location : Toledo, OH Joined : 2011-05-17Post Count : 3922 Merit : 31
Thanks for your replies. I actually opened up the actuator and inspected all the gears and found no broken wheels or teeth. I wasn't really able to understand how the potentiometer worked though.
Atteboy1
rk0ehn Enthusiast
Name : Christian Rolf Köhn Age : 34 Location : CD Juarez, MX Joined : 2011-08-11Post Count : 148 Merit : 14
I reinstalled it but it wouldn't control the blend door as it was supposed to.
how did you determine this? how did it behave? I'm suspecting of a bad wiring some where.
If there is a problem with this actuator (electronically) the "TEMP" numbers should blink indicating a DTC in the HVAC system, but you will need a proper scanner that can read these codes.
Here is some info that it might help:
atteboy1 Special
Name : Bob Atteberry Location : Florida Joined : 2011-08-13Post Count : 6 Merit : 0
I can see you are a good bit more educated about these systems than I. Especially when I see all the flow charts and electrical schematics. Wish I was that I was that informed but I'm not, unfortunately.
But your question was how was I able to reinstall the actuator and determine that it still wasn't working? Well at the time it was about 85 degrees here in tampa, I had the HVAC system set to Auto, and I dialed down the temperature to 70 and got hot air out of the drivers side - still. So I figured it still wasn't opening as needed.
I removed the actuator again, manually opened the blend door and voila, cool air. No electrical knowledge, just go figured.
Atteboy1
charlieRobinson Expert
Name : Charlie Age : 38 Location : Toledo, OH Joined : 2011-05-17Post Count : 3922 Merit : 31
Subject: Re: Write-Up: HVAC Assembly Fri Jun 28, 2013 11:08 am
99Rivman wrote:
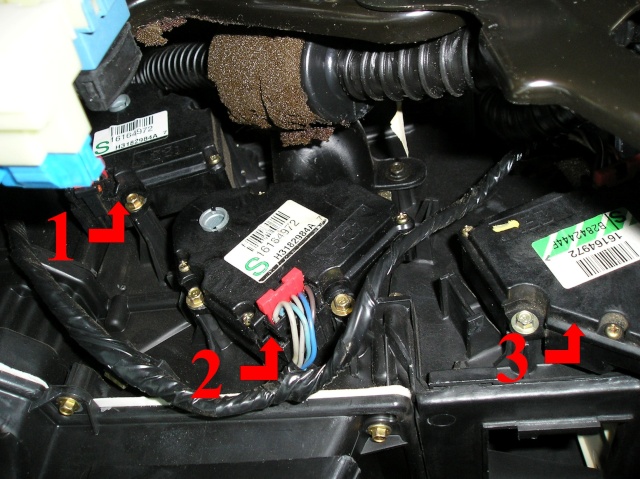
The actuators are listed as follows: 1 Defrost Actuator 2 Mode Actuator 3 Air Mix Actuator
Hot air on the driver's side. Cold on passenger. That means it's #3, right? I'm going to hunt for a new one of these mech boxes and swap it out.
99Rivman Aficionado
Name : Randall Location : North Carolina Joined : 2007-01-16Post Count : 2009 Merit : 89
Subject: Re: Write-Up: HVAC Assembly Sat Jun 29, 2013 7:17 pm
Make sure your system is "fully" charged first, that has been known to be the problem sometimes. These actuators can be taken apart and made to work if that does end up being your problem.
albertj Master
Name : Location : Finger Lakes of New York State Joined : 2007-05-31Post Count : 8598 Merit : 180
Subject: Re: Write-Up: HVAC Assembly Sun Jun 30, 2013 12:29 am
I had hot air drivers side, cold pax side... Turned out to be undercharged system. Over the years the refrigerant seeps out, I was down to 0.3 kg, system takes 0.9 kg.
runs excellent after the recharge.
if you take it to a reputable mechanic it should cost 30 to 50 to check for leaks and a bit maybe 20 to 40 more to refill system.
VJD2 Fanatic
Name : Vinny Location : Connecticut Joined : 2010-02-21Post Count : 310 Merit : 5
Which one of the actuators controls the floor vents? I haven't seen that mentioned in this post unless I missed it. I have defrost and center vent airflow but no flow to the floor. Thanks!
99Rivman Aficionado
Name : Randall Location : North Carolina Joined : 2007-01-16Post Count : 2009 Merit : 89
Which one of the actuators controls the floor vents? I haven't seen that mentioned in this post unless I missed it. I have defrost and center vent airflow but no flow to the floor. Thanks!
I actually believe they all have to work together to get the flow to the right place? I’m not positive and can’t look right now but I think the defrost and A/C doors have to be closed for the air to flow out the floor vents? The figures on previous pages show when it is in A/C mode, I would have to look at the “heat mode” figure to see how they should be positioned? I’ll try and get you something by this weekend.
VJD2 Fanatic
Name : Vinny Location : Connecticut Joined : 2010-02-21Post Count : 310 Merit : 5
Subject: Re: Write-Up: HVAC Assembly Wed Jan 15, 2014 11:18 am
Ya I'm not sure, I was trying to figure it out by looking at all the diagrams posted but nothing gives a clue. I didn't even see them outline a floor vent!
I'd appreciate any help and thanks in advance!
98riv Moderator
Location : USA Joined : 2007-01-14Post Count : 995 Merit : 30
Subject: Re: Write-Up: HVAC Assembly Wed Jan 15, 2014 11:52 am
VJD2 wrote:
Ya I'm not sure, I was trying to figure it out by looking at all the diagrams posted but nothing gives a clue. I didn't even see them outline a floor vent!
I'd appreciate any help and thanks in advance!
You can always watch to see which actuator moves when you change the temperature, etc. Change the temperature to see which actuator moves, then go onto the next option. By process of elimination you should be able to narrow down to which actuator that needs to be inspected.
Name : Joined : 2014-11-23Post Count : 131 Merit : 0
Subject: Re: Write-Up: HVAC Assembly Tue Dec 16, 2014 12:40 am
99Rivman wrote:
The actuators are listed as follows: 1 Defrost Actuator 2 Mode Actuator 3 Air Mix Actuator
After I shut the car off one night I could hear a door motor running back and forth for several minutes. After it stopped I started it back up and the ECC screen was flashing. Either side temperature controls are fine, but all I can get is defrost on any setting. If I set it to mid only I get a tiny bit out of the center vents but still defrost at the same time. Would that be the #1 actuator or the #2? I'm guessing when I heard it running back and forth that the gear cracked and it was trying to adjust and then gave up.
kelliestime2 Special
Name : Kellie Age : 61 Joined : 2012-02-18Post Count : 7 Merit : 0
Having problems just running the vents, air hasn't worked for quite a while. used my heater once a couple of weeks ago and now even on vent if is still pumping what feels like engine hot air through middle vents, under drivers side and drivers door vent. Am I still looking at the actuator scenario? 98 Riviera
EyeDoc1 Enthusiast
Name : Christen Location : Vancouver, WA Joined : 2016-03-30Post Count : 125 Merit : 5
Subject: Plastic ductwork behind center vents...some tips and shared frustration Wed Sep 06, 2017 12:10 am
If you look at page 1 of this posting, you've got some excellent pictures of the 3 drivers side actuators numbered 1, 2, and 3. Number 3 is literally attached to a plastic post on the outside with a metal gate inside the AC unit that allows you to direct heat or cold air to the floor or mid-center vents, while actuator #2 rotates a plastic post (what the actuator actually attaches to) and blends hot and cold air.
That being said, I thought I had an actuator that was non-functional, until I was able to get #2 and #3 actuator disconnected to their "plastic posts" or "gate valves", whatever you want to call them, and I noted they worked perfectly, so I'm at a loss to explain why my passenger's side AC is cold, and driver's side lukewarm. I bought a can of R-134, gave it a shot, and now everything is right with the world--I think. Maybe I just wasted a day of my life trying to fix something that really had its problem elsewhere. Anyway, you yourself can clearly watch the actuators moving throughout their ranges once disconnected from the AC box, but connected via their wiring. Removing the two hold down screws and letting the actuators hang freely allows you to observe them moving thru their full ranges of motion when you make changes to the HVAC control panel by having a second person manipulate the buttons...and do it in manual mode. Turns out mine were fine.
If you look at picture #1 in the first posting by Rivman, you can see all the actuators AFTER the duct work was removed (and IMHO, about the only way you're gonna get decent access to the actuators--but it comes at a cost). The lower picture shows the duct work intact. Clearly the first photo was taken AFTER the duct work was removed in picture #2. And the caption seemed to indicate that some idiot had left the ductwork out...and now I know why. Read on....
Simply put? In a little noticed memo, GM secretly hired ISIS to coordinate with Beelzebub to design the Riveria's duct work. Lot of question on "how do you remove the duct work" and secondly, (and not asked), how do you reinstall it? The first question seems to give erroneous advice to just "pull on it", as it's plastic and it won't break. Au contraire. I broke mine. If you want to remove that piece of duct work, it might be better to pull the ductwork straight down instead of being Schwartzenegger and pulling toward you, which is logical once you remove the ductwork and look how Satan installed it. That duct work has two tabs that fit into slots, and one plastic hook arrangement that looks to best be removed by jiggling it downward or pushing down--and I'm guessing straight down. Once you get it out, you'll find you have access to all 3 actuators easy peasy, just like shown in the first posted picture. One other thing is you might want to have that picture on your phone when working under the dash as it helped a lot to reorient the actuator in order to slide the plastic post into the metal housing on the actuator.
Of course, nobody mentioned how you're gonna get that ductwork all back together again. And there's the rub.
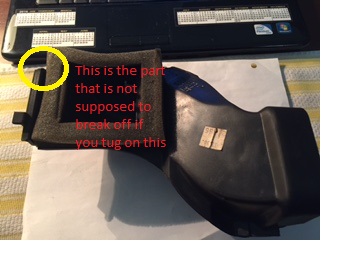
I'm a fair mechanic but a heck of a part changer. Getting it all back together is probably going to require me to remove the console. There...I said it. More work. I just cannot get the tabs to align (even though I only have ONE tab, not two) and push the duct work straight up (north-12 o'clock) for nothing. Again, the devil was sitting on the designer's shoulder just waiting for me, in the year of our Lord 2017 to attempt this and fail or get so frustrated that you want to just LEAVE THE PART OFF...which is apparently what happened to RivMan when he noted the part was missing. "No sh*t Sherlock...it's damned near impossible to remount the damned thing". If it ever was warranty work and the poor Buick mechanic was faced with this vs. the flat rate manual, plus the poor reimbursement for warranty work, I'm not surprised the part was left off. Here are some photos of the part.
I'm not very savvy at the photo thing, so I hope these upload. I'm going to try tomorrow and see if I can get the ductwork back together without pulling the console to have enough room to "do it right". Might be able to enlighten fellow Riviera owners. And time for me to order myself a pair of glasses with a bifocal segment at the top and on the bottom of the lens. They are call "Double D's" and if you ask your local optician to "see something in a 'double D', you're likely to get a weird look. Just go to a private eye doctor. They know what this specialty eyeglass lens is and it used by guys who work upside down or do overhead work, like muffler and brake guys, overhead instrument operators (think pilots), and electricians and sometimes carpenters. I should post a picture for this seldom used specialty eyeglass lens that few know about, and therefore, never ask. I think it was Donald Rumsfeld that famously said "you don't know what you don't know". Words to live by.