| | Write-Up: HVAC Assembly |  |
|
+33Jack the R TampaRivGuy 71stagegs EyeDoc1 kelliestime2 1997riv VJD2 atteboy1 Karma 96riv Tajis charlieRobinson Ridin-Rivi stan LARRY70GS 98riv rk0ehn AA VegasScott turtleman Jason moldymac Abaddon Eldo T Riley 96RIVMANN superivicharg Rickw 98RIV7777 albertj captshiner deekster_caddy 99Rivman 37 posters |
|
| Author | Message |
|---|
charlieRobinson
Expert

Name : Charlie
Age : 38
Location : Toledo, OH
Joined : 2011-05-17
Post Count : 3922
Merit : 31
| | Subject: Re: Write-Up: HVAC Assembly Fri Jun 28, 2013 11:08 am | |
| - 99Rivman wrote:
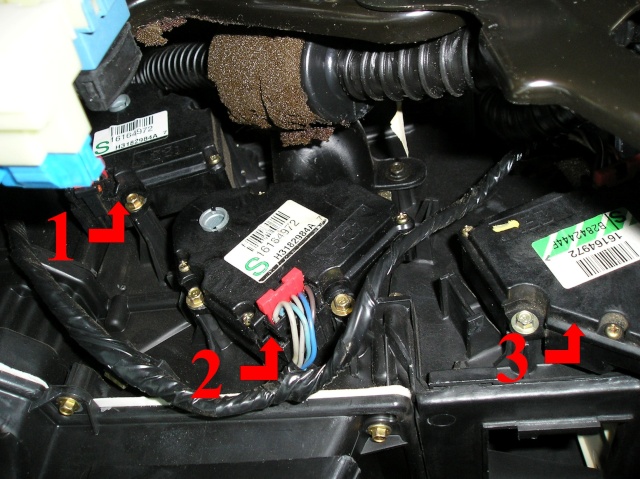
The actuators are listed as follows:
1 Defrost Actuator
2 Mode Actuator
3 Air Mix Actuator
Hot air on the driver's side. Cold on passenger. That means it's #3, right? I'm going to hunt for a new one of these mech boxes and swap it out. | |
|
| | |
99Rivman
Aficionado

Name : Randall
Location : North Carolina
Joined : 2007-01-16
Post Count : 2009
Merit : 89
| | Subject: Re: Write-Up: HVAC Assembly Sat Jun 29, 2013 7:17 pm | |
| Make sure your system is "fully" charged first, that has been known to be the problem sometimes. These actuators can be taken apart and made to work if that does end up being your problem. | |
|
| | |
albertj
Master

Name :
Location : Finger Lakes of New York State
Joined : 2007-05-31
Post Count : 8598
Merit : 180
| | Subject: Re: Write-Up: HVAC Assembly Sun Jun 30, 2013 12:29 am | |
| I had hot air drivers side, cold pax side... Turned out to be undercharged system. Over the years the refrigerant seeps out, I was down to 0.3 kg, system takes 0.9 kg.
runs excellent after the recharge.
if you take it to a reputable mechanic it should cost 30 to 50 to check for leaks and a bit maybe 20 to 40 more to refill system. | |
|
| | |
VJD2
Fanatic

Name : Vinny
Location : Connecticut
Joined : 2010-02-21
Post Count : 310
Merit : 5
| | Subject: Re: Write-Up: HVAC Assembly Mon Jan 13, 2014 7:53 pm | |
| Which one of the actuators controls the floor vents? I haven't seen that mentioned in this post unless I missed it. I have defrost and center vent airflow but no flow to the floor. Thanks! | |
|
| | |
99Rivman
Aficionado
Name : Randall
Location : North Carolina
Joined : 2007-01-16
Post Count : 2009
Merit : 89
| | Subject: Re: Write-Up: HVAC Assembly Tue Jan 14, 2014 5:21 pm | |
| - VJD2 wrote:
- Which one of the actuators controls the floor vents? I haven't seen that mentioned in this post unless I missed it. I have defrost and center vent airflow but no flow to the floor. Thanks!
I actually believe they all have to work together to get the flow to the right place? I’m not positive and can’t look right now but I think the defrost and A/C doors have to be closed for the air to flow out the floor vents? The figures on previous pages show when it is in A/C mode, I would have to look at the “heat mode” figure to see how they should be positioned? I’ll try and get you something by this weekend. | |
|
| | |
VJD2
Fanatic
Name : Vinny
Location : Connecticut
Joined : 2010-02-21
Post Count : 310
Merit : 5
| | Subject: Re: Write-Up: HVAC Assembly Wed Jan 15, 2014 11:18 am | |
| Ya I'm not sure, I was trying to figure it out by looking at all the diagrams posted but nothing gives a clue. I didn't even see them outline a floor vent!
I'd appreciate any help and thanks in advance! | |
|
| | |
98riv
Moderator
Location : USA
Joined : 2007-01-14
Post Count : 995
Merit : 30
| | Subject: Re: Write-Up: HVAC Assembly Wed Jan 15, 2014 11:52 am | |
| - VJD2 wrote:
- Ya I'm not sure, I was trying to figure it out by looking at all the diagrams posted but nothing gives a clue. I didn't even see them outline a floor vent!
I'd appreciate any help and thanks in advance! You can always watch to see which actuator moves when you change the temperature, etc. Change the temperature to see which actuator moves, then go onto the next option. By process of elimination you should be able to narrow down to which actuator that needs to be inspected.
_________________
1998 Supercharged Riviera - Custom CAI, Alpine spx-13ref, Infinity 6x9's, Alpine 4 Channel Amp, Kicker KX3, Silverstars, STB, Hawk Brake Pads, Monroe Air Shocks, KYB GR2
| |
|
| | |
1997riv
Enthusiast
Name :
Joined : 2014-11-23
Post Count : 131
Merit : 0
| | Subject: Re: Write-Up: HVAC Assembly Tue Dec 16, 2014 12:40 am | |
| - 99Rivman wrote:
The actuators are listed as follows:
1 Defrost Actuator
2 Mode Actuator
3 Air Mix Actuator
After I shut the car off one night I could hear a door motor running back and forth for several minutes. After it stopped I started it back up and the ECC screen was flashing. Either side temperature controls are fine, but all I can get is defrost on any setting. If I set it to mid only I get a tiny bit out of the center vents but still defrost at the same time. Would that be the #1 actuator or the #2? I'm guessing when I heard it running back and forth that the gear cracked and it was trying to adjust and then gave up. | |
|
| | |
kelliestime2
Special
Name : Kellie
Age : 61
Joined : 2012-02-18
Post Count : 7
Merit : 0
| | Subject: Re: Write-Up: HVAC Assembly Sun Sep 27, 2015 12:25 pm | |
| Having problems just running the vents, air hasn't worked for quite a while. used my heater once a couple of weeks ago and now even on vent if is still pumping what feels like engine hot air through middle vents, under drivers side and drivers door vent. Am I still looking at the actuator scenario? 98 Riviera | |
|
| | |
EyeDoc1
Enthusiast
Name : Christen
Location : Vancouver, WA
Joined : 2016-03-30
Post Count : 125
Merit : 5
| | Subject: Plastic ductwork behind center vents...some tips and shared frustration Wed Sep 06, 2017 12:10 am | |
| If you look at page 1 of this posting, you've got some excellent pictures of the 3 drivers side actuators numbered 1, 2, and 3. Number 3 is literally attached to a plastic post on the outside with a metal gate inside the AC unit that allows you to direct heat or cold air to the floor or mid-center vents, while actuator #2 rotates a plastic post (what the actuator actually attaches to) and blends hot and cold air. That being said, I thought I had an actuator that was non-functional, until I was able to get #2 and #3 actuator disconnected to their "plastic posts" or "gate valves", whatever you want to call them, and I noted they worked perfectly, so I'm at a loss to explain why my passenger's side AC is cold, and driver's side lukewarm. I bought a can of R-134, gave it a shot, and now everything is right with the world--I think. Maybe I just wasted a day of my life trying to fix something that really had its problem elsewhere. Anyway, you yourself can clearly watch the actuators moving throughout their ranges once disconnected from the AC box, but connected via their wiring. Removing the two hold down screws and letting the actuators hang freely allows you to observe them moving thru their full ranges of motion when you make changes to the HVAC control panel by having a second person manipulate the buttons...and do it in manual mode. Turns out mine were fine. If you look at picture #1 in the first posting by Rivman, you can see all the actuators AFTER the duct work was removed (and IMHO, about the only way you're gonna get decent access to the actuators--but it comes at a cost). The lower picture shows the duct work intact. Clearly the first photo was taken AFTER the duct work was removed in picture #2. And the caption seemed to indicate that some idiot had left the ductwork out...and now I know why. Read on.... Simply put? In a little noticed memo, GM secretly hired ISIS to coordinate with Beelzebub to design the Riveria's duct work. Lot of question on "how do you remove the duct work" and secondly, (and not asked), how do you reinstall it? The first question seems to give erroneous advice to just "pull on it", as it's plastic and it won't break. Au contraire. I broke mine. If you want to remove that piece of duct work, it might be better to pull the ductwork straight down instead of being Schwartzenegger and pulling toward you, which is logical once you remove the ductwork and look how Satan installed it. That duct work has two tabs that fit into slots, and one plastic hook arrangement that looks to best be removed by jiggling it downward or pushing down--and I'm guessing straight down. Once you get it out, you'll find you have access to all 3 actuators easy peasy, just like shown in the first posted picture. One other thing is you might want to have that picture on your phone when working under the dash as it helped a lot to reorient the actuator in order to slide the plastic post into the metal housing on the actuator. Of course, nobody mentioned how you're gonna get that ductwork all back together again. And there's the rub. I'm a fair mechanic but a heck of a part changer. Getting it all back together is probably going to require me to remove the console. There...I said it. More work. I just cannot get the tabs to align (even though I only have ONE tab, not two) and push the duct work straight up (north-12 o'clock) for nothing. Again, the devil was sitting on the designer's shoulder just waiting for me, in the year of our Lord 2017 to attempt this and fail or get so frustrated that you want to just LEAVE THE PART OFF...which is apparently what happened to RivMan when he noted the part was missing. "No sh*t Sherlock...it's damned near impossible to remount the damned thing". If it ever was warranty work and the poor Buick mechanic was faced with this vs. the flat rate manual, plus the poor reimbursement for warranty work, I'm not surprised the part was left off. Here are some photos of the part.  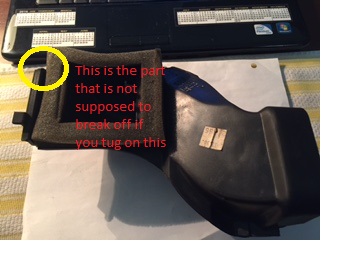 I'm not very savvy at the photo thing, so I hope these upload. I'm going to try tomorrow and see if I can get the ductwork back together without pulling the console to have enough room to "do it right". Might be able to enlighten fellow Riviera owners. And time for me to order myself a pair of glasses with a bifocal segment at the top and on the bottom of the lens. They are call "Double D's" and if you ask your local optician to "see something in a 'double D', you're likely to get a weird look. Just go to a private eye doctor. They know what this specialty eyeglass lens is and it used by guys who work upside down or do overhead work, like muffler and brake guys, overhead instrument operators (think pilots), and electricians and sometimes carpenters. I should post a picture for this seldom used specialty eyeglass lens that few know about, and therefore, never ask. I think it was Donald Rumsfeld that famously said "you don't know what you don't know". Words to live by. | |
|
| | |
EyeDoc1
Enthusiast
Name : Christen
Location : Vancouver, WA
Joined : 2016-03-30
Post Count : 125
Merit : 5
| | Subject: Re: Write-Up: HVAC Assembly Fri Sep 08, 2017 1:21 am | |
| OK...actually 48 hours went by and happy to say that I was able to get the ductwork back together WITHOUT resorting to removing the console. Have broken off one plastic tab on the ductwork actually made it easier to re-install, as I only had to push down on the slot on the upper part of the pre-existing ductwork to slide the tab into place and then push up on everything to seat the clip. Took about six minutes of laboriously working my hands around a very tight spot, but it can be done. I recommend putting the seatback all the way down, get an old pillow for your head or take 3 ibuprofen from the back-neck strain you're gonna be feeling later. Once you get the piece of ductwork back into place, you can then install the other piece of ductwork that's about a foot long and one side has that corrugated rectangular shape and that's a breeze compared to the other.
In fact, avoid taking the console apart at all costs, as I sure as heck broke the plastic tabs that hold the ashtray in, so that another junkyard piece I'll need to get...down the road.
Looks like the weekend will be made for a intake manifold gasket replacement on the firewall side. Always something.
Christen | |
|
| | |
98riv
Moderator
Location : USA
Joined : 2007-01-14
Post Count : 995
Merit : 30
| | Subject: Re: Write-Up: HVAC Assembly Fri Sep 08, 2017 7:19 am | |
| Thanks for the info. I had a similar problem a month or so ago with my AC. My AC also needed to be charged. Weird how it will still blow cold on the passenger side and not the drivers with a low charge.
I had taken out the center console this winter to fix the cracked wood around the shifter and I also encountered the same broken clips on the ash tray. It's a bad design as the plastic isn't thick enough to be pulled on. It also doesn't help that my car is almost 20 years old. I just put some hot glue on the back of the pieces to keep it from rattling, so I didn't need to buy another one. I don't use the ash tray anyway. I also had to fix a couple of cracked plastic pieces in the center console with some epoxy, fiberglass tape and some nails for added strength.
_________________
1998 Supercharged Riviera - Custom CAI, Alpine spx-13ref, Infinity 6x9's, Alpine 4 Channel Amp, Kicker KX3, Silverstars, STB, Hawk Brake Pads, Monroe Air Shocks, KYB GR2
| |
|
| | |
71stagegs
Enthusiast

Name : steve
Age : 71
Location : L.I NY
Joined : 2008-03-09
Post Count : 189
Merit : 2
| | Subject: Re: Write-Up: HVAC Assembly Thu Dec 07, 2017 2:22 pm | |
| Putting in a new actuator cant line up the shaft in the hvac with the new part it does not turn it is set all the way to 1 side should a new one  be in the middle position thx for help steve | |
|
| | |
albertj
Master
Name :
Location : Finger Lakes of New York State
Joined : 2007-05-31
Post Count : 8598
Merit : 180
| | Subject: Re: Write-Up: HVAC Assembly Fri Dec 08, 2017 11:35 am | |
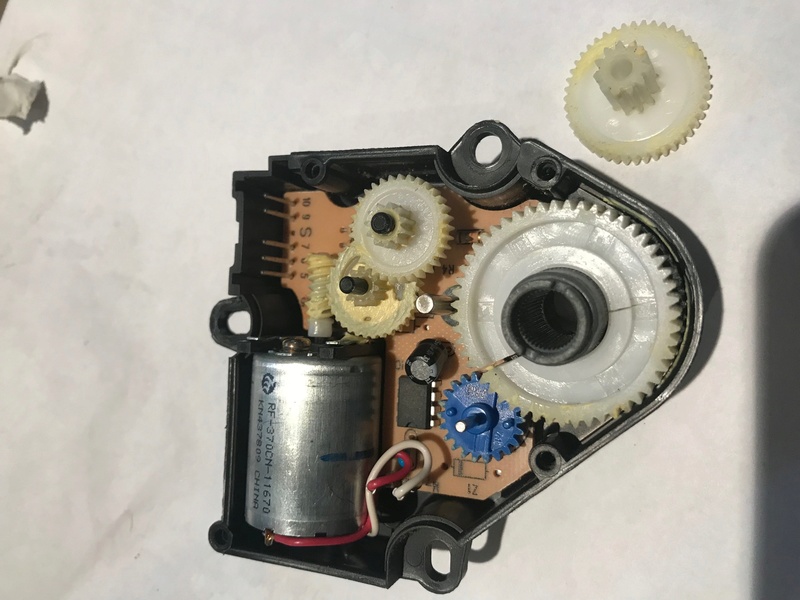
| Inside the actuator is a synchronous motor (moves exactly some distance given certain voltage input over certain time, think analog clock) and some gears.
What worked for me: I opened the actuator (look at it real hard, you'll figure out how the case unsnaps) and reposition the gears so you can install it. When you get things back together, cycle the HVAC (not too quickly) through all the air flow and temperature settings to allow the actuators to correctly reposition. Nervous about this? I don't blame you -- just open a *broken* one first, to see how it all goes together.
Last edited by albertj on Sat Dec 09, 2017 10:29 pm; edited 1 time in total | |
|
| | |
71stagegs
Enthusiast
Name : steve
Age : 71
Location : L.I NY
Joined : 2008-03-09
Post Count : 189
Merit : 2
| |
| | |
albertj
Master
Name :
Location : Finger Lakes of New York State
Joined : 2007-05-31
Post Count : 8598
Merit : 180
| | Subject: Re: Write-Up: HVAC Assembly Sat Dec 09, 2017 10:52 pm | |
| The actuator you pictured has a broken gear around the large black plastic hub. It will *probably* work once assembled as-is but only until the gear breaks someplace else, which it will pretty soon. I had an actuator I "repaired" but did not have an extra large gear like that so I put it back together with a gear that looked pretty much like what you have pictured. It worked for a while, I am thinking 5 months, but I had to repair it again because it finally failed, the big gear split and came off the hub.
OK, so here's the cool thing -- GM's got great engineering but not so much variation when it comes to hard parts like this. If you get any of their similar HVAC actuators and open them you will find similar - most likely identical - gears inside.
At a pick-and-pull, either at the entrance desk or customer service or what have you they will usually look up the cars for you that have the same or similar actuators you can pull from. A bunch of cars match up to one or another of the Riv actuators. So... you let them give you the list and hopefully the places those cars are in the lot and you just pull the actuators off the ones that are not too hard to get to. They are so cheap at the yards you can pull several and you'll most likely get the parts you need, and now that you know how to open them you can pop them apart in the yard and check...
The other thing you can do is get *just about any* of the older (mid 80's-mid '90s) GM actuators, the older ones had metal gears and those metal gears never really did break. You can swap many of the metal gears into your actuators with good motors/bad gears and wha-la, you have ready-to-use repaired actuators. It will take some guesswork to find the cars that have actuators with metal gears. Thinking about it, I wonder if I pulled actuators off cars older than what's listed on the Hollander. I don't recall. Also it occurs to me that someone with the right skills and equipment could *3D print* those gears.
Last edited by albertj on Fri Aug 30, 2019 8:51 am; edited 2 times in total | |
|
| | |
71stagegs
Enthusiast
Name : steve
Age : 71
Location : L.I NY
Joined : 2008-03-09
Post Count : 189
Merit : 2
| | Subject: Re: Write-Up: HVAC Assembly Sun Dec 10, 2017 11:13 am | |
| | |
|
| | |
albertj
Master
Name :
Location : Finger Lakes of New York State
Joined : 2007-05-31
Post Count : 8598
Merit : 180
| | Subject: Re: Write-Up: HVAC Assembly Mon Dec 11, 2017 12:29 am | |
| - 71stagegs wrote:
- Thx for the tips
You're welcome. I found working on the HVAC to be a bit much and don't mind sharing what I learned. Sitting on my head under the dash was fun for my spouse to watch and not fun at all to do. And those controllers... once you take a good look inside, they are not tough to fix. | |
|
| | |
71stagegs
Enthusiast
Name : steve
Age : 71
Location : L.I NY
Joined : 2008-03-09
Post Count : 189
Merit : 2
| | Subject: Re: Write-Up: HVAC Assembly Mon Dec 11, 2017 10:09 am | |
| LOL I took the seat out takes 10 minutes when u lay down you can get your head in there still a nightmare | |
|
| | |
71stagegs
Enthusiast
Name : steve
Age : 71
Location : L.I NY
Joined : 2008-03-09
Post Count : 189
Merit : 2
| | Subject: Re: Write-Up: HVAC Assembly Wed Dec 13, 2017 8:12 pm | |
| I got heat! put all 3 in today all the air flow directions work #3 in pic is rough the front bolt is a nightmare u need a universal and long extension to get it out then trying to start it is crazy I took it back out and put some clay around bolt and reinstalled it and the bolt stayed there then u have to get the universal going to get it started but at lease its in position.I took my seat out only way I could get in there.Rock Auto had Delco's for $75 I'm going to do r/s next I'm sure they are cracked too. those r over a $100 | |
|
| | |
albertj
Master
Name :
Location : Finger Lakes of New York State
Joined : 2007-05-31
Post Count : 8598
Merit : 180
| | Subject: Re: Write-Up: HVAC Assembly Wed Dec 13, 2017 9:08 pm | |
| - 71stagegs wrote:
- I got heat! put all 3 in today all the air flow directions work #3 in pic is rough the front bolt is a nightmare u need a universal and long extension to get it out then trying to start it is crazy I took it back out and put some clay around bolt and reinstalled it and the bolt stayed there then u have to get the universal going to get it started but at lease its in position.I took my seat out only way I could get in there.Rock Auto had Delco's for $75 I'm going to do r/s next I'm sure they are cracked too. those r over a $100
...again, I've had good luck with junkyard pulls. I suspect the ones with plastic gears had already been replaced in the donor cars, and so were not that old. | |
|
| | |
TampaRivGuy
Rookie
Name : TampaRivGuy
Joined : 2019-02-19
Post Count : 14
Merit : 0
| | Subject: Re: Write-Up: HVAC Assembly Wed Apr 03, 2019 8:47 am | |
| - VegasScott wrote:
- 99Rivman wrote:
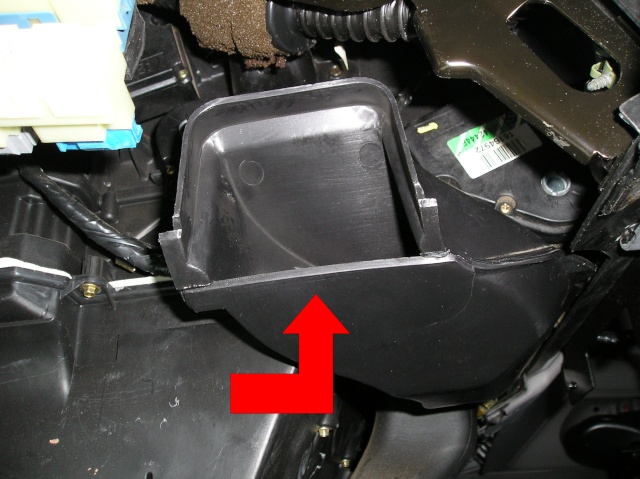
This is the vent part that someone had removed!
Anybody know how to remove that piece he is refering too?
My console is still in the car, and I don't want to take it out if I don't have to.
Thanks,
VegasScott How do you get this duct out? | |
|
| | |
LARRY70GS
Aficionado

Name : Larry
Age : 67
Location : Oakland Gardens, NY
Joined : 2007-01-23
Post Count : 2184
Merit : 149
| | Subject: Re: Write-Up: HVAC Assembly Wed Aug 28, 2019 1:10 pm | |
| I've had a problem with my HVAC system for awhile. With temperature set to minimum (60*), the air on the driver's side and center vents is noticeably warmer than the air coming out of the 4 passenger side IP vents. It isn't warm or even hot, just warmer than what comes out of the 4 passenger side (round ) vents. The passenger side vents are nice and cold, it's just the driver's side. That has to be one of the 3 actuators on the driver's side I'd think. Anyone know which one? Also, I have the same question as VegasScott and TampaRivGuy in the post above this one, how do you get the vent piece (pictured) out? Does it pull out? It blocks access to the actuators.
_________________
98 Riviera SC3800 All stock except gutted air box.
1970 Buick GS455 Stage1, TSP built 470BBB, 602HP/589TQ
Best MPH, 116.06 MPH, Best ET, 11.54
https://www.youtube.com/watch?v=UHCda-t_Jls
https://www.youtube.com/watch?v=sfT2tEO4XcU
| |
|
| | |
Jack the R
Master

Joined : 2007-01-16
Post Count : 8057
Merit : 105
| | Subject: Re: Write-Up: HVAC Assembly Wed Aug 28, 2019 9:42 pm | |
| All I can remember about that vent is that I broke a tab pulling mine, but when I had it out I figured out how to do it without breaking anything. But that was so long ago, I remember nothing more. I've noticed no ill effects from the broken tab though. | |
|
| | |
albertj
Master
Name :
Location : Finger Lakes of New York State
Joined : 2007-05-31
Post Count : 8598
Merit : 180
| | Subject: Re: Write-Up: HVAC Assembly Thu Aug 29, 2019 12:26 pm | |
| - LARRY70GS wrote:
- I've had a problem with my HVAC system for awhile. With temperature set to minimum (60*), the air on the driver's side and center vents is noticeably warmer than the air coming out of the 4 passenger side IP vents. It isn't warm or even hot, just warmer than what comes out of the 4 passenger side (round ) vents. The passenger side vents are nice and cold, it's just the driver's side. That has to be one of the 3 actuators on the driver's side I'd think. Anyone know which one? Also, I have the same question as VegasScott and TampaRivGuy in the post above this one, how do you get the vent piece (pictured) out? Does it pull out? It blocks access to the actuators.
Double check the setting of the passenger temp control on the passenger door. The big gear in the drivers side blend door actuator is probably wack. What worked for me was to pull the actuators, it's not that bad once you get to the first ones, and open them and check the gears. You can overhaul them with junkyard parts *or* Dorman now packages gear kits for rebuilding the actuators *or* just do a search on eBay or Amazon and replacement gears will appear. I don't remember how to get that vent piece out but there was something in the factory service manual. I don't remember having to get the vent piece out to work on the actuators. | |
|
| | |
Sponsored content
| | Subject: Re: Write-Up: HVAC Assembly | |
| |
|
| | |
| | Write-Up: HVAC Assembly | |
|