Riv Performance
Would you like to react to this message? Create an account in a few clicks or log in to continue.

The 8th Gen Riviera Resource
 
HomeDashboardLatest imagesSearchRiviera Questions & AnswersWrite-Ups IndexRegisterRelated LinksLog in


 Write-Up: Installing SLP Exhaust Headers

Go down 
+24
VJD2
Rickw
crlombardi69
Abaddon
98RIV7777
captshiner
Michael
ibmoses
Chicken
Supercharged
ewolfe0050
1998 Riv
dezorro
97rivman
dreww
turtleman
SpaceBar
deekster_caddy
98riv
Jason
Mr.Riviera
urbsnspices
AA
T Riley
28 posters
Go to page : 1, 2, 3, 4, 5, 6, 7  Next
AuthorMessage
T Riley
Guru
T Riley


Name : Travis
Age : 34
Location : Minnesconsin
Joined : 2007-02-08
Post Count : 5127
Merit : 10

Write-Up: Installing SLP Exhaust Headers Empty
PostSubject: Write-Up: Installing SLP Exhaust Headers   Write-Up: Installing SLP Exhaust Headers EmptyThu Feb 08, 2007 10:40 pm

??????????????????????????
Back to top Go down
http://www.rivperformance.com
AA
Administrator
AA


Name : Aaron
Age : 47
Location : C-bus, Ohio
Joined : 2007-01-13
Post Count : 18452
Merit : 252

Write-Up: Installing SLP Exhaust Headers Empty
PostSubject: Re: Write-Up: Installing SLP Exhaust Headers   Write-Up: Installing SLP Exhaust Headers EmptyThu Feb 08, 2007 11:45 pm

Step one: Soak all manifold studs with PB Blaster a few days before removal. Hit the bolts on the downpipe and the 02 sensor, too. Spray again every day until you go to break them loose.

Next: Spray 3 hours before you start the job. Lift car onto stands. Break bolts loose evenly, the manifold should slip out with some wiggling. Can remove the O2 after you have it all out.

What are you planning to do?

_________________
'05 GTO 6.0L • 6-spd • 95k miles • 0-60: 4.8s • 16.9 avg MPG • Nelson Ledges Lap: 1:26

'95 Celica GT 2.2L • 5-spd • 165k miles • 0-60: yes

'98 SC Riviera • 281k miles • 298 HP/370 TQ • 0-60: 5.79s • ET: 13.97 @ 99.28 • 4087 lb • 20.1 avg MPG • Nelson Ledges Lap: 1:30
3.4" pulley • AL104 plugs • 180º t-stat • FWI w/K&N • 1.9:1 rockers • OR pushrods • LS6 valve springs • SLP headers • ZZP fuel rails
KYB GR2 struts • MaxAir shocks • Addco sway bars • UMI bushings • GM STB • Enkei 18" EV5s w/ Dunlop DZ101s • F-body calipers
EBC bluestuff/Hawk HP plus • SS lines • Brembo slotted discs • DHP tuned • Aeroforce • Hidden Hitch

^^^ SOLD ^^^ frown

'70 Ninety-Eight Holiday Coupe 455cid • 116k miles
^^^ SOLD ^^^ frown
Back to top Go down
http://www.cardomain.com/ride/657082/4
T Riley
Guru
T Riley


Name : Travis
Age : 34
Location : Minnesconsin
Joined : 2007-02-08
Post Count : 5127
Merit : 10

Write-Up: Installing SLP Exhaust Headers Empty
PostSubject: Re: Write-Up: Installing SLP Exhaust Headers   Write-Up: Installing SLP Exhaust Headers EmptyThu Feb 08, 2007 11:47 pm

AA wrote:
Step one: Soak all manifold studs with PB Blaster a few days before removal. Hit the bolts on the downpipe and the 02 sensor, too. Spray again every day until you go to break them loose.

Spray 3 hours before you start the job. Lift car onto stands. Break bolts looses evenly, the manifold should slip out fairly easily. Can remove the O2 after you have it out

What are you planning to do?
paint them and possibly install headers ........ i can get the rear manifold out without doing anything to the engine mounts do i take the rear one out from underneath the car????????
Back to top Go down
http://www.rivperformance.com
AA
Administrator
AA


Name : Aaron
Age : 47
Location : C-bus, Ohio
Joined : 2007-01-13
Post Count : 18452
Merit : 252

Write-Up: Installing SLP Exhaust Headers Empty
PostSubject: Re: Write-Up: Installing SLP Exhaust Headers   Write-Up: Installing SLP Exhaust Headers EmptyThu Feb 08, 2007 11:57 pm

Yep, you'll have to go underneath. Be sure to use stands. The rear mani slides out to the rear. No mounts or cradle bolts need to be loosened. The hardest part is loosening the studs.

To my knowledge, SLP headers are the only ones used successfully on the Riv. Not saying other brands won't work... but no way to be sure until someone tries.

_________________
'05 GTO 6.0L • 6-spd • 95k miles • 0-60: 4.8s • 16.9 avg MPG • Nelson Ledges Lap: 1:26

'95 Celica GT 2.2L • 5-spd • 165k miles • 0-60: yes

'98 SC Riviera • 281k miles • 298 HP/370 TQ • 0-60: 5.79s • ET: 13.97 @ 99.28 • 4087 lb • 20.1 avg MPG • Nelson Ledges Lap: 1:30
3.4" pulley • AL104 plugs • 180º t-stat • FWI w/K&N • 1.9:1 rockers • OR pushrods • LS6 valve springs • SLP headers • ZZP fuel rails
KYB GR2 struts • MaxAir shocks • Addco sway bars • UMI bushings • GM STB • Enkei 18" EV5s w/ Dunlop DZ101s • F-body calipers
EBC bluestuff/Hawk HP plus • SS lines • Brembo slotted discs • DHP tuned • Aeroforce • Hidden Hitch

^^^ SOLD ^^^ frown

'70 Ninety-Eight Holiday Coupe 455cid • 116k miles
^^^ SOLD ^^^ frown
Back to top Go down
http://www.cardomain.com/ride/657082/4
T Riley
Guru
T Riley


Name : Travis
Age : 34
Location : Minnesconsin
Joined : 2007-02-08
Post Count : 5127
Merit : 10

Write-Up: Installing SLP Exhaust Headers Empty
PostSubject: thanks   Write-Up: Installing SLP Exhaust Headers EmptyThu Feb 08, 2007 11:59 pm

AA wrote:
Yep, you'll have to go underneath. Be sure to use stands. The rear slides out to the rear. No mounts or cradle bolts need to be loosened. The hardest part is loosening the studs.
wow i feel alot more confident about doing the install of headers so do u think with headers i wil be able to rund the 3.4 inch pulley i was talking about >>> i have the cai and straight exhaust!!
Back to top Go down
http://www.rivperformance.com
AA
Administrator
AA


Name : Aaron
Age : 47
Location : C-bus, Ohio
Joined : 2007-01-13
Post Count : 18452
Merit : 252

Write-Up: Installing SLP Exhaust Headers Empty
PostSubject: Re: Write-Up: Installing SLP Exhaust Headers   Write-Up: Installing SLP Exhaust Headers EmptyFri Feb 09, 2007 3:47 am


_________________
'05 GTO 6.0L • 6-spd • 95k miles • 0-60: 4.8s • 16.9 avg MPG • Nelson Ledges Lap: 1:26

'95 Celica GT 2.2L • 5-spd • 165k miles • 0-60: yes

'98 SC Riviera • 281k miles • 298 HP/370 TQ • 0-60: 5.79s • ET: 13.97 @ 99.28 • 4087 lb • 20.1 avg MPG • Nelson Ledges Lap: 1:30
3.4" pulley • AL104 plugs • 180º t-stat • FWI w/K&N • 1.9:1 rockers • OR pushrods • LS6 valve springs • SLP headers • ZZP fuel rails
KYB GR2 struts • MaxAir shocks • Addco sway bars • UMI bushings • GM STB • Enkei 18" EV5s w/ Dunlop DZ101s • F-body calipers
EBC bluestuff/Hawk HP plus • SS lines • Brembo slotted discs • DHP tuned • Aeroforce • Hidden Hitch

^^^ SOLD ^^^ frown

'70 Ninety-Eight Holiday Coupe 455cid • 116k miles
^^^ SOLD ^^^ frown
Back to top Go down
http://www.cardomain.com/ride/657082/4
urbsnspices
Fanatic
urbsnspices


Location : CHICAGO, US of MFn America
Joined : 2007-02-08
Post Count : 336
Merit : 4

Write-Up: Installing SLP Exhaust Headers Empty
PostSubject: Re: Write-Up: Installing SLP Exhaust Headers   Write-Up: Installing SLP Exhaust Headers EmptyFri Feb 09, 2007 7:46 am

TOG headers also fit on the riv. You still have to get the flex joint and o2 bung welded in.
Back to top Go down
AA
Administrator
AA


Name : Aaron
Age : 47
Location : C-bus, Ohio
Joined : 2007-01-13
Post Count : 18452
Merit : 252

Write-Up: Installing SLP Exhaust Headers Empty
PostSubject: Write-Up: Installing SLP Exhaust Headers   Write-Up: Installing SLP Exhaust Headers EmptyTue Feb 27, 2007 1:02 am

Installing SLP Exhaust Headers

Although not perfect, the SC Riviera has a pretty good exhaust system for an OEM set-up. From the engine, exhaust gases flow into a pair of cast iron manifolds, through a 2.5" down pipe, a catalytic converter, resonator, a few feet of 2.25" straight, and finally a T-split to dual 1.875" pipes, two mufflers, and oval tips. Not ideal, but better than your average car.

For running CAI and SC pulleys down to 3.4", you can get away with using a completely stock exhaust system if you tune for extra fuel. Even high-lift rockers can be ran with a stock exhaust, but this is where you begin to see some limitation in output. As you increase air flow to the engine, the exhaust now becomes the restrictive area. A larger diameter down pipe and/or a set of PEMs (ported exhaust manifolds) will help by letting out more air to lower boost somewhat, so you can expect a some reduction in KR. But larger down pipes and PEMs can only do so much. If you're planning to seriously modify your car, exhaust headers may be a better choice.

Headers increase exhaust flow in two ways. First, tube diameters up to the catalytic converter are increased. The 3" diameter flex-pipe used with SLP headers, for example, replaces the 2.5" OEM down pipe. 1.625" header primaries have a larger combined volume than the stock manis. Bigger pipes flow more air, and this is most important near the engine where exhaust gases are hotter and faster-moving than downstream. Another way headers improve exhaust flow is by spacing out the arrival time of each cylinder's exhaust pulses so they don't interfere with one another, reducing back pressure in the system. You cannot get this benefit by porting/polishing a stock manifold. This is the limitation of using PEMs.

Do you need headers? If you want to go as far as installing a cam, the answer is probably yes. With all the extra air flowing through the engine, you'll need a way to let it out. Even if you're not planning a cam, headers will improve the performance of an engine with high-lift rockers, though not quite as much. If you only plan to run a 3.4" pulley with intake and a mild tune, maybe headers aren't for your car. Not that they donn't work, but the power gained might be less than you'd expect for the amount of time/money spent.

Consider the price. Good headers aren't cheap. The set of stainless SLP Performance headers used for this write-up will run about $900 if you do the work yourself. TOG headers are another stainless option for about the same price (here's a link to a TOG install). New on the scene is a brand called Pacesetter, which sells for only $350. Keep in mind these cheaper headers use a slightly different design and have not yet been tested on a Riviera. Also, they are made of uncoated mild steal, so likely will not last like the SS versions. Ceramic coating for the Pacesetters is available for an additional cost. Also new to the market are Chinese-made knock-offs of the SLP design for less than $250 on ebay. Like the SLPs, they are stainless, but like the Pacestters they are not coated.

Important note: installing headers will change your car's character somewhat. Put simply, thin-walled headers are not as quiet as the heavier OEM cast-iron manifolds, so they will resonate when you get on them, and vibration can be both felt and heard inside/outside the car. If you value your Riv's luxury car feel, you may want to consider PEMs instead, or find a front header (or PowerLog) and keep the rear manifold in place. Another consideration is that most headers are considered off-road equipment and may not pass inspection in some states. If you're unsure of the the laws in your area, check with your local authority.

Deciding to move forward? A great choice for exhaust headers are manufactured by SLP Performance, makers of optional performance packages used by GM. Constructed of .055" wall 409 stainless steel using CNC mandrel bends with a built-in 3" flex pipe, these headers are made in USA and Jet-Hot aluminum/ceramic coated inside and out. Truly a top-notch product that fits the Riviera, produces noticeable HP gains, and is proven to last whether you're racing your car or driving it every day. Available through INTENSE Racing, here's what you get:

[img]Write-Up: Installing SLP Exhaust Headers HeadersNEW-1[/img]

Parts included with the SLP set ($699.99): front side header, back side header/collector/flex pipe, crossover pipe, & O2 sensor wire/connector.

Included with the SLP installation kit ($89.99): (2) header gaskets, (2) clamps, (other accessories intended for W-body installation, not used).

While possible to reuse the existing studs, ARP header bolts are recommended ($29.99), and if you intend to delete the catalytic converter, the INTENSE stainless steel race pipe ($49.99) is a perfect fit, or any 3.5" OD pipe will work. A Flowmaster venturi cone can be used to join the race pipe to the existing system. If you're going to run a cat converter, chose a high-flow type ($75-150) to replace the stock unit.

Since we are using headers designed for the W-Body cars (GTP, GS), the transmission filler tube must be replaced with one from a Series II-equipped Pontiac GTP. This can be obtained for $10 from Ed Morad or a local salvage yard.

Tools you'll need are a good set of wrenches, a socket set, and a Sawzall will come in handy. And it really helps to have a second hand to help out. I had a friend working up top while I was down below... made the job much easier. Plus, if you need to go to the parts store...

Give yourself an entire day to do the job. Depending on your skill level, and your luck, you could be done in time for dinner. Just in case, it might be better to start Saturday vs. Sunday if you need the car for the work week. You want to be able to take your time and get it right.

STEP 1: Apply PB Blaster penetrating lubricant generously to all exhaust manifold studs/bolts and down pipe flange the night before starting the job.

STEP 2: Before removing the manifolds, drive the car until warmed up, then begin work as soon as it's cool enough to access the bolts. Reapply PB Blaster as in STEP 1.

STEP 3: Disconnect the battery. It's under the rear seat cushion. Just lift it up, loosen the negative terminal, and get it over with. If you skip this step, don't say I didn't warn you...

STEP 4: Remove the engine cover and oil filler neck.

STEP 5: Disconnect the front and rear ignition wires. Remove the plastic bracket and relocate the front/rear wires out of the way.

Write-Up: Installing SLP Exhaust Headers HeaderWU1

STEP 6: Remove front manifold heat shield (temporarily).

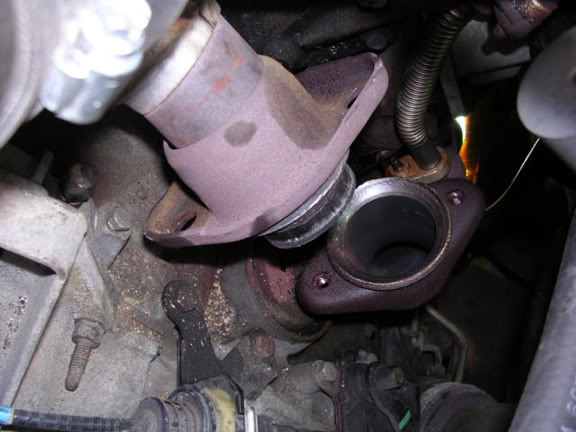
STEP 7: Loosen manifold bolts on front side and two bolts on crossover pipe. Remove front manifold.
Write-Up: Installing SLP Exhaust Headers HeaderWU2

STEP 8: Remove front manifold gasket and clean up gasket area.
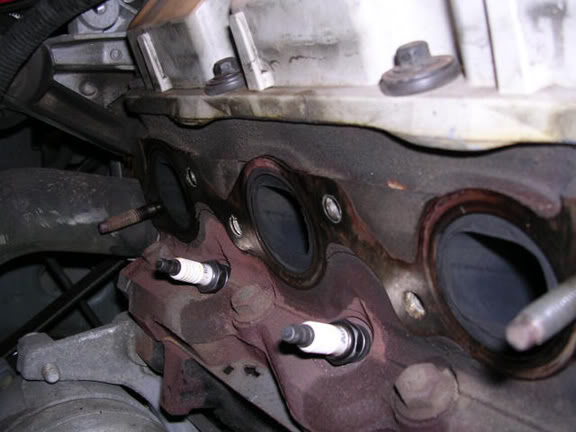
Write-Up: Installing SLP Exhaust Headers HeaderWU3

STEP 9: Jack up the front end of the car and support with jack stands. You need to raise the car enough so you can get under the car and work. You do not need to remove the front wheels.

STEP 10: Loosen two bolts on down pipe flange and disconnect.

Write-Up: Installing SLP Exhaust Headers HeaderWU4

STEP 11: Using a hack saw or Sawzall, cut the stock pipe close to the cat converter.
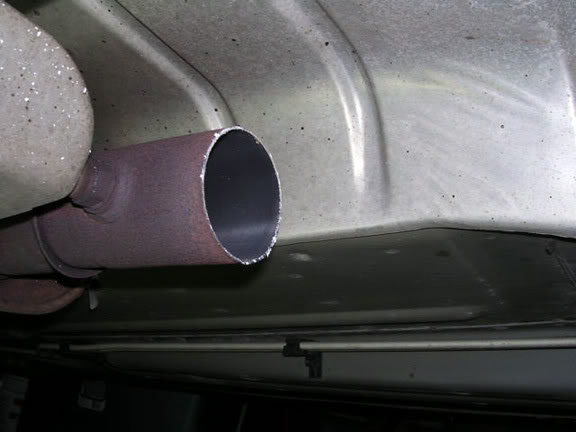
Write-Up: Installing SLP Exhaust Headers HeaderWU5

STEP 12: Loosen two bolts on rear crossover connection and disconnect.
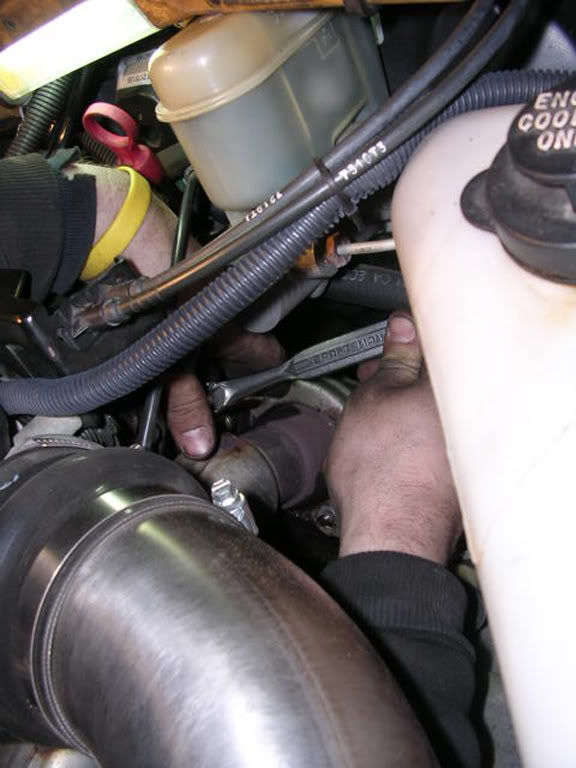
Write-Up: Installing SLP Exhaust Headers HeaderWU6

STEP 13: Remove crossover pipe.

Write-Up: Installing SLP Exhaust Headers HeaderWU65

STEP 14: Loosen and remove EGR assembly (temporarily).
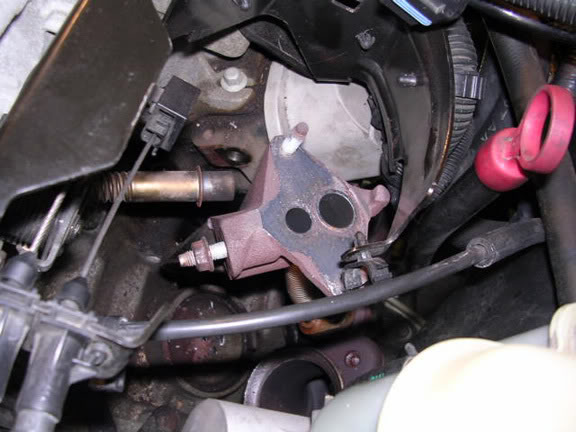
Write-Up: Installing SLP Exhaust Headers HeaderWU7

STEP 15: Disconnect front O2 sensor wire connector. Replace with new wire/connector.

STEP 16: Loosen screw and remove transmission oil filler tube & dipstick.

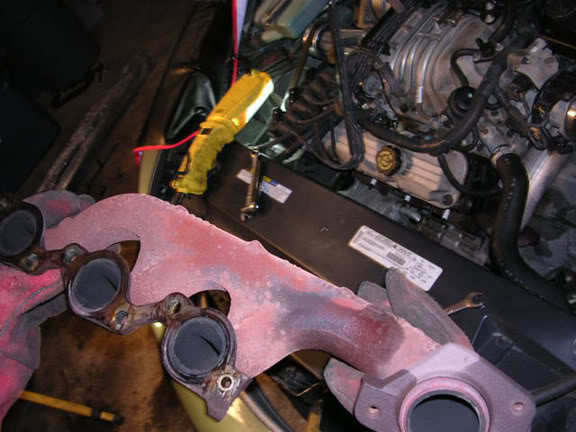
STEP 17: Loosen manifold bolts on back side. Remove rear manifold (should slide out the bottom). here's a picture of the old manifolds next to the headers:
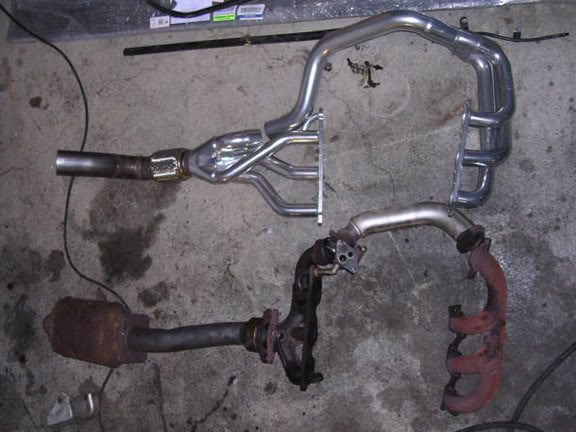
Write-Up: Installing SLP Exhaust Headers HeaderWU8

STEP 18: Remove rear manifold gasket and clean up gasket area.
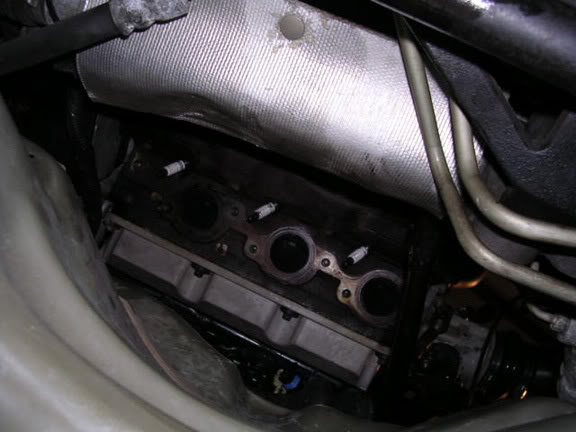
Write-Up: Installing SLP Exhaust Headers HeaderWU9

STEP 19: Remove O2 sensor from rear manifold; install into rear header. This is obviously a good time to replace with a new O2 sensor if yours has lots of miles on it. Use only an AC sensor sold at dealerships.

STEP 20: Install rear header w/ gasket. Tighten bolts to 22 lb-ft.
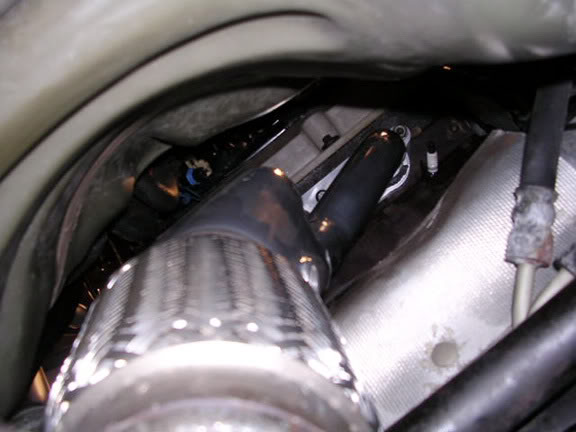
Write-Up: Installing SLP Exhaust Headers HeaderWU10

STEP 21: Install GTP transmission tube & dipstick.
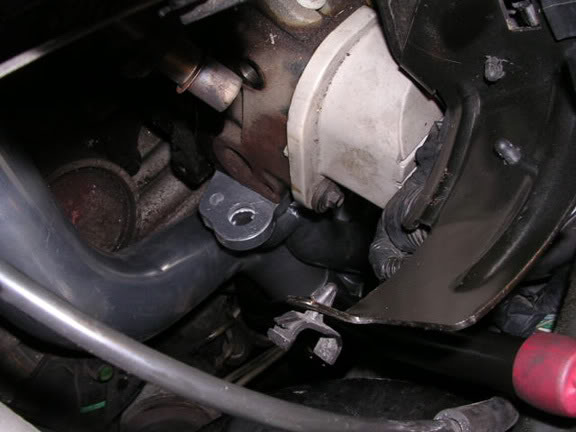
Write-Up: Installing SLP Exhaust Headers HeaderWU11

STEP 22: Verify flex pipe and stock exhaust pipe are aligned and there is room for race pipe/cat covert to fit. Trim pipes if necessary. If installing cat, install it with clamps, then skip to STEP 25.

Write-Up: Installing SLP Exhaust Headers HeaderWU12

STEP 23: Insert reducer pipe into stock exhaust. Tap into place.
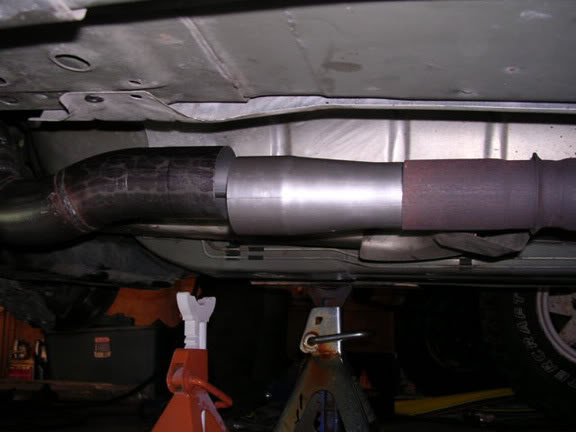
Write-Up: Installing SLP Exhaust Headers HeaderWU13

STEP 24: Disconnect rear exhaust hangers. Pull system toward rear and Insert race pipe (may need two people to do this). Clamp pieces in place. Be careful! Edges of pipe and clamps are sharp.
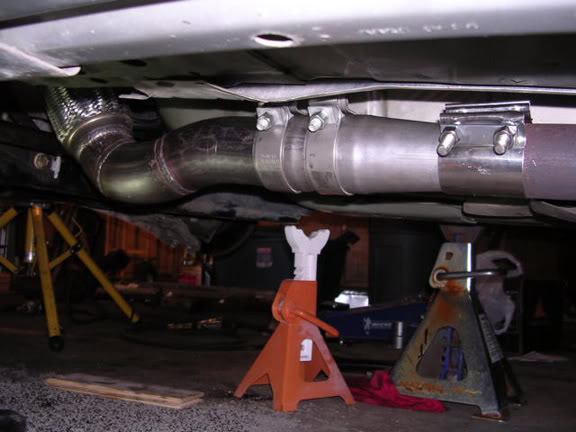
Write-Up: Installing SLP Exhaust Headers HeaderWU14

STEP 25: Reconnect front O2 sensor w/ new wire connector.
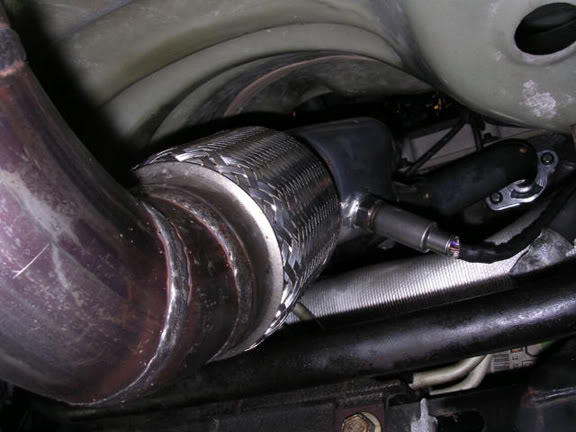
Write-Up: Installing SLP Exhaust Headers HeaderWU15

STEP 26: Slip clamp over low side of crossover pipe and insert into rear header. Apply high-temp silicone sealant between mating surfaces.
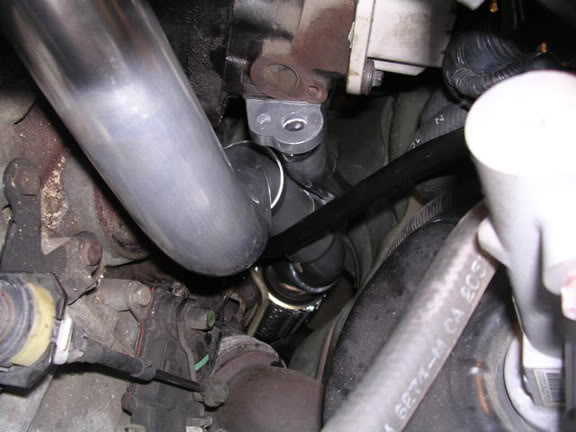
Write-Up: Installing SLP Exhaust Headers HeaderWU16

STEP 27: Slip clamp over top side of crossover pipe and insert into front header (sorry, clamp not visible in picture). Apply high-temp silicone sealant between mating surfaces.
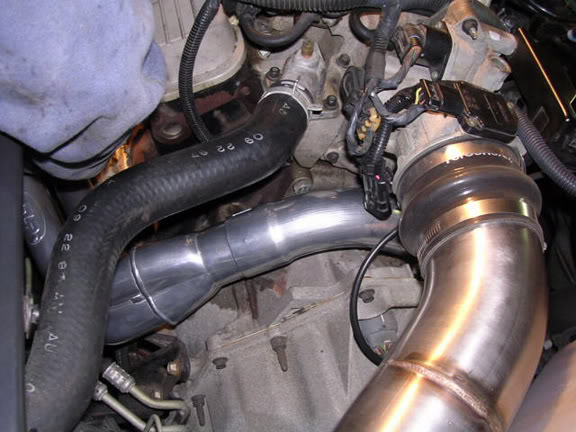
Write-Up: Installing SLP Exhaust Headers HeaderWU17

STEP 28: Position and install front header w/gasket. Tighten bolts to 22 lb-ft.

Write-Up: Installing SLP Exhaust Headers HeaderWU18

STEP 29: Make sure crossover pipe is oriented so as not to interfere with other engine parts. Tighten pipe clamps "very tight" with ratchet wrench. Wipe away excess silicone.

STEP 30: Reinstall EGR assembly.

STEP 31: Reinstall front heat shield. Shield will need to be bent to avoid contact with the new header.

STEP 32: Reconnect ignition wires and put everything back together.

Before starting the car, wait 2 hours for the RTV to set. Once you start the engine, you're probably going to hear some noise coming from beneath. The clamps used to hold the cat or race pipe together might not form a reliable seal. For best results, take the car to qualified muffler tech to get the joints TIG welded (or do it yourself if you're able). Some shops will do this for as little as $20-$50 if all they need to do is remove the clamps and weld your pieces in place.

Once things are welded up, you should notice an attenuation in noise level. Even then you will probably notice a "tinny" kind of sound that's characteristic of headers on an OHV engine. It's just something that takes getting used to. If you notice any kind of rumble or drone coming from up front, check the header bolts for tightness. Also make sure there is no leakage from the EGR pipe or the crossover connections. Remember, the clamps need to be very tight to seal.

With SLP headers, there's one noise that can get pretty annoying, a "ticking" sound that comes from the braided flex tube under the car. If you're hearing this, you probably have everything else pretty well sealed, as it's not that loud. Still, it can be noticeable, especially with windows rolled down. The only way to deal with this is to wrap the flex tube with header wrap. A good choice is Thermo-Tec header wrap available at JEGs high performance center. A single 1" x 50' roll sells for $23.99, and is just enough to fully wrap the flex tube. This will lower the noise quite a bit. Use a pipe/hose clamp to hold in place:

Write-Up: Installing SLP Exhaust Headers Headerwrap

A source of noise that may not present itself immediately is the vibration of the metal heat shields under the car... making contact with the header/exhaust pipe or rear O2 sensor during acceleration, or a shield may become loose over time and resonate at a certain RPM, making a metallic buzzing sound. To fix this, you need to locate the vibration and either remove it, add mass to it, or bend it so that the noise goes away.

Apart from the noise issues, headers do add worth-while performance gain. The power gained will vary with different levels of modification. A stock Riv would probably see very little gain from headers, but with a 3.4" SC pulley, intake, and rockers, you'll probably be looking at a solid 15 HP gain. An engine with cam or IC could see an extra 20-25 HP. These numbers don't seem like much, but consider that you'll see that power through most of the band, not just up top or down low. Rockers, for example, kick in only from 4-6k RPM. Headers, on the other hand, give a real power increase in the mid band as well as up top (right where we need it, imo). And unlike N/A cars, you needn't worry about loss of low-end torque. First, we have a gob of it already, especially when using lower SC pulley sizes. If some goes away, it will only help with launching, and your transmission will thank you. Second, any loss in torque is partly a result of lowered boost from the opened exhaust system. This can be remedied by dropping SC pulley size if KR permits.

Best of luck to anyone tackling this project. It's not really as difficult as it looks, even if you don't work on cars all the time. The best part is, you do not need to drop the cradle to install SLP headers. They just slide right in! Besides the custom welds, things are pretty straightforward.

Would like to thank Tim King at INTENSE and Rob (RivMan) for their technical assistance, and Ed Morad for supplying a few extra parts. Also would like to thank my friend Adam for helping with the install and letting me use his garage and air tools. Please PM or email me with any questions or concerns regarding this write-up.


Last edited by AA on Wed Apr 21, 2010 10:41 am; edited 2 times in total
Back to top Go down
http://www.cardomain.com/ride/657082/4
Mr.Riviera
Expert
Mr.Riviera


Name : Matthew
Age : 38
Location : Florida
Joined : 2007-01-17
Post Count : 4394
Merit : 101

Write-Up: Installing SLP Exhaust Headers Empty
PostSubject: Re: Write-Up: Installing SLP Exhaust Headers   Write-Up: Installing SLP Exhaust Headers EmptyTue Feb 27, 2007 11:33 am

was you flex pipe double or single braid?
and is our DP a 3" OD and 2.5" ID?
wonderful write up Aaron! clap

_________________
1996 with 254k miles, L32 4" FWI -> ported N* -> Ported Gen V w/3.0" Pulley, Stage 3 Phenolic I/C, ZZP FMHE, 1.84 RR, Headers and 3" pipe to mufflers, F-body brakes, and lowered on Eibachs. -RIP
AMG C400 White on black. Stage 2 w/E30 - 11.9@117 -daily
Write-Up: Installing SLP Exhaust Headers Dsc_0110
Back to top Go down
AA
Administrator
AA


Name : Aaron
Age : 47
Location : C-bus, Ohio
Joined : 2007-01-13
Post Count : 18452
Merit : 252

Write-Up: Installing SLP Exhaust Headers Empty
PostSubject: Re: Write-Up: Installing SLP Exhaust Headers   Write-Up: Installing SLP Exhaust Headers EmptyTue Feb 27, 2007 1:11 pm

SLP flex pipe is single braid, probably part of the reason it ticks.

Not sure about the downpipe. I got rid of mine a while back. It's hard to remember doing the install nearly a full year ago. I thought it was 2.5" ID, but might be 2.25" ID.

_________________
'05 GTO 6.0L • 6-spd • 95k miles • 0-60: 4.8s • 16.9 avg MPG • Nelson Ledges Lap: 1:26

'95 Celica GT 2.2L • 5-spd • 165k miles • 0-60: yes

'98 SC Riviera • 281k miles • 298 HP/370 TQ • 0-60: 5.79s • ET: 13.97 @ 99.28 • 4087 lb • 20.1 avg MPG • Nelson Ledges Lap: 1:30
3.4" pulley • AL104 plugs • 180º t-stat • FWI w/K&N • 1.9:1 rockers • OR pushrods • LS6 valve springs • SLP headers • ZZP fuel rails
KYB GR2 struts • MaxAir shocks • Addco sway bars • UMI bushings • GM STB • Enkei 18" EV5s w/ Dunlop DZ101s • F-body calipers
EBC bluestuff/Hawk HP plus • SS lines • Brembo slotted discs • DHP tuned • Aeroforce • Hidden Hitch

^^^ SOLD ^^^ frown

'70 Ninety-Eight Holiday Coupe 455cid • 116k miles
^^^ SOLD ^^^ frown
Back to top Go down
http://www.cardomain.com/ride/657082/4
Mr.Riviera
Expert
Mr.Riviera


Name : Matthew
Age : 38
Location : Florida
Joined : 2007-01-17
Post Count : 4394
Merit : 101

Write-Up: Installing SLP Exhaust Headers Empty
PostSubject: Re: Write-Up: Installing SLP Exhaust Headers   Write-Up: Installing SLP Exhaust Headers EmptyTue Feb 27, 2007 6:10 pm

hopefully my zzp 3" DP wont tick since i opted for the double braid, we shall see...if i ever find a shop that will do it cheap.

according to zzp, the gp DP is 2.09 ID and their 3" DP is 2.86 ID. 2.09 is crazy!!!

_________________
1996 with 254k miles, L32 4" FWI -> ported N* -> Ported Gen V w/3.0" Pulley, Stage 3 Phenolic I/C, ZZP FMHE, 1.84 RR, Headers and 3" pipe to mufflers, F-body brakes, and lowered on Eibachs. -RIP
AMG C400 White on black. Stage 2 w/E30 - 11.9@117 -daily
Write-Up: Installing SLP Exhaust Headers Dsc_0110
Back to top Go down
AA
Administrator
AA


Name : Aaron
Age : 47
Location : C-bus, Ohio
Joined : 2007-01-13
Post Count : 18452
Merit : 252

Write-Up: Installing SLP Exhaust Headers Empty
PostSubject: Re: Write-Up: Installing SLP Exhaust Headers   Write-Up: Installing SLP Exhaust Headers EmptyTue Feb 27, 2007 6:13 pm

The 2.09" ID is probably an improvement for a N/A car, but for our application... nono

_________________
'05 GTO 6.0L • 6-spd • 95k miles • 0-60: 4.8s • 16.9 avg MPG • Nelson Ledges Lap: 1:26

'95 Celica GT 2.2L • 5-spd • 165k miles • 0-60: yes

'98 SC Riviera • 281k miles • 298 HP/370 TQ • 0-60: 5.79s • ET: 13.97 @ 99.28 • 4087 lb • 20.1 avg MPG • Nelson Ledges Lap: 1:30
3.4" pulley • AL104 plugs • 180º t-stat • FWI w/K&N • 1.9:1 rockers • OR pushrods • LS6 valve springs • SLP headers • ZZP fuel rails
KYB GR2 struts • MaxAir shocks • Addco sway bars • UMI bushings • GM STB • Enkei 18" EV5s w/ Dunlop DZ101s • F-body calipers
EBC bluestuff/Hawk HP plus • SS lines • Brembo slotted discs • DHP tuned • Aeroforce • Hidden Hitch

^^^ SOLD ^^^ frown

'70 Ninety-Eight Holiday Coupe 455cid • 116k miles
^^^ SOLD ^^^ frown
Back to top Go down
http://www.cardomain.com/ride/657082/4
Mr.Riviera
Expert
Mr.Riviera


Name : Matthew
Age : 38
Location : Florida
Joined : 2007-01-17
Post Count : 4394
Merit : 101

Write-Up: Installing SLP Exhaust Headers Empty
PostSubject: Re: Write-Up: Installing SLP Exhaust Headers   Write-Up: Installing SLP Exhaust Headers EmptyTue Feb 27, 2007 6:30 pm

http://www.zzperformance.com/grand_prix/products1.php?id=551&catid=110

i think they were measuring the GTP DP

_________________
1996 with 254k miles, L32 4" FWI -> ported N* -> Ported Gen V w/3.0" Pulley, Stage 3 Phenolic I/C, ZZP FMHE, 1.84 RR, Headers and 3" pipe to mufflers, F-body brakes, and lowered on Eibachs. -RIP
AMG C400 White on black. Stage 2 w/E30 - 11.9@117 -daily
Write-Up: Installing SLP Exhaust Headers Dsc_0110
Back to top Go down
AA
Administrator
AA


Name : Aaron
Age : 47
Location : C-bus, Ohio
Joined : 2007-01-13
Post Count : 18452
Merit : 252

Write-Up: Installing SLP Exhaust Headers Empty
PostSubject: Re: Write-Up: Installing SLP Exhaust Headers   Write-Up: Installing SLP Exhaust Headers EmptyTue Feb 27, 2007 6:38 pm

I donno, my down pipe was bigger than 1.75" ID, I know that. From your link:

"2.5 inch downpipes are designed for naturally aspirated applications where no loss in low end torque is desired. They can also be used in supercharged applications when the lowest possible cost is important. They come with interlock flex standard."

Maybe you could measure yours and clarify this mystery. Everything I've read suggests the 3" pipe is the way to go.

_________________
'05 GTO 6.0L • 6-spd • 95k miles • 0-60: 4.8s • 16.9 avg MPG • Nelson Ledges Lap: 1:26

'95 Celica GT 2.2L • 5-spd • 165k miles • 0-60: yes

'98 SC Riviera • 281k miles • 298 HP/370 TQ • 0-60: 5.79s • ET: 13.97 @ 99.28 • 4087 lb • 20.1 avg MPG • Nelson Ledges Lap: 1:30
3.4" pulley • AL104 plugs • 180º t-stat • FWI w/K&N • 1.9:1 rockers • OR pushrods • LS6 valve springs • SLP headers • ZZP fuel rails
KYB GR2 struts • MaxAir shocks • Addco sway bars • UMI bushings • GM STB • Enkei 18" EV5s w/ Dunlop DZ101s • F-body calipers
EBC bluestuff/Hawk HP plus • SS lines • Brembo slotted discs • DHP tuned • Aeroforce • Hidden Hitch

^^^ SOLD ^^^ frown

'70 Ninety-Eight Holiday Coupe 455cid • 116k miles
^^^ SOLD ^^^ frown
Back to top Go down
http://www.cardomain.com/ride/657082/4
Jason
Aficionado
Jason


Name : Jason
Age : 41
Location : Comox, BC, Canada
Joined : 2007-01-23
Post Count : 1378
Merit : 66

Write-Up: Installing SLP Exhaust Headers Empty
PostSubject: Re: Write-Up: Installing SLP Exhaust Headers   Write-Up: Installing SLP Exhaust Headers EmptyTue Feb 27, 2007 8:47 pm

nice write-up.
I'm looking at headers and a DHP pwrtuner as my next mods. I'm just waiting for a set of used slps to go up on clubgp or regalgs
Back to top Go down
http://www.cardomain.com/id/Doctor_Meltdown
98riv
Moderator


Location : USA
Joined : 2007-01-14
Post Count : 995
Merit : 30

Write-Up: Installing SLP Exhaust Headers Empty
PostSubject: Re: Write-Up: Installing SLP Exhaust Headers   Write-Up: Installing SLP Exhaust Headers EmptyFri Mar 02, 2007 9:34 pm

Nice write up! I have read that other people suggest removing the throttle body and intake tube to help give some more room.
Back to top Go down
AA
Administrator
AA


Name : Aaron
Age : 47
Location : C-bus, Ohio
Joined : 2007-01-13
Post Count : 18452
Merit : 252

Write-Up: Installing SLP Exhaust Headers Empty
PostSubject: Re: Write-Up: Installing SLP Exhaust Headers   Write-Up: Installing SLP Exhaust Headers EmptyFri Mar 02, 2007 10:45 pm

Hmm... maybe in W-body cars it would help, but I never thought of doing that because the crossover and front header are already fairly easy to access.

_________________
'05 GTO 6.0L • 6-spd • 95k miles • 0-60: 4.8s • 16.9 avg MPG • Nelson Ledges Lap: 1:26

'95 Celica GT 2.2L • 5-spd • 165k miles • 0-60: yes

'98 SC Riviera • 281k miles • 298 HP/370 TQ • 0-60: 5.79s • ET: 13.97 @ 99.28 • 4087 lb • 20.1 avg MPG • Nelson Ledges Lap: 1:30
3.4" pulley • AL104 plugs • 180º t-stat • FWI w/K&N • 1.9:1 rockers • OR pushrods • LS6 valve springs • SLP headers • ZZP fuel rails
KYB GR2 struts • MaxAir shocks • Addco sway bars • UMI bushings • GM STB • Enkei 18" EV5s w/ Dunlop DZ101s • F-body calipers
EBC bluestuff/Hawk HP plus • SS lines • Brembo slotted discs • DHP tuned • Aeroforce • Hidden Hitch

^^^ SOLD ^^^ frown

'70 Ninety-Eight Holiday Coupe 455cid • 116k miles
^^^ SOLD ^^^ frown
Back to top Go down
http://www.cardomain.com/ride/657082/4
deekster_caddy
Master


Name : Derek
Age : 52
Location : Reading, MA
Joined : 2007-01-31
Post Count : 7717
Merit : 109

Write-Up: Installing SLP Exhaust Headers Empty
PostSubject: Re: Write-Up: Installing SLP Exhaust Headers   Write-Up: Installing SLP Exhaust Headers EmptyMon Mar 05, 2007 10:03 pm

Thanks for this writeup Aaron, it's probably the next target on my wish list...

-Derek
Back to top Go down
SpaceBar
Aficionado
SpaceBar


Name : Patrick
Age : 38
Location : Quincy, MA
Joined : 2007-04-08
Post Count : 1199
Merit : 3

Write-Up: Installing SLP Exhaust Headers Empty
PostSubject: Headers Installed!   Write-Up: Installing SLP Exhaust Headers EmptySat Jul 28, 2007 6:35 pm

The girlfriends uncle has his own shop so I brought it down to him and had him installed the headers up on a lift. He said he didn't have that many problems with them. They are SLP headers from Intense. Also have the HF Cat now. They feel great. Sound good too. Just need to get rid of that ticking from the flexpipe. I bought 50' of 2" exhaust wrap today I'm going to be tossing that on probably tomorrow morning.

Write-Up: Installing SLP Exhaust Headers 2798762210078761267S425x425Q85

Write-Up: Installing SLP Exhaust Headers 2289242650078761267S425x425Q85

Write-Up: Installing SLP Exhaust Headers 2131480750078761267S425x425Q85

Flexpipe before I cover it. wink

Write-Up: Installing SLP Exhaust Headers 2026036550078761267S425x425Q85

Theres the High Flow Cat from Intense.
Back to top Go down
http://community.webshots.com/user/xspacebarx
turtleman
Expert
turtleman


Name : Codith
Age : 37
Location : Villa Park, IL
Joined : 2007-02-08
Post Count : 3671
Merit : 140

Write-Up: Installing SLP Exhaust Headers Empty
PostSubject: Re: Write-Up: Installing SLP Exhaust Headers   Write-Up: Installing SLP Exhaust Headers EmptySat Jul 28, 2007 7:38 pm

so tell me, what do you notice in power and sound? I trust you'll post a video if its noticeably different.
Back to top Go down
SpaceBar
Aficionado
SpaceBar


Name : Patrick
Age : 38
Location : Quincy, MA
Joined : 2007-04-08
Post Count : 1199
Merit : 3

Write-Up: Installing SLP Exhaust Headers Empty
PostSubject: Re: Write-Up: Installing SLP Exhaust Headers   Write-Up: Installing SLP Exhaust Headers EmptySat Jul 28, 2007 7:55 pm

There feels less power on the low end but not by much I don't think. I haven't really pushed it but about 60% throttle it feels pretty good. The car just seems to feel better all around now though. And I dropped a couple degrees of knock too, so that helps. wink

I don't know if its just me but the sound seems to be different. I don't think its as loud but it sounds deeper now. The ticking from the flex pipe is the only bad part.

I'll get a video up of the headers when it stops raining here.
Back to top Go down
http://community.webshots.com/user/xspacebarx
turtleman
Expert
turtleman


Name : Codith
Age : 37
Location : Villa Park, IL
Joined : 2007-02-08
Post Count : 3671
Merit : 140

Write-Up: Installing SLP Exhaust Headers Empty
PostSubject: Re: Write-Up: Installing SLP Exhaust Headers   Write-Up: Installing SLP Exhaust Headers EmptySat Jul 28, 2007 7:57 pm

loosing low end torque?... isn't it really nice to have a blower with a MPS sometimes...
Back to top Go down
SpaceBar
Aficionado
SpaceBar


Name : Patrick
Age : 38
Location : Quincy, MA
Joined : 2007-04-08
Post Count : 1199
Merit : 3

Write-Up: Installing SLP Exhaust Headers Empty
PostSubject: Re: Write-Up: Installing SLP Exhaust Headers   Write-Up: Installing SLP Exhaust Headers EmptySat Jul 28, 2007 8:00 pm

turtleman wrote:
loosing low end torque?... isn't it really nice to have a blower with a MPS sometimes...

It was also never above the low 80s before I had the headers put on and the last week its been over 90 and rediculously humid out. So thats hurting the car a good amount. frown

I'm already down to a 3.3 with about 3-4* of knock at 60-70% throttle. I don't want to drop anymore till I get this thing tuned in.

Maybe I'll get the SSIC someday and drop down but that would require the 42.5# injectors too. But if I can't get control of that knock that will be the next option. wink
Back to top Go down
http://community.webshots.com/user/xspacebarx
dreww
Junkie
dreww


Location : Dallas
Joined : 2007-04-10
Post Count : 851
Merit : 9

Write-Up: Installing SLP Exhaust Headers Empty
PostSubject: Re: Write-Up: Installing SLP Exhaust Headers   Write-Up: Installing SLP Exhaust Headers EmptySat Jul 28, 2007 8:01 pm

awesome. wish I had a lift when I do mine. you tuned yet?
Back to top Go down
SpaceBar
Aficionado
SpaceBar


Name : Patrick
Age : 38
Location : Quincy, MA
Joined : 2007-04-08
Post Count : 1199
Merit : 3

Write-Up: Installing SLP Exhaust Headers Empty
PostSubject: Re: Write-Up: Installing SLP Exhaust Headers   Write-Up: Installing SLP Exhaust Headers EmptySat Jul 28, 2007 8:04 pm

dreww wrote:
awesome. wish I had a lift when I do mine. you tuned yet?

I don't have any access to a lift besides him and not many tools at the house so thats why I brought it down to him. He didn't charge me much and nobody else would touch it besides a shop that wanted to charge me STARTING at $450. That was with him saying it should take him 4 hours of labor and without any problems. He also told me I wasn't going to see any gains from them because they are the same size as the stock. Needless to say I haven't been back to that shop. wink

So the girlfriends uncle said to drop it off he would take a look at it and I talked to him that night he said they got the manifolds off and put the front on and just had the back to do it would be done the next day. Charged me $300 and it took them about 6 1/2 hours to do.

And I'm not tuned yet. Derek is going to do my tuning for me sometime after he gets back from vacation. Sometime soon I'm going to invest in an HPtuner for myself though and learn how to tune.
Back to top Go down
http://community.webshots.com/user/xspacebarx
Sponsored content


Write-Up: Installing SLP Exhaust Headers Empty
PostSubject: Re: Write-Up: Installing SLP Exhaust Headers   Write-Up: Installing SLP Exhaust Headers Empty

Back to top Go down
 
Write-Up: Installing SLP Exhaust Headers
Back to top 
Page 1 of 7Go to page : 1, 2, 3, 4, 5, 6, 7  Next
 Similar topics
-
» Write-Up: Wrapping Exhaust Headers
» Knock-Off Headers (Pace Setter, Autochrome, Chinese, eBay, etc.)
» Write-Up: Installing KYB GR-2 Struts
» Write-Up: Installing the Optima 34/78 red top
» Write-Up: Installing Intercooler (IC)

Permissions in this forum:You cannot reply to topics in this forum
Riv Performance ::   Supercharged 3800 Tech :: Series II Engine & Transmission-
Jump to: