| | Write-Up: Replacing Accessory Belt Tensioner |  |
|
+14The Roadmaster 98riv albertj Jelorian pbrktrt adri playa LARRY70GS DEMonte1997 deekster_caddy Rickw Eldo AA manofmany 18 posters |
|
| Author | Message |
|---|
Eldo
Expert

Name : Mark
Age : 59
Location : West Salem, Oregon... FINALLY
Joined : 2009-04-09
Post Count : 3176
Merit : 104
| | Subject: Re: Write-Up: Replacing Accessory Belt Tensioner Wed Oct 20, 2010 11:14 pm | |
| - DEMonte1997 wrote:
I'll explain where the bolts go for just the tensioner and where it bolts to the alt. Also the coolant lines and where they go. I was happy with how easy it was. To quote the late, great Ted Knight: Welllllllll.... We're WAITing!  | |
|
| | |
DEMonte1997
Aficionado

Name : Rick
Age : 46
Location : CT
Joined : 2009-03-03
Post Count : 1429
Merit : 37
| | Subject: Re: Write-Up: Replacing Accessory Belt Tensioner Thu Oct 21, 2010 2:27 am | |
| Sorry for the wait. Okay.... So Aaron had a similar write-up for replacing the SC tensioner assembly but I couldn't find one for the accessory one. Like him, I was getting odd chirping sounds one morning where there was excessive dew and when it rained. The squeaking wasn't crazy but enough to get annoying. After reading his description and speaking with him about it, I decided to change out mine. The result is no more noise. Onto the write-up. Please go ahead and ask questions for anything that is unclear or missing... I tend to skip steps as I'm explaining things lol....  You want a part number. I picked up the Gates belt tensioner as it seemed the cheapest. It is part #38152. I grabbed one from Amazon for $45/shipped. Looks like the price already went up $10.  You can go on rockauto to get part numbers and then throw them into google shopping to see what you get. Before I decided on the Gates tensioner, the Goodyear one was cheapest. Prices seem to fluctuate. Here's a link to the one on Amazon. Still cheaper than Rockauto I think. http://www.amazon.com/Gates-38152-Belt-Tensioner-Assembly/dp/B000C2YAFW Here are the tools/materials you will want to have on hand: ratcheting wrench and various extensions 19mm socket 15mm socket 13mm socket and ratcheting wrench (or just wrench) 10mm wrench red RTV silicone coolant elbow (not sure of part number.. it came with tensioner assembly) Here is a pic of the engine bay where you will be working. You can see the bright shiny new tensioner sitting below the alternator. 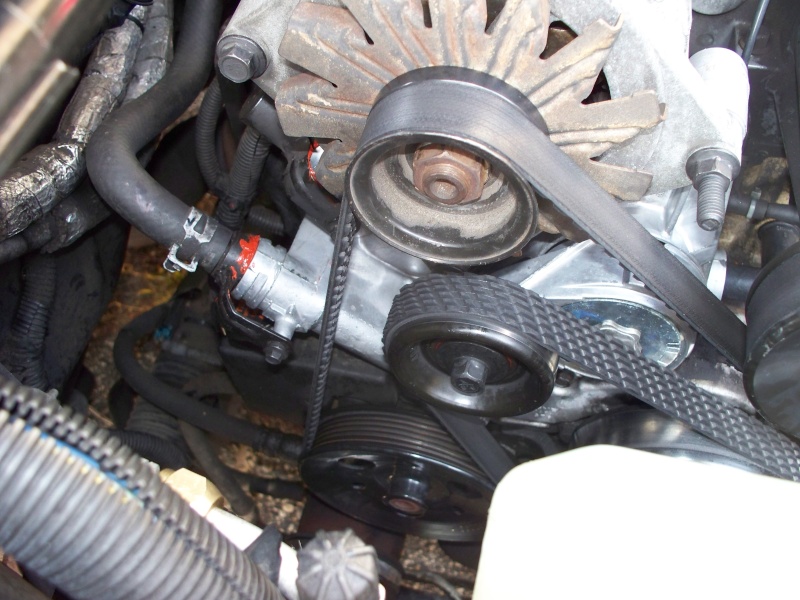 First, disconnect the battery. It is located underneath the back seat. 8mm socket (i believe) loosens terminal bolts. Second, you will want to drain the coolant out. Climb underneath the car and pull the push pins off the front valence to reveal the petcock on the radiator. It is located on the driver side. I believe the size of the bolt on it was 19mm. I had a 7quart low profile pan to put underneath while it drained. Next, you will want to release tension from the accessory belt. You can do this by using a 15mm socket on the pulley underneath the alternator pulley in the picture above. Turn the ratchet towards the firewall and that will give the belt enough slack to slide off the pulley. Next, you will want to remove the alternator. There are (6) areas you want to pay attention to. I would start with the alternator ground nut. It is a 10mm nut if memory serves. Once this is off, you can go to the MAP bracket bolt. *Note: both of these are on opposite side of the alt from the pulley.* I believe the MAP bolt is a 13mm. After that, there are three 13mm bolts holding the alt in place. Two are towards the top and easy to locate. The last one is at the bottom of the assembly. You can feel around for that. After you have loosened them, make sure to unplug the alt! That's why I said there are SIX things you want to pay attention to. Don't want to ruin any wire harnesses...  Okay.. Alt is out. You have a pretty good view of the tensioner assembly. Here is a pic of my old one so you can see what it looks like: 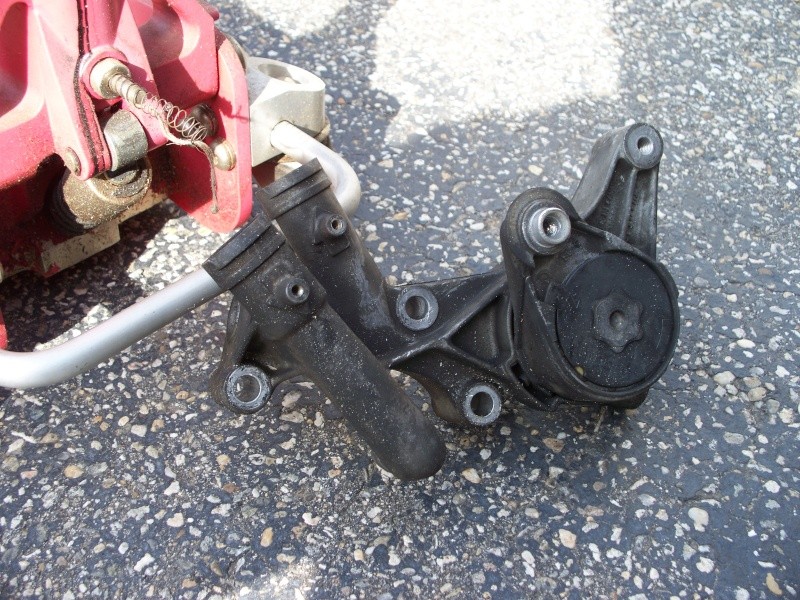 This should give you an idea of where the coolant lines run and where the additional bolts go. You will notice that a couple of the 13mm bolts you already pulled for the alternator attach that to the tensioner. There are a few more 13mm bolts that need to be removed as well as two 10mm bolts for the coolant lines before the assembly can be taken out. Once you remove all of them, you also have to contend with the coolant elbow that runs from the tensioner to the lower intake manifold. I just jostled the elbow out of the manifold first and then pulled it from the tensioner. The old elbow broke off at the ends in both parts so it is imperative that you have a new one on hand to replace. I used needle nose pliers to get the pieces out of the intake manifold. It wasn't terrible. The pliers I used had a bend to them so I was able to get behind the broken parts and just pull them out. Worked great. The coolant lines will come out pretty easy if you twist them a little back and forth. Since you drained the coolant, there shouldn't be much of any leaking out when you pull those lines. I want to make quick mention that this install should be pretty easy when you see the tensioner unit that was sent to you. When I took that out of the box, I was able to quickly see what went where so I wasn't flying blind... so to speak. For the coolant lines that are pulled, I cleaned the surfaces off that go back into the tensioner and tacked on some red RTV silicone to where the o-rings are just to make sure they make a good seal. I let them sit for about 30 mins before reinstalling. For the coolant elbow, I did the same thing... just added some RTV around where the o-ring sits to ensure there is a decent seal. I tacked the RTV with my index finger and thumb to give it a little texture. Next reinstall everything the opposite order of taking apart. Take your time and you should be fine. If you want, you can use the tensioner pulley that comes with the unit or re-use your old one. Since I previously had a metal pulley, I opted for reusing that. Note: to remove the pulley, turn your ratchet towards the radiator. It's a reverse threaded bolt. Once everything is put back into place, re-route belt. Put petcock back into radiator and replace coolant. I decided to put new coolant in my car so it was a pseudo-coolant change.  Did you reconnect the battery??? Just in case lol You will need to bleed coolant system of air. You can do it a number of ways. I just ran the car for a few minutes with the radiator cap off. Then turned car off. Let it sit for a bit and put the cap back on. Ran it again and then bled the last bits of air out through the stat housing. I'm sure there are better ways but this is what I did. If the reservoir looks low after bleeding the system, make sure to add some fluid to that. I think that's it but I'm sure I left parts out and took too much detail to others. I'm going to attach more pics at the bottom to provide a little more perspective. Please post here to let me know where this is deficient and I will add more info.  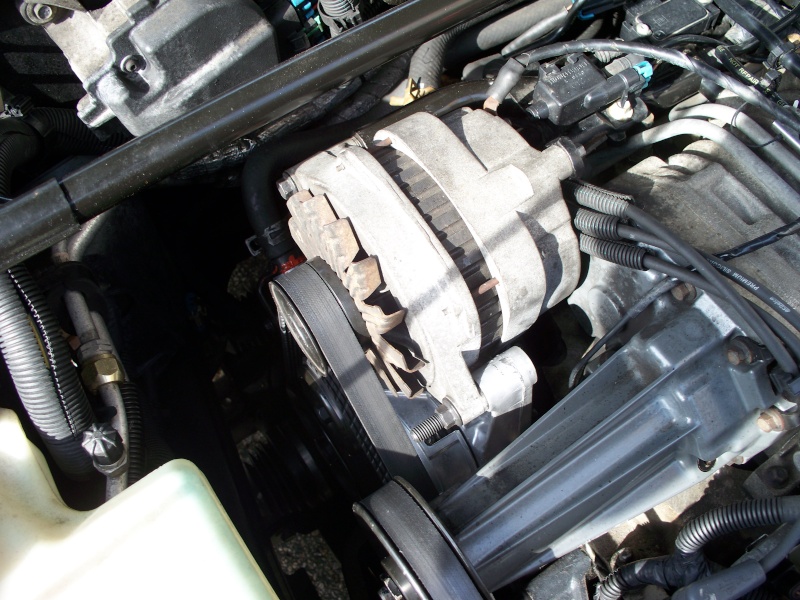 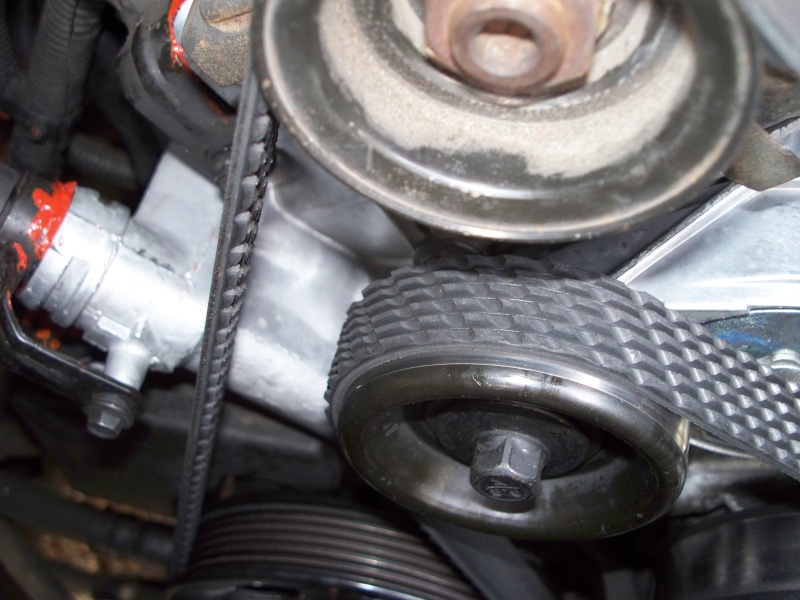   edit: if someone can show my stupid ass how to make arrows with photoshop, i can make this writeup better by showing exactly which parts are removed at each step... (although it was pretty easy IMO) | |
|
| | |
deekster_caddy
Master
Name : Derek
Age : 52
Location : Reading, MA
Joined : 2007-01-31
Post Count : 7717
Merit : 109
| | Subject: Re: Write-Up: Replacing Accessory Belt Tensioner Sun Oct 24, 2010 4:24 pm | |
| One thing I would have done differently - get new O-rings and use some grease and they will be fine. Don't RTV the O-rings or you are completely screwing somebody down the road. Otherwise nice write-up. I gave you a plus.  | |
|
| | |
Eldo
Expert
Name : Mark
Age : 59
Location : West Salem, Oregon... FINALLY
Joined : 2009-04-09
Post Count : 3176
Merit : 104
| | Subject: Re: Write-Up: Replacing Accessory Belt Tensioner Sun Oct 24, 2010 6:31 pm | |
| Great photos!! At last, we can see exactly how this thing is plumbed. The "external", non-elbow passage plugs into the front of the head, right? I do agree with Deek about the RTV - I've already pulled the heater-hose pipes once to get at the spark plugs, and after cleaning and lubing with a little fresh anti-freeze I re-installed them and the O-rings don't leak. That brings up another question, though: Did the elbow and the 3 other coolant fittings on the tensioner come with new O-rings? P.S. - Derek, your 'plus' didn't take hold... There was no green stripe until I put my own vote in.  | |
|
| | |
DEMonte1997
Aficionado
Name : Rick
Age : 46
Location : CT
Joined : 2009-03-03
Post Count : 1429
Merit : 37
| | Subject: Re: Write-Up: Replacing Accessory Belt Tensioner Sun Oct 24, 2010 7:26 pm | |
| All of the coolant fittings came with new o-rings. I've taken apart things that have silicone gaskets before and aside from the cleaning of the surfaces, the whole process of pulling the surfaces apart was easy. After all... it's just high temp silicone. | |
|
| | |
Eldo
Expert
Name : Mark
Age : 59
Location : West Salem, Oregon... FINALLY
Joined : 2009-04-09
Post Count : 3176
Merit : 104
| | Subject: Re: Write-Up: Replacing Accessory Belt Tensioner Sun Oct 24, 2010 7:54 pm | |
| - DEMonte1997 wrote:
- All of the coolant fittings came with new o-rings....
EXXX-cellent... | |
|
| | |
deekster_caddy
Master
Name : Derek
Age : 52
Location : Reading, MA
Joined : 2007-01-31
Post Count : 7717
Merit : 109
| | Subject: Re: Write-Up: Replacing Accessory Belt Tensioner Sun Oct 24, 2010 8:23 pm | |
| - Eldo wrote:
- P.S. - Derek, your 'plus' didn't take hold...
ahh that would be the intent not actually triggering the deed. It is done now. | |
|
| | |
AA
Administrator

Name : Aaron
Age : 47
Location : C-bus, Ohio
Joined : 2007-01-13
Post Count : 18452
Merit : 252
| | Subject: Re: Write-Up: Replacing Accessory Belt Tensioner Mon Oct 25, 2010 6:33 am | |
|  Nice write-up! _________________ '05 GTO 6.0L • 6-spd • 95k miles • 0-60: 4.8s • 16.9 avg MPG • Nelson Ledges Lap: 1:26'95 Celica GT 2.2L • 5-spd • 165k miles • 0-60: yes'98 SC Riviera • 281k miles • 298 HP/370 TQ • 0-60: 5.79s • ET: 13.97 @ 99.28 • 4087 lb • 20.1 avg MPG • Nelson Ledges Lap: 1:30
3.4" pulley • AL104 plugs • 180º t-stat • FWI w/K&N • 1.9:1 rockers • OR pushrods • LS6 valve springs • SLP headers • ZZP fuel rails
KYB GR2 struts • MaxAir shocks • Addco sway bars • UMI bushings • GM STB • Enkei 18" EV5s w/ Dunlop DZ101s • F-body calipers
EBC bluestuff/Hawk HP plus • SS lines • Brembo slotted discs • DHP tuned • Aeroforce • Hidden Hitch^^^ SOLD ^^^ '70 Ninety-Eight Holiday Coupe 455cid • 116k miles^^^ SOLD ^^^ | |
|
| | |
LARRY70GS
Aficionado

Name : Larry
Age : 68
Location : Oakland Gardens, NY
Joined : 2007-01-23
Post Count : 2193
Merit : 150
| | Subject: Re: Write-Up: Replacing Accessory Belt Tensioner Tue May 10, 2011 5:28 pm | |
| Does the plastic elbow come with all new accessory tensioners? Can you see the elbow in any of the pictures?
_________________
98 Riviera SC3800 All stock except gutted air box.
1970 Buick GS455 Stage1, TSP built 470BBB, 602HP/589TQ
Best MPH, 116.06 MPH, Best ET, 11.54
https://www.youtube.com/watch?v=UHCda-t_Jls
https://www.youtube.com/watch?v=sfT2tEO4XcU
| |
|
| | |
DEMonte1997
Aficionado
Name : Rick
Age : 46
Location : CT
Joined : 2009-03-03
Post Count : 1429
Merit : 37
| | Subject: Re: Write-Up: Replacing Accessory Belt Tensioner Tue May 10, 2011 5:51 pm | |
| The tensioner DID come with the elbow which I thought was nice. Good ole' Gates and their fantastic parts. You can see the elbow in the first pic I posted. Follow the accesory belt from the alt pulley to the right edge of the picture. You will see the elbow just above the SC pulley. I can take another pic as the car sits now for a better view if you want. | |
|
| | |
LARRY70GS
Aficionado
Name : Larry
Age : 68
Location : Oakland Gardens, NY
Joined : 2007-01-23
Post Count : 2193
Merit : 150
| | Subject: Re: Write-Up: Replacing Accessory Belt Tensioner Tue May 10, 2011 6:08 pm | |
| - DEMonte1997 wrote:
- The tensioner DID come with the elbow which I thought was nice. Good ole' Gates and their fantastic parts.
You can see the elbow in the first pic I posted. Follow the accesory belt from the alt pulley to the right edge of the picture. You will see the elbow just above the SC pulley. I can take another pic as the car sits now for a better view if you want. Thank You Rick, I see it now. I just ordered Goodyear 49239. Hopefully, they include the elbow. Actually, my water pump started to leak, and everything is original at 134,000 miles, as near as I can tell. I ordered both tensioners, all the pulleys, both belts, water pump, and even the heater hoses. Going to change everything on the front of the engine. Just want to make sure there are no other elbows that I might need to replace (besides the one leading from the tensioner to the LIM) I want to have everything on hand once I tear into this on the weekend.
_________________
98 Riviera SC3800 All stock except gutted air box.
1970 Buick GS455 Stage1, TSP built 470BBB, 602HP/589TQ
Best MPH, 116.06 MPH, Best ET, 11.54
https://www.youtube.com/watch?v=UHCda-t_Jls
https://www.youtube.com/watch?v=sfT2tEO4XcU
| |
|
| | |
playa
Fanatic

Name : Mark
Age : 46
Location : Newberg, OR
Joined : 2009-03-17
Post Count : 394
Merit : 11
| | Subject: Re: Write-Up: Replacing Accessory Belt Tensioner Fri Oct 07, 2011 10:23 am | |
| So I just finished doing a complete replacement of the accessory tensioner and a couple things I noted: No need to use the hi temp silicone on the heater hoses - in fact I wouldn't. Do however spend the $1.50 on new O rings at Ace or whatever. Mine appeared fine but were brittle beyond belief. BTW, anybody ever notice the arrows on the tensioner where the screws go  My elbow sheered off in the LIM so in order to get the piece out and not risk losing crap down in the engine, I used a cotter pin puller tool like below. 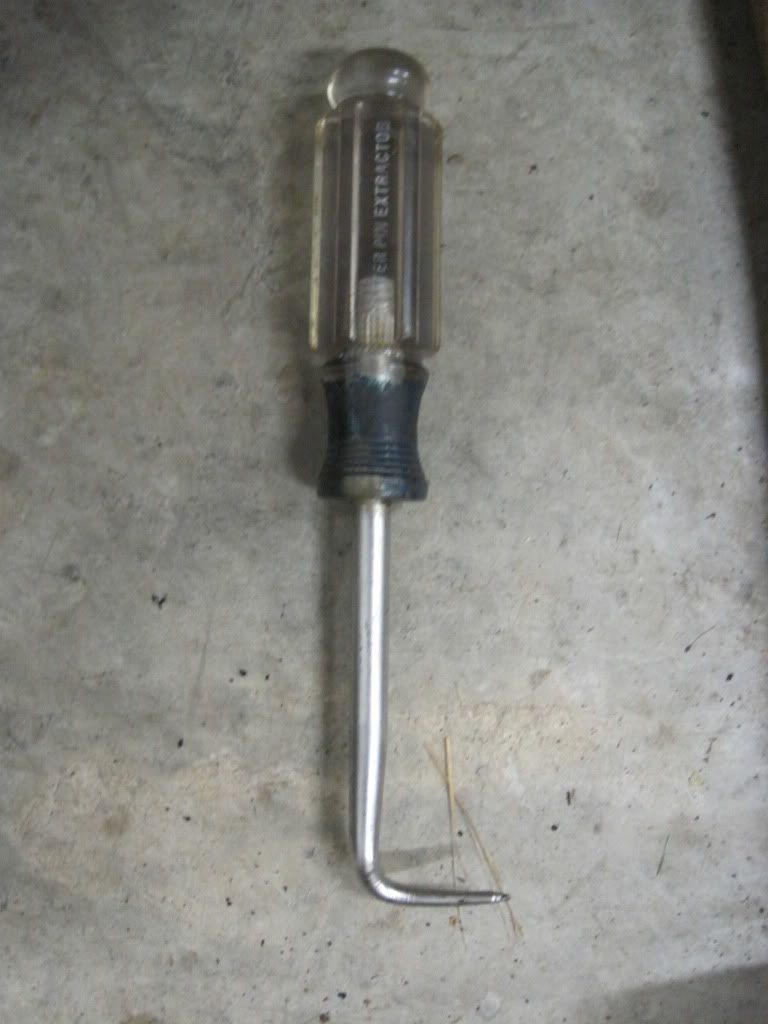 I never unhooked the battery, just be aware of your alternator positive lead. Overall, pretty easy job. I did like Larry and did everything at once which is the way to go if you can get there. 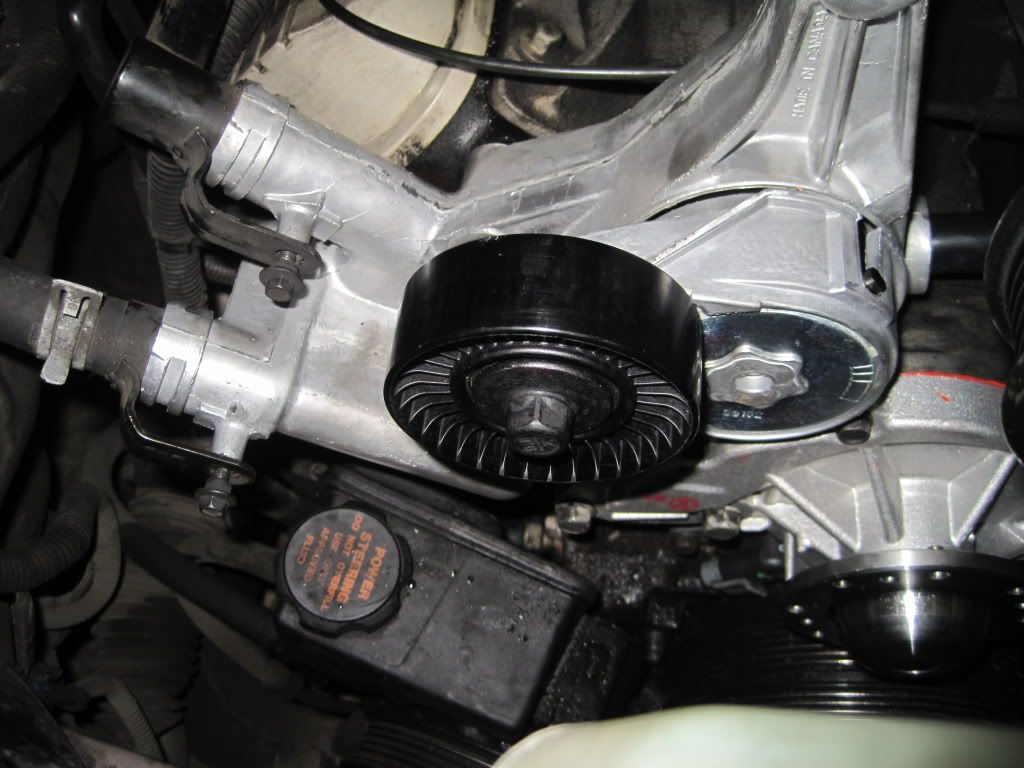 | |
|
| | |
manofmany
Addict
Name : manofmany
Age : 40
Joined : 2008-07-26
Post Count : 611
Merit : 5
| | Subject: Re: Write-Up: Replacing Accessory Belt Tensioner Fri Oct 07, 2011 7:49 pm | |
| I recently replaced this along with my LIM gaskets. I actually broke the elbow AND the housing piece that fits into what I believe is the timing cover. Took some handy work to get that sucker out! I agree, any type of sealant is not necessary. The o-rings do the job just fine. | |
|
| | |
adri
Amateur
Name : adri(95S1SC)
Location : Athens, OH
Joined : 2011-10-26
Post Count : 37
Merit : 1
| | Subject: Re: Write-Up: Replacing Accessory Belt Tensioner Wed Oct 26, 2011 1:37 am | |
| i am trying to replace my whole assembly right under my alternator because while attempting to replace the pulley the bolt broke off and is stuck in there(sucks). i see on amazon that they have the assembly for my 95 supercharged but im not sure which one to get because after you specify the make, model etc it says fitment notes: serpentine - except w/ supercharger. what the hell does that mean? is this the assembly i get? help, i need my car! | |
|
| | |
pbrktrt
Enthusiast
Name : patrick gervais
Location : muskegon.mi
Joined : 2011-07-18
Post Count : 164
Merit : 5
| | Subject: Re: Write-Up: Replacing Accessory Belt Tensioner Wed Oct 26, 2011 7:34 am | |
| adri, I don't know about amazon, but I can give you Gates/NAPA #'s to interchange. 38268 is the supercharger belt drive tensioner and 38269 is the alternator/power steering pump tensioner. I hope this is some help. | |
|
| | |
Jelorian
Amateur
Name : Jel
Location : SF Bay Area
Joined : 2011-11-18
Post Count : 38
Merit : 5
| | Subject: Re: Write-Up: Replacing Accessory Belt Tensioner Sat Jan 14, 2012 2:15 pm | |
| I'll be doing mine today. Ordered the Gates version, part #38152 from Amazon. Its now $61.95 and 2 day shipping is free since I'm a prime member. At all my local shop parts stores, the Gates or equivalent were $90+. Still a good deal from Amazon.
I opened the package when I got it and not only did it come with the coolant elbow, but the accessory pulley as well. However it is plastic so I'll just keep it as a spare. The pulley that is on my Riv now is metal so I'm going to reuse it.
Hope that darn squeak goes away!! The whole reason I'm going to do this! | |
|
| | |
albertj
Master

Name :
Location : Finger Lakes of New York State
Joined : 2007-05-31
Post Count : 8687
Merit : 181
| | Subject: Re: Write-Up: Replacing Accessory Belt Tensioner Sat Jan 14, 2012 2:18 pm | |
| - Jelorian wrote:
- I'll be doing mine today. Ordered the Gates version, part #38152 from Amazon. Its now $61.95 and 2 day shipping is free since I'm a prime member. At all my local shop parts stores, the Gates or equivalent were $90+. Still a good deal from Amazon.
I opened the package when I got it and not only did it come with the coolant elbow, but the accessory pulley as well. However it is plastic so I'll just keep it as a spare. The pulley that is on my Riv now is metal so I'm going to reuse it.
Hope that darn squeak goes away!! The whole reason I'm going to do this! you might wanna keep that plastic pulley - even if the metal one is not squeaking the bearings are sealed/dry and do not get any better with use/age. just sayin Albertj | |
|
| | |
Jelorian
Amateur
Name : Jel
Location : SF Bay Area
Joined : 2011-11-18
Post Count : 38
Merit : 5
| | Subject: Re: Write-Up: Replacing Accessory Belt Tensioner Tue Jan 17, 2012 11:34 pm | |
| - albertj wrote:
- Jelorian wrote:
- I'll be doing mine today. Ordered the Gates version, part #38152 from Amazon. Its now $61.95 and 2 day shipping is free since I'm a prime member. At all my local shop parts stores, the Gates or equivalent were $90+. Still a good deal from Amazon.
I opened the package when I got it and not only did it come with the coolant elbow, but the accessory pulley as well. However it is plastic so I'll just keep it as a spare. The pulley that is on my Riv now is metal so I'm going to reuse it.
Hope that darn squeak goes away!! The whole reason I'm going to do this!
you might wanna keep that plastic pulley - even if the metal one is not squeaking the bearings are sealed/dry and do not get any better with use/age.
just sayin
Albertj
Yes indeed. Going to keep it as a spare for sure. Who would have thought that to change a pulley tensioner, you would end up learning how to drain and refill your coolant as well as learn how to replace your alternator. | |
|
| | |
98riv
Moderator
Location : USA
Joined : 2007-01-14
Post Count : 995
Merit : 30
| | Subject: Re: Write-Up: Replacing Accessory Belt Tensioner Tue Jan 01, 2013 9:05 am | |
| Does anyone know the part number(s) for the o-rings that are on the back of the tensioner? I found replacement o-rings for the black plastic elbow here https://rivperformance.editboard.com/t3092p30-lim-coolant-elbow - DEMonte1997 wrote:
- ACDELCO Part # 1534066
ACDELCO Part # 24502846
Buy on rockauto. Throw these on the Dorman aluminum elbows. Top is orange (x3) bottom is purple (1). Or hit up local NAPA for them.
_________________
1998 Supercharged Riviera - Custom CAI, Alpine spx-13ref, Infinity 6x9's, Alpine 4 Channel Amp, Kicker KX3, Silverstars, STB, Hawk Brake Pads, Monroe Air Shocks, KYB GR2
Last edited by 98riv on Mon Jan 07, 2013 5:10 pm; edited 1 time in total | |
|
| | |
deekster_caddy
Master
Name : Derek
Age : 52
Location : Reading, MA
Joined : 2007-01-31
Post Count : 7717
Merit : 109
| | Subject: Re: Write-Up: Replacing Accessory Belt Tensioner Tue Jan 01, 2013 11:49 am | |
| I know if you go pick up the cheap HELP Coolant Elbows it comes with the elbow we need, plus the elbow we don't need. (don't use the HELP elbows, they are crap for quality) You can use the O-ring from that elbow we don't need as it's the same size.
| |
|
| | |
98riv
Moderator
Location : USA
Joined : 2007-01-14
Post Count : 995
Merit : 30
| | Subject: Re: Write-Up: Replacing Accessory Belt Tensioner Tue Jan 01, 2013 2:16 pm | |
| - deekster_caddy wrote:
- I know if you go pick up the cheap HELP Coolant Elbows it comes with the elbow we need, plus the elbow we don't need. (don't use the HELP elbows, they are crap for quality) You can use the O-ring from that elbow we don't need as it's the same size.
So if I get the replacement o-rings that I mentioned above, they will also work for the tensioner o-rings?
_________________
1998 Supercharged Riviera - Custom CAI, Alpine spx-13ref, Infinity 6x9's, Alpine 4 Channel Amp, Kicker KX3, Silverstars, STB, Hawk Brake Pads, Monroe Air Shocks, KYB GR2
| |
|
| | |
AA
Administrator
Name : Aaron
Age : 47
Location : C-bus, Ohio
Joined : 2007-01-13
Post Count : 18452
Merit : 252
| | Subject: Re: Write-Up: Replacing Accessory Belt Tensioner Tue Jan 01, 2013 2:28 pm | |
| You can buy set of 200 various sized O-rings and grommets for around $10 at Amazon.com. Might contain the ones you're looking for? 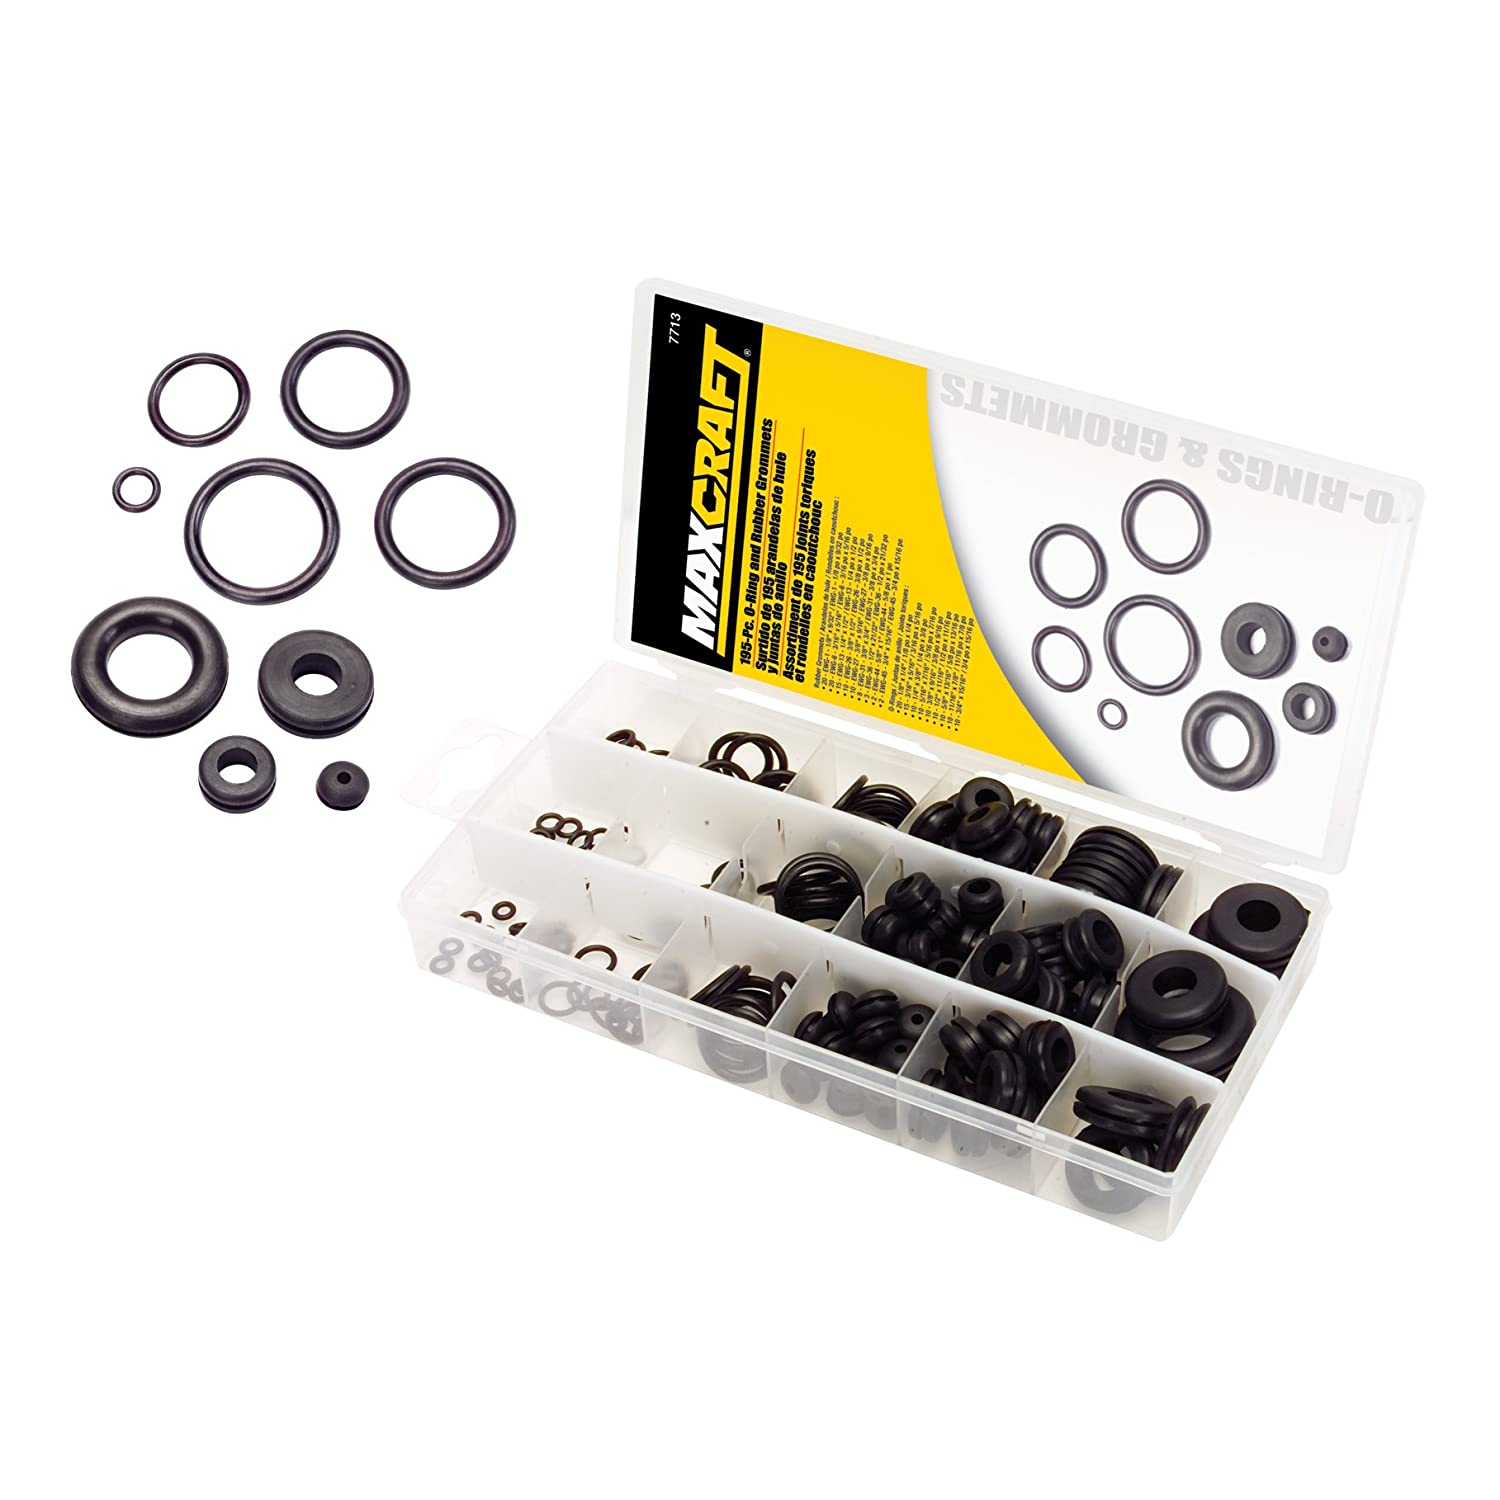 _________________ '05 GTO 6.0L • 6-spd • 95k miles • 0-60: 4.8s • 16.9 avg MPG • Nelson Ledges Lap: 1:26'95 Celica GT 2.2L • 5-spd • 165k miles • 0-60: yes'98 SC Riviera • 281k miles • 298 HP/370 TQ • 0-60: 5.79s • ET: 13.97 @ 99.28 • 4087 lb • 20.1 avg MPG • Nelson Ledges Lap: 1:30
3.4" pulley • AL104 plugs • 180º t-stat • FWI w/K&N • 1.9:1 rockers • OR pushrods • LS6 valve springs • SLP headers • ZZP fuel rails
KYB GR2 struts • MaxAir shocks • Addco sway bars • UMI bushings • GM STB • Enkei 18" EV5s w/ Dunlop DZ101s • F-body calipers
EBC bluestuff/Hawk HP plus • SS lines • Brembo slotted discs • DHP tuned • Aeroforce • Hidden Hitch^^^ SOLD ^^^ '70 Ninety-Eight Holiday Coupe 455cid • 116k miles^^^ SOLD ^^^ | |
|
| | |
98riv
Moderator
Location : USA
Joined : 2007-01-14
Post Count : 995
Merit : 30
| | Subject: Re: Write-Up: Replacing Accessory Belt Tensioner Tue Jan 01, 2013 2:29 pm | |
| I wasn't sure if any o-ring would work because the "old" ones are leaking already after being replaced less than a year ago.
_________________
1998 Supercharged Riviera - Custom CAI, Alpine spx-13ref, Infinity 6x9's, Alpine 4 Channel Amp, Kicker KX3, Silverstars, STB, Hawk Brake Pads, Monroe Air Shocks, KYB GR2
| |
|
| | |
deekster_caddy
Master
Name : Derek
Age : 52
Location : Reading, MA
Joined : 2007-01-31
Post Count : 7717
Merit : 109
| | Subject: Re: Write-Up: Replacing Accessory Belt Tensioner Tue Jan 01, 2013 7:59 pm | |
| Make sure the hole in the block is clean, and put a little grease on the Oring when you assemble it. | |
|
| | |
98riv
Moderator
Location : USA
Joined : 2007-01-14
Post Count : 995
Merit : 30
| | Subject: Re: Write-Up: Replacing Accessory Belt Tensioner Mon Jan 07, 2013 5:10 pm | |
| The tensioner o-ring looked fine, but noticed that the elbow was leaking again. I found out the coolant elbow o-rings were completely flat and it was very loose in the tensioner and in the lower intake manifold. This is the second time that a Dorman elbow has done this. I ended up going to the dealer and getting an AC Delco elbow. I never had this trouble with the stock elbow, so hopefully the AC Delco one will do the same. Here is the part number 24503423. I will also post this in the coolant elbow thread.
_________________
1998 Supercharged Riviera - Custom CAI, Alpine spx-13ref, Infinity 6x9's, Alpine 4 Channel Amp, Kicker KX3, Silverstars, STB, Hawk Brake Pads, Monroe Air Shocks, KYB GR2
| |
|
| | |
Sponsored content
| | Subject: Re: Write-Up: Replacing Accessory Belt Tensioner | |
| |
|
| | |
| | Write-Up: Replacing Accessory Belt Tensioner | |
|


