| | Write-Up: Custom Rear Adjustment Links |  |
|
+19matt270avian Sir Psycho Sexy charlieRobinson al_roethlisberger Mr.Riviera Z-type Karma RidzRiv joshuadalegrimes flyineagle96 stan sniperdude Jason turtleman AA Derek Abaddon BMD robotennis61 23 posters |
|
| Author | Message |
|---|
robotennis61
Guru

Name : robotennis
Age : 62
Location : las vegas
Joined : 2007-12-17
Post Count : 5562
Merit : 143
| | Subject: Write-Up: Custom Rear Adjustment Links Thu Dec 16, 2010 12:24 am | |
| just thought i would share my new rear suspension set up. the rods are what the service manual calls"inner/outer adjustment links" . The alu set weigh just a hair over 4lbs . the spherical bearings in the pic are the bushings for the rear control arms. ill do a write up when all the rest of the build happens. the spacer sleeves are not coming in until after the new year,and the bolting down of the rear RSSA wont happen until then too.all spherical bearings are 0 maintenance nylon injected. should last a long time on the smooth roads of Vegas.when they wear out,its a simple remove a circlip and pop in a new one.  ps. the spherical bearings with spacers attached in the pic,are for the control arms. the stock control arms have to be removed and the bushings pressed(burned out) along with the aluminum stock spacer and a steel sleeve with circlip channels machined into them installed. it is a project.
Last edited by robotennis61 on Mon Mar 11, 2013 2:53 am; edited 4 times in total | |
|
| | |
BMD
Aficionado

Name : BMD
Location : Canada
Joined : 2009-04-28
Post Count : 1161
Merit : 36
| | Subject: Re: Write-Up: Custom Rear Adjustment Links Thu Dec 16, 2010 12:33 am | |
| OH MAN ROBO, what timing, I think I will be needing to do this soon, a write-up would be greatly appreciated. | |
|
| | |
robotennis61
Guru
Name : robotennis
Age : 62
Location : las vegas
Joined : 2007-12-17
Post Count : 5562
Merit : 143
| | Subject: Re: Write-Up: Custom Rear Adjustment Links Sat Dec 18, 2010 4:10 pm | |
| - BMD wrote:
- OH MAN ROBO, what timing, I think I will be needing to do this soon, a write-up would be greatly appreciated.
kool! i ran sphericals through 4 NY winters,and the bearings did not degrade at all! impressive for bearings that had to be re greased periodically. these bearings are self lubing. I bet the winters in Canada are harsher than NY,but with maintenance you can stretch the life of the bearings. i expect to be riding a little harsher though,something like an extra 7lbs in the tires. the sharp bumps come on a little stronger though but totally acceptable. | |
|
| | |
Abaddon
Expert

Name : Scott
Location : Macomb, Michigan
Joined : 2010-02-24
Post Count : 4314
Merit : 185
| | Subject: Re: Write-Up: Custom Rear Adjustment Links Sat Dec 18, 2010 6:23 pm | |
| Cool Robo. BUT, you haven't shared where you got those bad boys!  I love those style of tie-rod ends. I'd love to convert the front and rear to those. They're strong as hell and easily maintained. | |
|
| | |
robotennis61
Guru
Name : robotennis
Age : 62
Location : las vegas
Joined : 2007-12-17
Post Count : 5562
Merit : 143
| | Subject: Re: Write-Up: Custom Rear Adjustment Links Sat Dec 18, 2010 7:51 pm | |
| - Abaddon wrote:
- Cool Robo. BUT, you haven't shared where you got those bad boys!
I love those style of tie-rod ends. I'd love to convert the front and rear to those. They're strong as hell and easily maintained. OK BUDDY! i haven't yet installed them. i took the measurements as close as i thought possible. i might have to play around with the mounting locations a bit,meaning the "rear support assembly" where the adjustment links go by way of a cam bolt,might need to be eliminated. that is to say,the rubber isolators that are between the mounting point and the chassis,are going to go bye bye. ill have to fab up a bracket or modify the original and weld into place. when you look under there you will know what I'm talking about. its a stiffer ride. nothing would make me more stoked than to have someone give an idea of mine a try. here are the part #s for anyone interested. by all means i invite anyone to come up with their own measurements and tweak as necessary,but this is as close as i could get it. this set up also does away with the rear ball joints,replacing them with rod ends. buyer beware,this is a race set up and is guaranteed to get heads scratching...  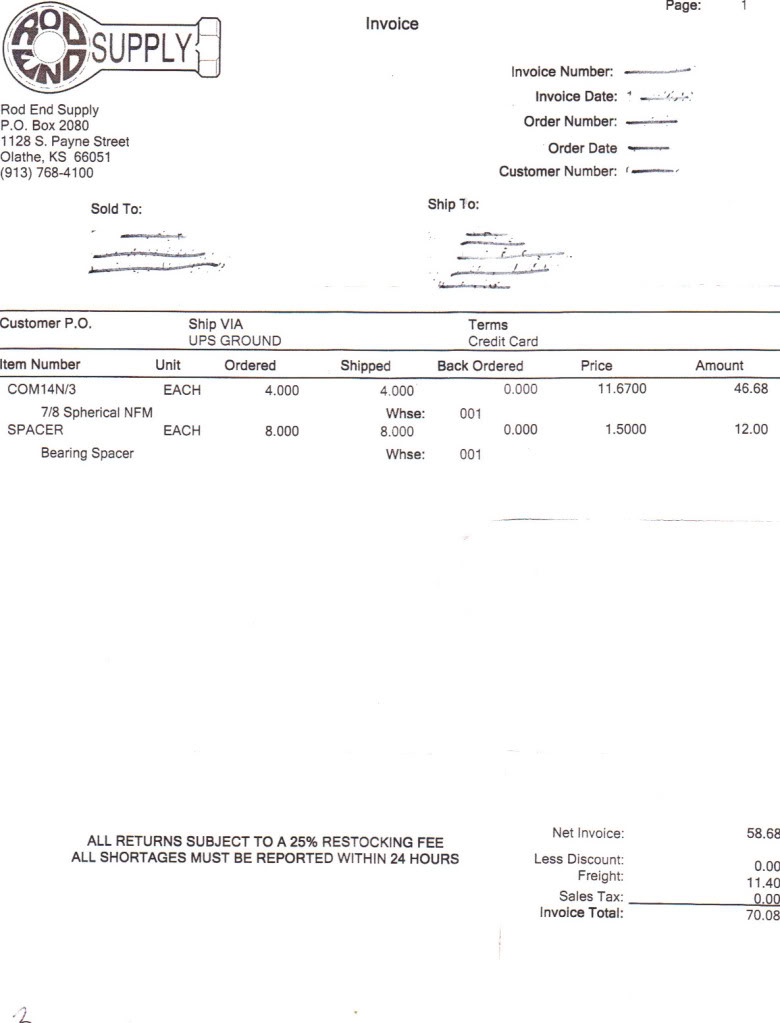 as anyone can plainly see,this set up is CHEAP! just in time for the holidays
Last edited by robotennis61 on Tue Aug 26, 2014 7:39 pm; edited 1 time in total | |
|
| | |
robotennis61
Guru
Name : robotennis
Age : 62
Location : las vegas
Joined : 2007-12-17
Post Count : 5562
Merit : 143
| |
| | |
Derek
Fanatic
Name : Derek
Age : 42
Location : New Jersey
Joined : 2010-03-23
Post Count : 255
Merit : 10
| | Subject: Re: Write-Up: Custom Rear Adjustment Links Sun Feb 19, 2012 4:27 pm | |
| Very pretty! I likey!! You know what you had made right there is almost exactly the same as the cross bar on most adjustable strut tower braces. I don't see stb's in your mods list... Make 2 more of those the appropriate length and some brackets and you have yourself a custom set of stbs. I'm just sayin... Lol | |
|
| | |
robotennis61
Guru
Name : robotennis
Age : 62
Location : las vegas
Joined : 2007-12-17
Post Count : 5562
Merit : 143
| | Subject: Re: Write-Up: Custom Rear Adjustment Links Sun Feb 19, 2012 4:33 pm | |
| I know! I have the heims allready.All I need is the alu tubing for the rear STB.
The reason expensive STB kits have heims, s to facilitate removal.If youve had to remove a one piece STB you know what I mean.they get hung up on the shock tower studs and become a PIA
Last edited by robotennis61 on Mon Mar 11, 2013 2:54 am; edited 1 time in total | |
|
| | |
AA
Administrator

Name : Aaron
Age : 46
Location : C-bus, Ohio
Joined : 2007-01-13
Post Count : 18448
Merit : 252
| | Subject: Re: Write-Up: Custom Rear Adjustment Links Sun Feb 19, 2012 5:06 pm | |
| Have you gotten the rear end aligned yet? If so, how did it go? Noticing the inner edge of your tire is wearing, indicating a tow out condition, but I guess that's why you needed to replace them in the first place. _________________ '05 GTO 6.0L • 6-spd • 95k miles • 0-60: 4.8s • 16.9 avg MPG • Nelson Ledges Lap: 1:26'95 Celica GT 2.2L • 5-spd • 165k miles • 0-60: yes'98 SC Riviera • 281k miles • 298 HP/370 TQ • 0-60: 5.79s • ET: 13.97 @ 99.28 • 4087 lb • 20.1 avg MPG • Nelson Ledges Lap: 1:30
3.4" pulley • AL104 plugs • 180º t-stat • FWI w/K&N • 1.9:1 rockers • OR pushrods • LS6 valve springs • SLP headers • ZZP fuel rails
KYB GR2 struts • MaxAir shocks • Addco sway bars • UMI bushings • GM STB • Enkei 18" EV5s w/ Dunlop DZ101s • F-body calipers
EBC bluestuff/Hawk HP plus • SS lines • Brembo slotted discs • DHP tuned • Aeroforce • Hidden Hitch^^^ SOLD ^^^  '70 Ninety-Eight Holiday Coupe 455cid • 116k miles '70 Ninety-Eight Holiday Coupe 455cid • 116k miles^^^ SOLD ^^^ | |
|
| | |
robotennis61
Guru
Name : robotennis
Age : 62
Location : las vegas
Joined : 2007-12-17
Post Count : 5562
Merit : 143
| | Subject: Re: Write-Up: Custom Rear Adjustment Links Sun Feb 19, 2012 5:09 pm | |
| I aligned them myself.The worn tires are from Big-O-tires.when I had my cheapie tires instaled,the mech failed to tighten the knuckle bolts correctly and the result of that is bald tires.Never go to Big-O-tires. I did notice the problem,but was too lazy/didnt care to fix it.they were originaly on the front,moved em to the back.All good now,just waiting to do my front and rear coilovers to put on my fresh set of meats. | |
|
| | |
turtleman
Expert

Name : Codith
Age : 36
Location : Villa Park, IL
Joined : 2007-02-08
Post Count : 3671
Merit : 140
| | Subject: Re: Write-Up: Custom Rear Adjustment Links Sun Feb 19, 2012 7:05 pm | |
| So the center bolts that used to be the eccentric cams are now simple stationary bolts and you adjust the bar by twisting it like a tie rod end then or what? I'm just going off what it looks like. I'm very interested in this mod because the stud for my rear adjustment cam snapped off when I took it in for an attempted alignment. Do you know what all the arms are made of? and is there a change in anything for handling and whatnot? | |
|
| | |
robotennis61
Guru
Name : robotennis
Age : 62
Location : las vegas
Joined : 2007-12-17
Post Count : 5562
Merit : 143
| | Subject: Re: Write-Up: Custom Rear Adjustment Links Sun Feb 19, 2012 9:02 pm | |
| I got rid of the OEM cambolts.the rear control arms on the 95 are alu. after I installed my adjustable strut camber bolts up front on the knuckle,I saved the OEM strut knuckle bolts and used those for the 5/8 heims out back.they fit perfect.I then took the strut bolt nut and welded it to a fat washer and welded it to the inside of the RSSA bracket .I then enlarged the elongated hole closest to the wheel that the stupid eccentric cam bolt went through.Then I ran the bolt into a 5/8s" spacer, a fat washer and the heim and the misalignment cone spacers, and bolted it all down.You could put a bigger heim and tube if you want. I went with the lightest possible.You could go with an inch or inch and 3/4 tube and and a fat heim.that would look wicked.a big fat set up! haha.
removing the eccentric cam bolt is difficult.it is captured between the back end of the RSSA and the gas tank.There is a through hole at the very back of the RSSA that the cam bolt go's through,but you have to loosen up the RSSA somewhat and with a pry bar wedged between the underbody and the RSSA pry down to give yourself some slack to wiggle the cam bolt out.be careful welding the strut nut into place,the gas tank is right there lol! if you go down there all i've said will begin to make sense.at the front of the RSSA where the new bolt will rest,there are these upside down "U' things welded to the RSSA .they are there for the eccentric degreed washers.cut them off. they are only held in place with a couple tacks.
and yes,they are adjustable by hand.the new heims are ,right hand and left hand along with the tube.so ya just twist and done.stupid easy.and they ride really nice.
Last edited by robotennis61 on Sun Feb 28, 2016 7:06 pm; edited 5 times in total | |
|
| | |
robotennis61
Guru
Name : robotennis
Age : 62
Location : las vegas
Joined : 2007-12-17
Post Count : 5562
Merit : 143
| | Subject: Re: Write-Up: Custom Rear Adjustment Links Sun Feb 19, 2012 9:31 pm | |
| I should point out a couple things. The Rivs soft rubber bushings out back have the car constantly toeing in and toeing out as you drive.the control arm bushings are allowing side to side movement and the Rear Body Mount bushings(so called in the FSM) are allowing fore and aft and side to side movement.this translates into what some call "Vague feeling" the car doesn't know where it wants to go!? and it mushes it's poor ass all over the place giving you a nice close up of walls and other cars as you fight to control her in fast turns.if you're smart you'll slow down and take turns a little slower.
The adjustable links are in on it too.they allow exactly what they were enginered not to do.to prevent Toe Movement!. so...adding the heims to the rear end will school the Rivs ass somewhat but ya gotta keep going and eliminate the "Rear Body Mounts" how do you do that?well...the rear body mounts are held into place with 2 bolts each.there are two RBMs,one for each adjustable link. remove the RBMs,and cut the rubber bushing at its base.save the nut that the RBM runs through and weld it to the RBM plate.done. you have to remove the RBM to see what I'm talking about.
my next step is to replace the rubber control arm bushings with sphericals. that will be sometime soon. after that the rear end will be done.
all the little bits make the whole. Don't forget to hard mount the RSSA forward body mounts.doing just the adjustable links won't net a whole lot.
Last edited by robotennis61 on Sun Feb 28, 2016 7:10 pm; edited 1 time in total | |
|
| | |
Jason
Aficionado

Name : Jason
Age : 40
Location : Comox, BC, Canada
Joined : 2007-01-23
Post Count : 1378
Merit : 65
| | Subject: Re: Write-Up: Custom Rear Adjustment Links Mon Feb 20, 2012 6:34 pm | |
| | |
|
| | |
robotennis61
Guru
Name : robotennis
Age : 62
Location : las vegas
Joined : 2007-12-17
Post Count : 5562
Merit : 143
| | Subject: Re: Write-Up: Custom Rear Adjustment Links Mon Feb 20, 2012 9:22 pm | |
| | |
|
| | |
turtleman
Expert
Name : Codith
Age : 36
Location : Villa Park, IL
Joined : 2007-02-08
Post Count : 3671
Merit : 140
| | Subject: Re: Write-Up: Custom Rear Adjustment Links Sat Mar 09, 2013 2:40 pm | |
| I'm visiting some options for this. So the bar you used is 5/8 threaded 7/8 OD? how long? And I'm kinda wondering why not just keep an OE style tie rod end for the control arm side? That aftermarket stud adapter deal seems a little messy looking and you're sayin' you have to ream the arm too? Those 10* reamers are more expensive than the parts are! lol
Anyway I'm not doin the RSSA mounting mod or spherical bushings and stuff. I'm just lookin to fix and lighten the current dummy design. I do really want to mount a 2nd gen rear cross-member though while I'm at it though. | |
|
| | |
robotennis61
Guru
Name : robotennis
Age : 62
Location : las vegas
Joined : 2007-12-17
Post Count : 5562
Merit : 143
| | Subject: Re: Write-Up: Custom Rear Adjustment Links Sat Mar 09, 2013 4:50 pm | |
| well...on page one of this thread is the order sheet for all the parts needed to convert. as for the "Stud adapter" well,its been in use for decades.look it up. it is a tried and true hotrodders tip.its even found on some of the older formula 1 cars. if ya cant see it,i cant explain it.
there is really no other way to lighten the load in the back. I would have to be in front of you to explain how i did it.its complicated. if you remove it and give it some Look-see,youll figure it out. | |
|
| | |
turtleman
Expert
Name : Codith
Age : 36
Location : Villa Park, IL
Joined : 2007-02-08
Post Count : 3671
Merit : 140
| | Subject: Re: Write-Up: Custom Rear Adjustment Links Tue Apr 02, 2013 3:02 pm | |
| I'm going to try to go ahead and do this before june so I can actually align the car properly before racing it at high speeds lol. I ordered the parts and I gotta check at work if we have a 10deg reamer. One question  Looking at the inside end of the arm there, the sleeve held in place by the insulation is pretty much a slide-in fit to the rear cradle until you tighten down that nut and it's all kinda smushed tight right? So I'm thinkin I want to make some aluminum spacers or something to take up the room that's going to be on each side of the heim joint that will attach to cradle and then washers similar to the original offset ones except they'd be centered. right? | |
|
| | |
sniperdude
Fanatic

Name : Mike
Location : Chicago
Joined : 2012-06-04
Post Count : 250
Merit : 18
| |
| | |
robotennis61
Guru
Name : robotennis
Age : 62
Location : las vegas
Joined : 2007-12-17
Post Count : 5562
Merit : 143
| | Subject: Re: Write-Up: Custom Rear Adjustment Links Tue Apr 02, 2013 7:10 pm | |
| - turtleman wrote:
- I'm going to try to go ahead and do this before june so I can actually align the car properly before racing it at high speeds lol. I ordered the parts and I gotta check at work if we have a 10deg reamer.
One question
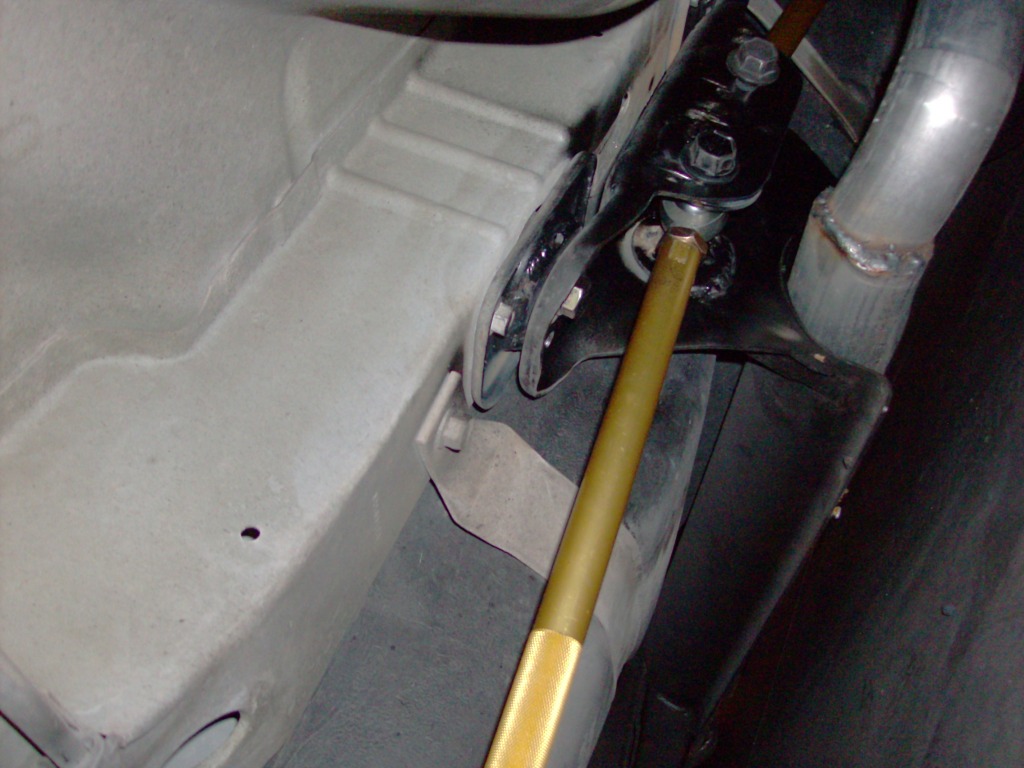
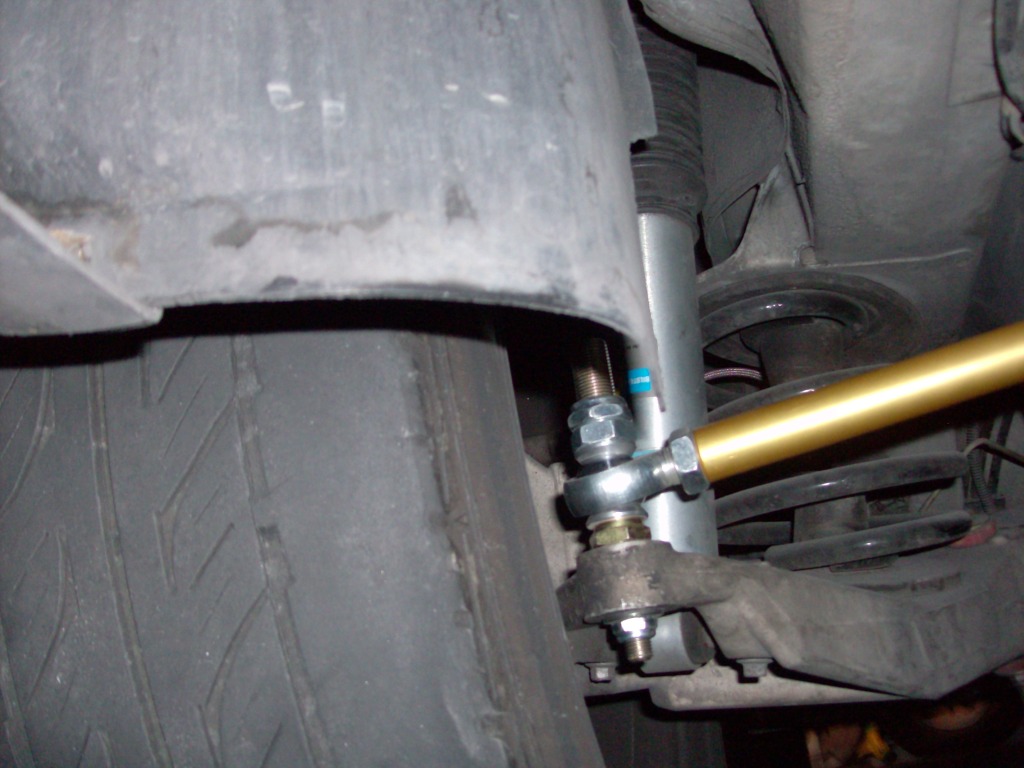
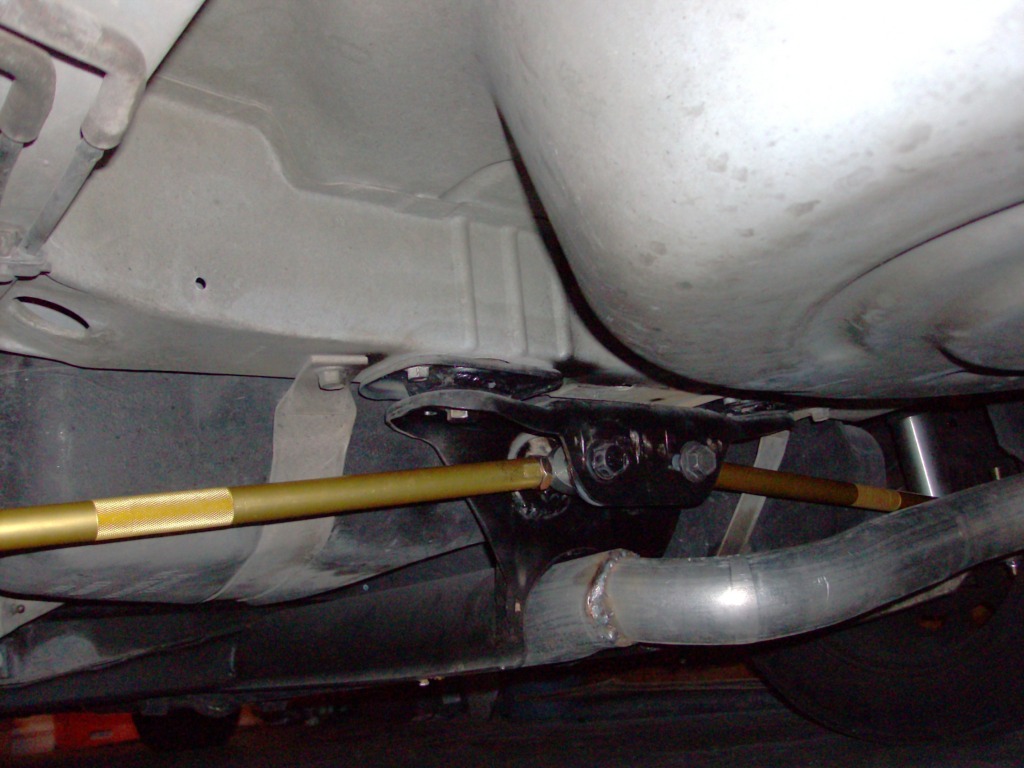
Looking at the inside end of the arm there, the sleeve held in place by the insulation is pretty much a slide-in fit to the rear cradle until you tighten down that nut and it's all kinda smushed tight right? So I'm thinkin I want to make some aluminum spacers or something to take up the room that's going to be on each side of the heim joint that will attach to cradle and then washers similar to the original offset ones except they'd be centered. right? Let me see if i get it? Now,Just FORGET what you NOW have on the car in terms of attachment points,to a point. If you have an FSM,go to "Rear Suspension" The FSM calls the rubber mounts that bolt into the underside of the body the "Rear Body Mount" remove them. What you are going to do is eliminate the rubber.You will have to cut them in half.Now you are left with just the rectangular bracket and the nut.right? Now you can do 3 things,you can cut down the nut that is on the INSIDE of the "RBM" and weld it to the INSIDE of the RBM rectangualr bracket,and then bolt the rectangular bracket back to the body with the 4 little bolts . Or you can weld the ENTIRE rectangular bracket to the underside of the body after modifying the INSIDE RBM nut.See what I mean?Youre gonna have to remove that RBM to see where I'm going with this. You can come up with any combination you want.As long as the RSSA is bolted to the underside of the body.You can make your own attachment points.You can make more than 2,you can make 4 or 5.As long as the RSSA dont move yer good.This is how I did it.It works for me and that good enough. Now,The bolting down of the Adjustment link is super straight forward.You no longer have to OBEY the bogus concentric washer.The one used for toe.It's gone. You will only use the mounting point at the back of the RSSA bracket. Ok,here is a pic of where I mounted and fabbed up the mounting point for the adjusment links and the How.  As you can see I placed a big ol nut for the great big ol bolt to go thru on the inside of the RSSA bracket.I used it as a spacer then I welded it in place.For spacers you can use anything you want.I welded that nut to the bracket so I dont have to mess with falling spacers and what not. On the other side of the bracket I took another big nut for a 5/8s bolt and welded to the inside of the RSSA bracket. You can see how I did this in both pics  So what youre doing is using all the OEM mounting points for the new Adjustment Links. You will most likely have to drop the RSSA to remove the rear OEM nut that the OEM cam bolt goes into.It is a captured nut on the back of the RSSA.You will have to drop the RSSA anyway when you start to weld.You dont absolutely have to but it's safer and ten times less a headache.Gazoline ya know. Now all thats left is to install the new components.Follow my pics and you cant go wrong.Make sure you have nothing but the most primo hardware for the mod. The thru bolt for the new heim joints is 5/8s of course.You have access to heavy duty machining equipment right? well then I would remove the control arms and match the taper of the New stud to the taper of the control arm. So,without further ado...have fun. p.s. My goal is to eliminate the RSSA alltogether so my set up is temporary but tottaly strong.I does not move AT ALL TURTLE!!! p.s.s. if you get stranded give me a shout. p.s.s.s You may have to elongate and mess with the outside holes on the RSSA to make room for the 5/8s bolts.Dont be surprised if you have to.I lined things up and still had to elongate and ream the OEM bracket holes.When youre all done and everything is in place, all you have to do to permanetly locate the holes for the bolts is to get a bil steel washer and weld it into place.This way the bolt allways has a nice home to go into and you wont be laying on your back fiddling with rat holes.See what I mean?
Last edited by robotennis61 on Wed Apr 03, 2013 2:02 am; edited 2 times in total | |
|
| | |
stan
Expert
Joined : 2007-07-01
Post Count : 2558
Merit : 12
| | Subject: Re: Write-Up: Custom Rear Adjustment Links Tue Apr 02, 2013 8:24 pm | |
| I gotta say,that looks great. | |
|
| | |
turtleman
Expert
Name : Codith
Age : 36
Location : Villa Park, IL
Joined : 2007-02-08
Post Count : 3671
Merit : 140
| | Subject: Re: Write-Up: Custom Rear Adjustment Links Wed Apr 03, 2013 1:05 am | |
| Great pictures man - thanks! I found no 10* reamers today  I stole the specs off the ones you can buy and I'm gonna see if we can alter a straight one and make a 10deg but that would be a lot of material needing to be ground off lol, if that doesn't work out, any chance I could barrow one for you robo? | |
|
| | |
robotennis61
Guru
Name : robotennis
Age : 62
Location : las vegas
Joined : 2007-12-17
Post Count : 5562
Merit : 143
| | Subject: Re: Write-Up: Custom Rear Adjustment Links Wed Apr 03, 2013 2:00 am | |
| Sorry,me no have one.I used a 10* step bit.not pretty but efficient. | |
|
| | |
flyineagle96
Junkie

Name : James E
Age : 55
Location : Dalton,Mass
Joined : 2009-12-21
Post Count : 915
Merit : 23
| | Subject: Re: Write-Up: Custom Rear Adjustment Links Wed Apr 03, 2013 7:31 am | |
| Fine work Robo,in my exps metal bearings without grease become sloppy!!! In the pics they do pivot right???LOL  | |
|
| | |
robotennis61
Guru
Name : robotennis
Age : 62
Location : las vegas
Joined : 2007-12-17
Post Count : 5562
Merit : 143
| | Subject: Re: Write-Up: Custom Rear Adjustment Links Wed Apr 03, 2013 10:08 am | |
| - flyineagle96 wrote:
- Fine work Robo,in my exps metal bearings without grease become sloppy!!! In the pics they do pivot right???LOL
they are nylon injected sphericals.Same ones used on dirt trackers.According to the manufacture theyve been known to go 100 thousand plus miles with no loss of integrity.They are self cleaning and require NO maintenance.Sez the manufacture. Here is a pic of my rear control arms from my Acura Legend I posted in another thread.I dont know if you saw them but they went thru 7 NYC winters with zero fail and No slop in the race.I briefly convinced my self to follow some kind of maintenance routine but quickly gave up.Today they are as tight and wear free as the day I bought them oh way back when.No kiddin. 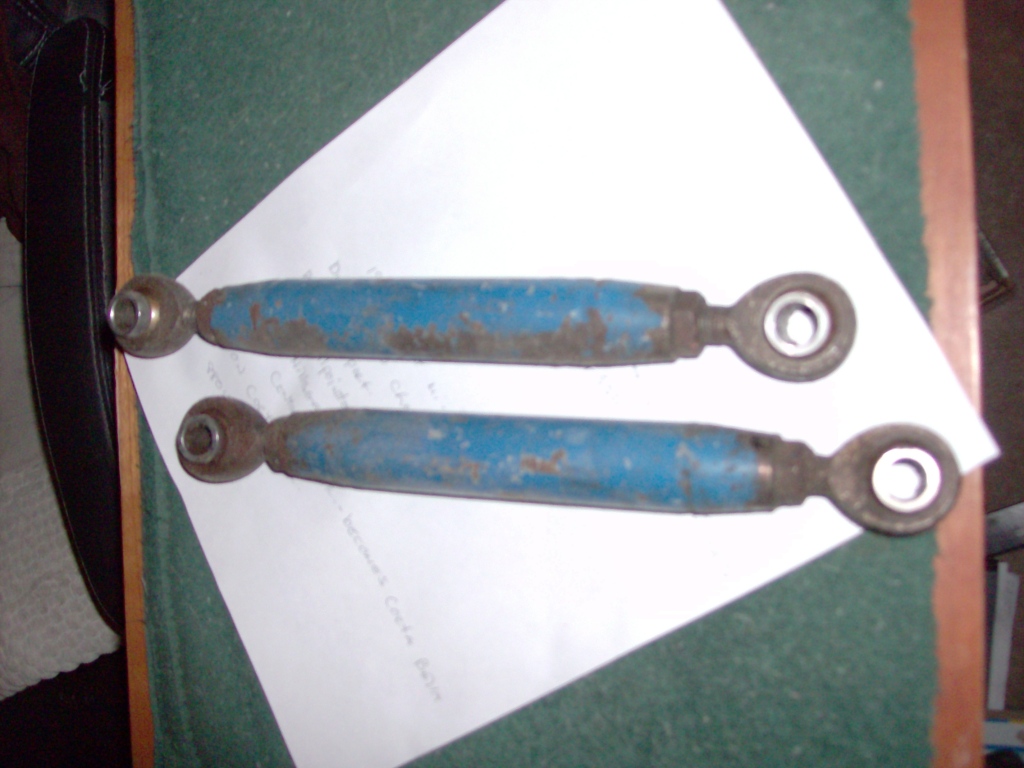 The manufacture sez the sphericals I used in the mod should give me no issues at all.We'll see.If they do fail at some point,a replacement spherical only costs $12.99.how cool is that!? The inexpensive sphericals in the old NY pic cost me $10.00 each! lol! | |
|
| | |
Sponsored content
| | Subject: Re: Write-Up: Custom Rear Adjustment Links | |
| |
|
| | |
| | Write-Up: Custom Rear Adjustment Links | |
|