| | Write-Up: HVAC Assembly |  |
|
+33Jack the R TampaRivGuy 71stagegs EyeDoc1 kelliestime2 1997riv VJD2 atteboy1 Karma 96riv Tajis charlieRobinson Ridin-Rivi stan LARRY70GS 98riv rk0ehn AA VegasScott turtleman Jason moldymac Abaddon Eldo T Riley 96RIVMANN superivicharg Rickw 98RIV7777 albertj captshiner deekster_caddy 99Rivman 37 posters |
|
| Author | Message |
|---|
VegasScott
Enthusiast

Name : Scott
Location : Las Vegas, Nevada
Joined : 2010-12-21
Post Count : 117
Merit : 8
| | Subject: Re: Write-Up: HVAC Assembly Sun Nov 27, 2011 7:04 pm | |
| Yeah, I saw that too. :  VegasScott | |
|
| | |
VegasScott
Enthusiast
Name : Scott
Location : Las Vegas, Nevada
Joined : 2010-12-21
Post Count : 117
Merit : 8
| | Subject: Re: Write-Up: HVAC Assembly Sun Nov 27, 2011 7:52 pm | |
| Terminal Dropped... Everything back to normal.  VegasScott  | |
|
| | |
stan
Expert
Joined : 2007-07-01
Post Count : 2558
Merit : 12
| | Subject: Re: Write-Up: HVAC Assembly Sun Nov 27, 2011 11:43 pm | |
|
Last edited by stan on Mon Nov 28, 2011 10:19 pm; edited 1 time in total | |
|
| | |
deekster_caddy
Master
Name : Derek
Age : 52
Location : Reading, MA
Joined : 2007-01-31
Post Count : 7717
Merit : 109
| | Subject: Re: Write-Up: HVAC Assembly Mon Nov 28, 2011 12:47 pm | |
| what does Terminal Dropped mean? | |
|
| | |
LARRY70GS
Aficionado

Name : Larry
Age : 68
Location : Oakland Gardens, NY
Joined : 2007-01-23
Post Count : 2193
Merit : 150
| | Subject: Re: Write-Up: HVAC Assembly Mon Nov 28, 2011 2:06 pm | |
| - deekster_caddy wrote:
- what does Terminal Dropped mean?
I'm thinking battery terminal. let's see if I'm right 
_________________
98 Riviera SC3800 All stock except gutted air box.
1970 Buick GS455 Stage1, TSP built 470BBB, 602HP/589TQ
Best MPH, 116.06 MPH, Best ET, 11.54
https://www.youtube.com/watch?v=UHCda-t_Jls
https://www.youtube.com/watch?v=sfT2tEO4XcU
| |
|
| | |
VegasScott
Enthusiast
Name : Scott
Location : Las Vegas, Nevada
Joined : 2010-12-21
Post Count : 117
Merit : 8
| | Subject: Re: Write-Up: HVAC Assembly Mon Nov 28, 2011 3:07 pm | |
| - LARRY70GS wrote:
I'm thinking battery terminal. let's see if I'm right Ding! Ding! Ding! WE HAVE A WINNER! My posts from my phone are always a pain in the butt, so I type as little as possible when using it. VegasScott | |
|
| | |
Ridin-Rivi
Enthusiast

Name : Darrin
Age : 39
Location : WI
Joined : 2007-05-22
Post Count : 242
Merit : 0
| |
| | |
96RIVMANN
Fanatic

Name : Paul
Location : MN
Joined : 2007-10-22
Post Count : 253
Merit : 11
| | Subject: Re: Write-Up: HVAC Assembly Sat Jun 30, 2012 2:55 am | |
| | |
|
| | |
deekster_caddy
Master
Name : Derek
Age : 52
Location : Reading, MA
Joined : 2007-01-31
Post Count : 7717
Merit : 109
| | Subject: Re: Write-Up: HVAC Assembly Sun Jul 01, 2012 8:33 am | |
| - 96RIVMANN wrote:
- Add a can of freon. Trust me, it will take care of your problem!!!!!!!!!!!!!!!!!!!!!!!
https://rivperformance.editboard.com/t1867p135-faq-warm-hot-air-on-drivers-side-cold-on-passenger-side this may be the case (very likely from what I've seen here), but whatever you do please do NOT blindly just add a can of freon. You must at minimum check low pressure, and if you really want to know what is happening high pressure too, before and after you add freon. Do lots of people add freon without checking? Yes. But there are more things going on than just low pressure in your A/C system, and making sure both high and low pressures are within spec is an important step. If the low side is below spec and adding a can fixes all your problems you are lucky. Have someone put gauges on both sides after you are finished just to make sure everything is okay. I bought a cheap (but nice) set of gauges at Advance Auto Parts for $80. | |
|
| | |
Ridin-Rivi
Enthusiast
Name : Darrin
Age : 39
Location : WI
Joined : 2007-05-22
Post Count : 242
Merit : 0
| | Subject: Re: Write-Up: HVAC Assembly Mon Jul 02, 2012 10:01 am | |
| | |
|
| | |
99Rivman
Aficionado

Name : Randall
Location : North Carolina
Joined : 2007-01-16
Post Count : 2009
Merit : 90
| | Subject: Re: Write-Up: HVAC Assembly Wed Jul 04, 2012 6:24 am | |
| - deekster_caddy wrote:
- 96RIVMANN wrote:
- Add a can of freon. Trust me, it will take care of your problem!!!!!!!!!!!!!!!!!!!!!!!
https://rivperformance.editboard.com/t1867p135-faq-warm-hot-air-on-drivers-side-cold-on-passenger-side
this may be the case (very likely from what I've seen here), but whatever you do please do NOT blindly just add a can of freon. You must at minimum check low pressure, and if you really want to know what is happening high pressure too, before and after you add freon. Do lots of people add freon without checking? Yes. But there are more things going on than just low pressure in your A/C system, and making sure both high and low pressures are within spec is an important step. If the low side is below spec and adding a can fixes all your problems you are lucky. Have someone put gauges on both sides after you are finished just to make sure everything is okay. I bought a cheap (but nice) set of gauges at Advance Auto Parts for $80.  You do need to check the pressures, putting in too much can cause problems too. Another way to check the system is to set it at the lowest temp setting and listen/watch the compressor. What this does is override the temp readings and tell the system to run at max, if the compressor cycles that also tells you the Freon is low. | |
|
| | |
charlieRobinson
Expert

Name : Charlie
Age : 39
Location : Knoxville, TN
Joined : 2011-05-17
Post Count : 3924
Merit : 31
| | Subject: Re: Write-Up: HVAC Assembly Sat Aug 04, 2012 5:52 pm | |
| Anyone have a write up for glovebox removal to reach this HVAC component? | |
|
| | |
albertj
Master

Name :
Location : Finger Lakes of New York State
Joined : 2007-05-31
Post Count : 8687
Merit : 181
| | Subject: Re: Write-Up: HVAC Assembly Sat Aug 04, 2012 10:27 pm | |
| - charlieRobinson wrote:
- Anyone have a write up for glovebox removal to reach this HVAC component?
Glove-box comes out pretty easy, set of screws under the hinge. I know this sounds, well, terse but all you do is empty the box then unscrew the box at the hinge. If you look you'll see them. Take your time, no worries. | |
|
| | |
charlieRobinson
Expert
Name : Charlie
Age : 39
Location : Knoxville, TN
Joined : 2011-05-17
Post Count : 3924
Merit : 31
| | Subject: Re: Write-Up: HVAC Assembly Sun Aug 05, 2012 3:21 pm | |
| sorry, didnt mean removing the glovebox. I meant, how do you get the HVAC out of the glovebox area? Seems like you have to take more than the door of the box off to get back in that left corner. | |
|
| | |
98riv
Moderator
Location : USA
Joined : 2007-01-14
Post Count : 995
Merit : 30
| | Subject: Re: Write-Up: HVAC Assembly Wed Aug 15, 2012 4:59 pm | |
| I was looking at gmpartsdirect.com and was looking at the parts diagram for the hvac and it lists a filter for the hvac system. Part number 6 is the filter and part 7 is the filter retainer. http://www.trademotion.com/parts/1998/BUICK/RIVIERA/?siteid=214858&vehicleid=1303322&diagram=AD95066 I always heard that we didn't have an HVAC filter on our system. Is that a different filter than what I am thinking of?
_________________
1998 Supercharged Riviera - Custom CAI, Alpine spx-13ref, Infinity 6x9's, Alpine 4 Channel Amp, Kicker KX3, Silverstars, STB, Hawk Brake Pads, Monroe Air Shocks, KYB GR2
| |
|
| | |
AA
Administrator

Name : Aaron
Age : 47
Location : C-bus, Ohio
Joined : 2007-01-13
Post Count : 18452
Merit : 252
| | Subject: Re: Write-Up: HVAC Assembly Wed Aug 15, 2012 5:28 pm | |
| I think whoever said that meant there is no SERVICEABLE filter, or cabin air filter. That looks like some kind of permanent filter, not sure of its purpose. _________________ '05 GTO 6.0L • 6-spd • 95k miles • 0-60: 4.8s • 16.9 avg MPG • Nelson Ledges Lap: 1:26'95 Celica GT 2.2L • 5-spd • 165k miles • 0-60: yes'98 SC Riviera • 281k miles • 298 HP/370 TQ • 0-60: 5.79s • ET: 13.97 @ 99.28 • 4087 lb • 20.1 avg MPG • Nelson Ledges Lap: 1:30
3.4" pulley • AL104 plugs • 180º t-stat • FWI w/K&N • 1.9:1 rockers • OR pushrods • LS6 valve springs • SLP headers • ZZP fuel rails
KYB GR2 struts • MaxAir shocks • Addco sway bars • UMI bushings • GM STB • Enkei 18" EV5s w/ Dunlop DZ101s • F-body calipers
EBC bluestuff/Hawk HP plus • SS lines • Brembo slotted discs • DHP tuned • Aeroforce • Hidden Hitch^^^ SOLD ^^^  '70 Ninety-Eight Holiday Coupe 455cid • 116k miles '70 Ninety-Eight Holiday Coupe 455cid • 116k miles^^^ SOLD ^^^ | |
|
| | |
Tajis
Amateur
Name : Tajis
Age : 38
Joined : 2012-08-24
Post Count : 28
Merit : 4
| | Subject: Re: Write-Up: HVAC Assembly Fri Aug 24, 2012 4:25 pm | |
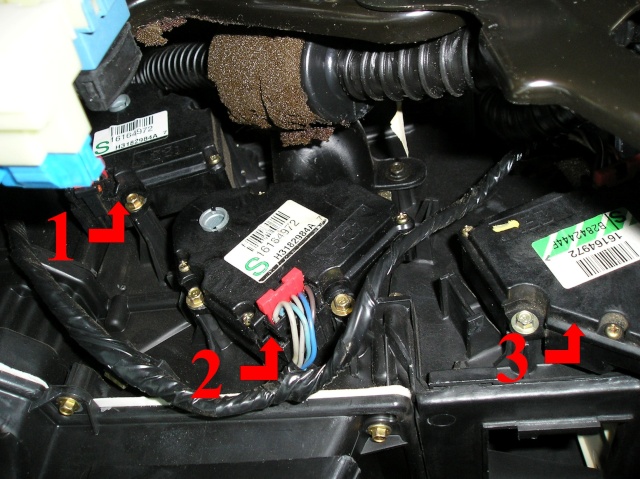
|  This thing is my problem. I've tried every which way to remove it short of taking the dash apart. How does it come loose? I need to get to the actuator directly above it but can't work with it in the way. I feel like an idiot for asking, but what am I doing wrong? LOL | |
|
| | |
charlieRobinson
Expert
Name : Charlie
Age : 39
Location : Knoxville, TN
Joined : 2011-05-17
Post Count : 3924
Merit : 31
| | Subject: Re: Write-Up: HVAC Assembly Sun Aug 26, 2012 2:50 pm | |
| I am tackling #2 actuator on the drivers side. Is it possible to take it off from underneath? only taking the 3 screw plastic plate to get to it? Or must more of the dash come off?
If #2 doesn't look suspicious I will check #3. I am getting hot air on drivers side, middle, and rear.
| |
|
| | |
charlieRobinson
Expert
Name : Charlie
Age : 39
Location : Knoxville, TN
Joined : 2011-05-17
Post Count : 3924
Merit : 31
| | Subject: Re: Write-Up: HVAC Assembly Sun Aug 26, 2012 5:42 pm | |
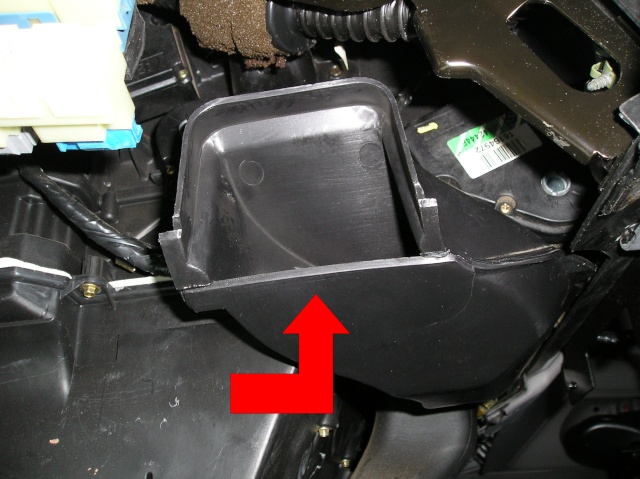
| Got the 2 button plug breakpedal harness things off. A quick 180 turn and pull. looks like I have almost enough room to get to the actuator now. Im with Tajis at this point. It would be a lot easier to work if I could get that duct elbow out of the way. Any protips from someone with experience on this part of the car?
I think those 2 buttons that are mounted to the brake pedal are for ABS and traction, maybe?
| |
|
| | |
Tajis
Amateur
Name : Tajis
Age : 38
Joined : 2012-08-24
Post Count : 28
Merit : 4
| | Subject: Re: Write-Up: HVAC Assembly Mon Aug 27, 2012 4:06 pm | |
| I've 'somewhat' managed to get to the bolts that mount the actuators on. I had to use a very small quarter inch ratchet and still haven't managed to get to all the bolts. | |
|
| | |
Tajis
Amateur
Name : Tajis
Age : 38
Joined : 2012-08-24
Post Count : 28
Merit : 4
| | Subject: Re: Write-Up: HVAC Assembly Tue Aug 28, 2012 3:32 pm | |
| I may have made more progress. Apparently a tool called a "Thumbwheel ratchet" or a "Finger ratchet" will make this job a whole lot easier. It's basically a round ratchet head without a handle that fits in over the screw and gives a thumb grip to twist the screw by hand. | |
|
| | |
charlieRobinson
Expert
Name : Charlie
Age : 39
Location : Knoxville, TN
Joined : 2011-05-17
Post Count : 3924
Merit : 31
| | Subject: Re: Write-Up: HVAC Assembly Fri Aug 31, 2012 1:00 pm | |
| - Tajis wrote:
- I may have made more progress. Apparently a tool called a "Thumbwheel ratchet" or a "Finger ratchet" will make this job a whole lot easier. It's basically a round ratchet head without a handle that fits in over the screw and gives a thumb grip to twist the screw by hand.
Tajis, any luck so far? | |
|
| | |
Tajis
Amateur
Name : Tajis
Age : 38
Joined : 2012-08-24
Post Count : 28
Merit : 4
| | Subject: Re: Write-Up: HVAC Assembly Sun Sep 02, 2012 6:20 pm | |
| The thumb wheel ratchet does make a big difference in removing the screws. I was able to get the middle actuator free without incident, but I'm having trouble with the one closest to the driver. "Number 3"
I can 100% confirm that the original diagram is backward. The middle actuator controls the heat/cold mix on the driver's side. Number 3 will be the one that controls the vents. Using the thumbwheel ratchet I was able to remove number 2 from the bottom, so it is possible.
For number 3, I believe you'll need a screwdriver with extension and quarter inch bit to reach the recessed socket. Still in the process of trying to figure that one out. | |
|
| | |
Tajis
Amateur
Name : Tajis
Age : 38
Joined : 2012-08-24
Post Count : 28
Merit : 4
| | Subject: Re: Write-Up: HVAC Assembly Wed Sep 05, 2012 7:46 pm | |
| Success! I now have air coming through my middle vents!
For the number 2 motor, get a thumbwheel ratchet and feel for the bolts. Attach the ratchet and twist the bolts off. Keep in mind you're basically doing this blind due to the vent being in the way. This is the motor that mixes hot and cold for the driver's side.
Number 3... That's the one that is a PITA to remove. The bolt furthest away from the driver's seat on the number 3 motor is easy to remove. The thumbwheel ratchet will fit right on and have it off in no time. The one closest to the driver's seat is hard to remove. Remove the hard to reach bolt first, since if you don't the whole actuator will be wobbling and trying to get in the way.
I ended up getting a six inch long, quarter inch wobble socket extension. You cannot do this without a wobble socket. This let me flex the 7/32 connector down onto the bolt (with several tries). You will have to run the extension through the open middle of the nearby support arm thing. The socket will not get an easy grip, but it WILL come loose with enough persistence. I ended up holding part of the extension down so that the socket remained angled correctly.
Also, if you have a helper it helps if they hold a flashlight toward the main set of vents over the shift stick. It's the easiest way to get a light on where you're aiming.
Once this is off you'll be able to either replace the part or otherwise manually route the air back up to the vents!
I hope this helps someone not have to go through the trial and error process like I did. | |
|
| | |
albertj
Master
Name :
Location : Finger Lakes of New York State
Joined : 2007-05-31
Post Count : 8687
Merit : 181
| | Subject: Re: Write-Up: HVAC Assembly Wed Sep 05, 2012 8:24 pm | |
| - charlieRobinson wrote:
- Got the 2 button plug breakpedal harness things off. A quick 180 turn and pull. looks like I have almost enough room to get to the actuator now. Im with Tajis at this point. It would be a lot easier to work if I could get that duct elbow out of the way. Any protips from someone with experience on this part of the car?
I think those 2 buttons that are mounted to the brake pedal are for ABS and traction, maybe?
buttons on the brake pedal - top one (usually blue) is cruise control, bottom one is brake lights and a signal line to the electronic brake control or some such - it's in the factory manual. By the way you might want to remove those buttons (the holders are keyed, remove the plugs then twist them and remove0 and open up the switches and check the contacts. I checked mine this week for PM and found the contacts were burned--burned bad in the brake lite switch, not so bad in the cruise switch. The cruise switch cleaned up with a little sanding. I replaced the brake light switch. Again they are not very expensive, you can find them for under $10 each if you look hard enough. | |
|
| | |
Sponsored content
| | Subject: Re: Write-Up: HVAC Assembly | |
| |
|
| | |
| | Write-Up: HVAC Assembly | |
|