Riv Performance
Would you like to react to this message? Create an account in a few clicks or log in to continue.

The 8th Gen Riviera Resource
 
HomeDashboardLatest imagesSearchRiviera Questions & AnswersWrite-Ups IndexRegisterRelated LinksLog in


 Write-Up: Lower Intake Manifold change on a '95

Go down 
+8
pbrktrt
robotennis61
porkchok
BillBoost37
T Riley
jamie
Chicken
Karma
12 posters
Go to page : 1, 2  Next
AuthorMessage
Karma
Aficionado
Karma


Name : Andrew
Age : 39
Location : Ontario, Canada
Joined : 2008-01-14
Post Count : 1949
Merit : 123

Write-Up: Lower Intake Manifold change on a '95 Empty
PostSubject: Write-Up: Lower Intake Manifold change on a '95   Write-Up: Lower Intake Manifold change on a '95 EmptyWed Oct 08, 2008 1:39 pm

Write-up: Changing the LIM on a 95 Riviera

1.Disconnect the battery. If you don't know where your battery is, perhaps you should not be attempting this.

2.Drain the coolant. This might also be a good time to do a coolant flush. The coolant bung is located directly under the driver side headlight. The front-under plastic splash guard must be removed to get access to the coolant drain bung.

3.Remove all the drive belts. On the 95 this is as simple as finding a wrench that matches your idler pulleys, gently pulling up to take away the tension, and removing the belts. No removal of the engine mount is needed for the 95 as it is for the 96-99. If you are unsure if you can get the belts back on again correctly, make a diagram or take a digital picture.

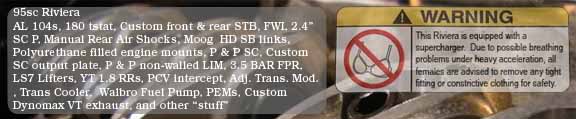
4.Remove all the vacuum lines that obstruct the fuel rail. This is a good time to take pictures so that you can get all the vacuum lines back where they belong. A good method is also to always leave one end of each vacuum line attached to some “larger” piece such as any vacuum Tees, solenoids, or boost actuator. By keeping at least one end always attached, it makes it so that you can re-assemble without even referring to your pictures as I did. Disconnect the vacuum lines so that they stay attached to different items in a way that you can remember, such as by size.

Photobucket

Photobucket

5.Disconnect the wires that connect to the Throttle Body and the Fuel Injectors. Pay close attention to the safety clips that you don't break the brittle plastic. I find a small slot screwdriver helpful. The fuel injector connectors get gently squeezed on the metal wire hoop on their widest side, and they come off really easy. Never force anything when it comes to electrical connections under the hood.

6.Remove the four 10mm bolts holding the fuel rail down. Put them in a small plastic sandwich bag, and mark them something appropriate such as “Fuel rail bolts.” Carefully remove the plastic wire keepers that are attached to the fuel rail. I left the keepers attached to the wires that they belonged to.

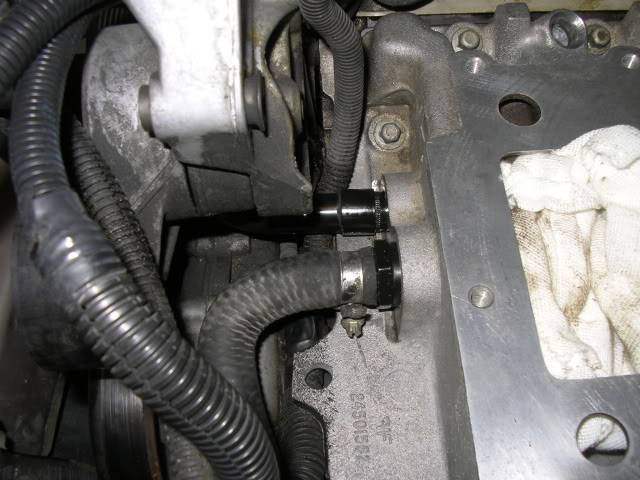
7.If you do not intend to paint the fuel rail, it can be gently moved aside for access to the rest of the engine. However, I prefer to remove the quick connects further up the line so that things are out of the way. Keep in mind that there is a pressure release valve at the back of the fuel rail covered by a screw on cap. Unscrew the cap and press the stem with a small screw driver to ensure that the fuel is not under pressure. Also keep in mind that if removing the quick connects further up the line that it will spill some fuel out. Use a rag. Try and leave the 2 yellow safety clips on the fuel rail where the fittings can swivel. Remove the L shaped plastic bracket that joins each side of the swivel fittings. To remove the fuel rail, gently pull straight up. The injectors should stay attached to the rail and pull out with some effort.

Photobucket

8.If you haven't already gotten to it, remove the vacuum line connecting to the brake booster. That is the largest vacuum line that goes from the black fitting on top of the supercharger to just under the brake fluid holder.

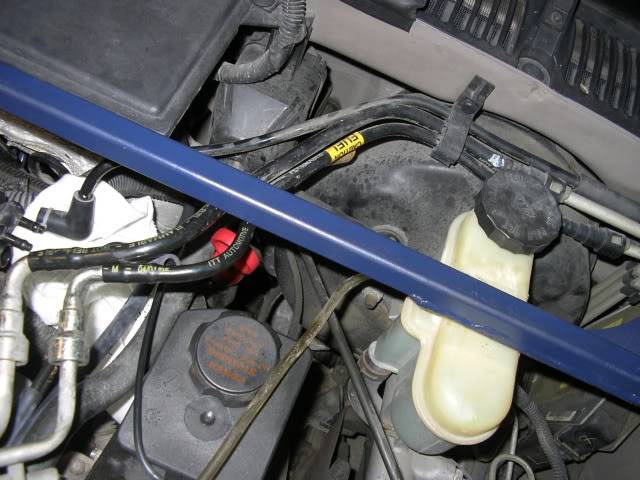
9.There is a folded metal plate that wraps around the throttle body. It is also what keeps the throttle lines in place. It has two 5/15” bolts and one 1/2” bolt. Also there are little metal throttle clips. A small set of needle nose pliers works well for the throttle clips. Remove all bolts and clips and put in a bag marked appropriately.

Photobucket

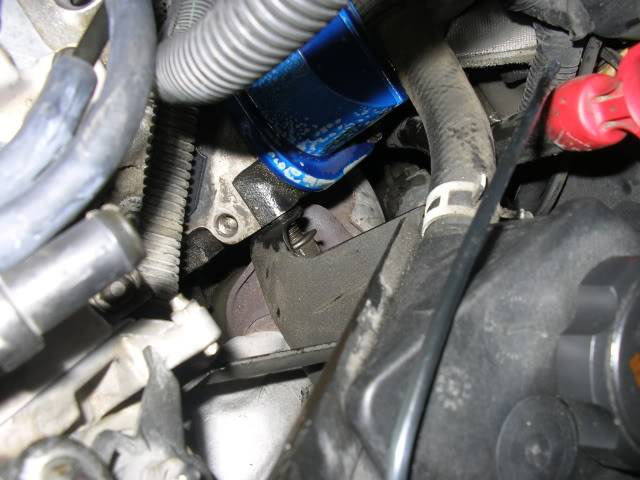
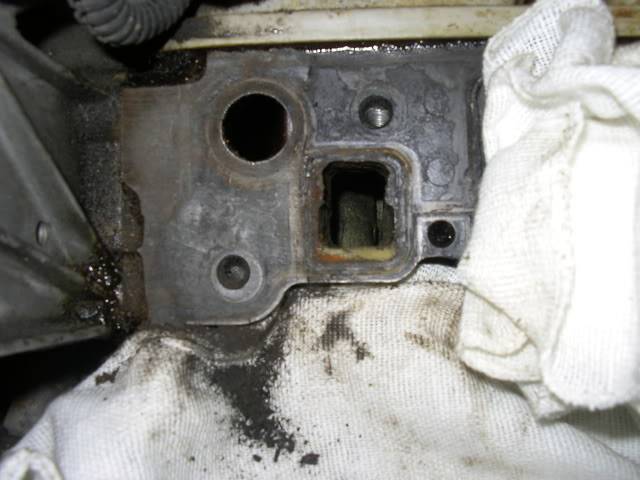
10.The tricky part comes with moving this throttle body plate. It is still held in place by a bolt that also holds your heat shield on. Crawl into that side of your engine armed with a ratchet wrench and a 13mm socket, preferably attached to each other.. You will locate and remove two nuts that hold your heat shield in place.. The heat shield should now be loose, and with some persuasion, can be removed and set aside. One of the studs that you JUST removed a nut from is actually a stud with a 5/8” HEX in the middle of it. Use a long socket 5/8” to remove this. This bolt-like thing is the last thing holding that TB bracket on. The TB bracket also has the power steering res. Attached to it. For this reason I don't recommend removing it entirely. At this point it should be sufficiently loosened that you can push it out of your way.

Below in the center is the stud that holds the TB braket and heat shield:
Photobucket

11.It can be assumed that everything small like nuts and bolts should be bagged according to the area that they were removed. Do not lose these little bags. Do not let your children play with these little bags, even if they do want to build their own car.

12. Now for everything holding the supercharger in place. The EGR pipe connects with a 1/2” and 10mm at each end respectively. Remove and bag it.

13.Turn your attention to the alternator sitting in its nice bracket in the upper left of your engine bay. Carefully disconnect the wire connector at the 12 volt clip. The ground wire is a 13mm nut. Be careful trying to undo this nut as the whole thing is only held in place with a plastic insulator from the alternators body. I used a set of vice grips to hold the shaft still whilst I removed the nut. I also stuck a screwdriver in around there trying to figure out how the whole thing worked, and had an enormous spark blow the tip off the small flat head screwdriver. I guess I should have remembered to disconnect the battery. I hope you remembered.

14.The alternator is held on by a 13mm bolt in the front, and a long bolt at the back. The rear bolt is also 13mm.

Photobucket

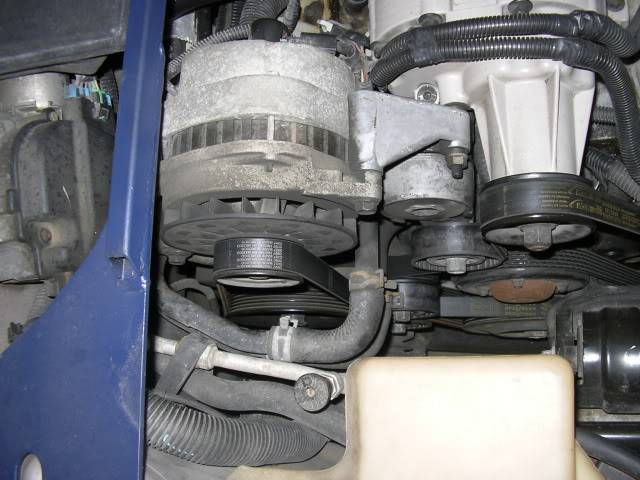
15.Carefully move any wires out of the way in an organized manner so that nothing is obstructing the supercharger.

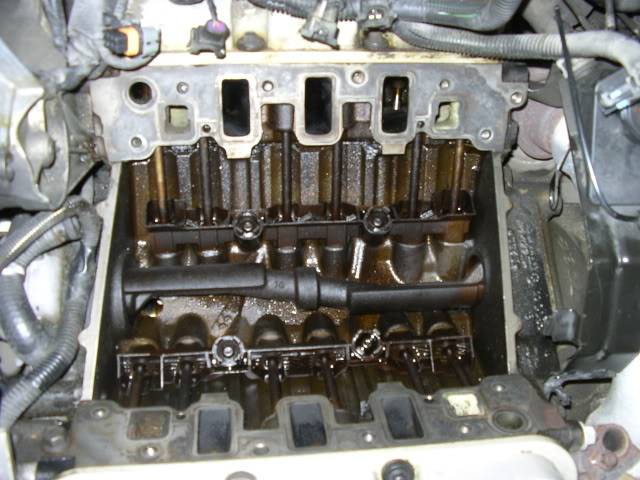
16.The supercharger is held down with seven 10mm bolts. Carefully remove and bag. IF you are unable to lift the SC off the LIM at this point, you can carefully use a MASSIVE slot screwdriver to pry it off. Care should be taken and you should use the front pry-port located on the SC at the front of the engine.

17.Now if all is going correctly, you should be faced with your lower intake manifold.

Photobucket

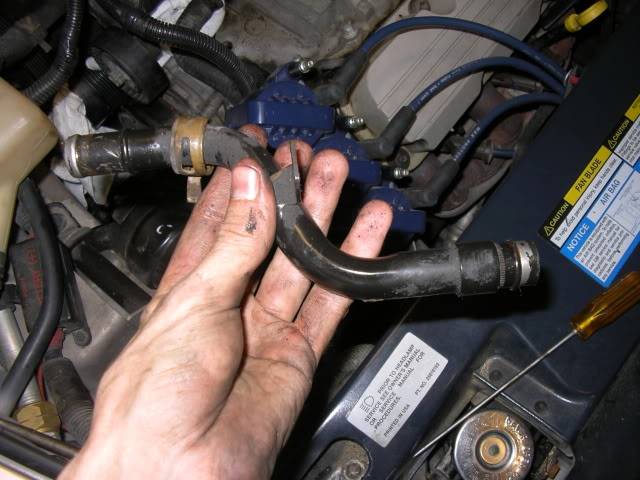
18.On your right, it the coolant exit and thermostat housing. Carefully remove the squeeze clamps holding the hose onto it. Remove the host and stuff a rag into the end to keep stray coolant “in.” The thermostat housing can stay on the LIM until after it is completely removed from the engine. At that point you can decide if it is moving over to the new LIM or not.

19.To you left are two other coolant fittings. The larger is closer to you, and has a pipe clamp holding the rubber pipe on to it. Carefully remove this clamp and remove the rubber pipe from the fitting. If things are going like they did for me, the fitting will be plastic, and it will tear off with almost no force leaving the threads in the hole. Of well, at least I'm putting in a new LIM. A new fitting can be gotten from your GM dealer for around 30$. This one is metal.

Photobucket

20.The last coolant is a nice S shaped metal pipe. This just sticks into your LIM, it is sealed with an o-ring, and is held there by a 13mm bolt on the alternator bracket. Remove and bag. Make sure you have a new o-ring for this. I used one that I had from a universal O-ring kit.

Photobucket

21.Now undo the ten LIM bolts. They are 3/8” socket. Bag the bolts.

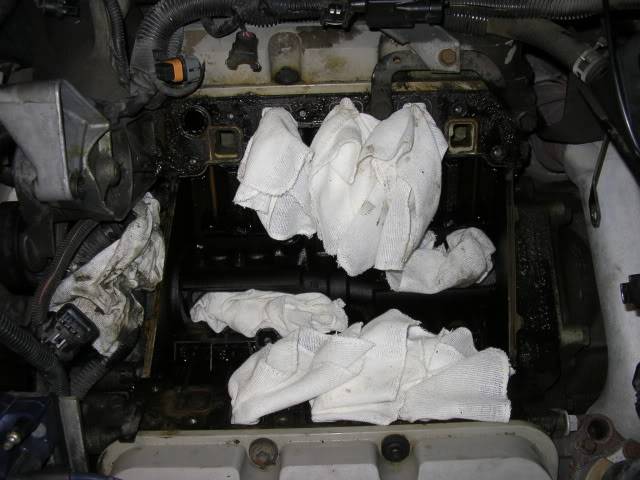
22.The LIM should lift up very easy. CAREFULLY lift it straight up. KEEP IT LEVEL! You want the MINIMUM amount of coolant spilling out of the passages into the valley below. Almost none should be spilled IF you keep it level!

23.Say hello to the lifter valley.

Photobucket

24.Gently stuff a clean rag into each of the engine head ports. Add another rag in the valley at each end where there is a bigger hole, but do not stuff it in. Lay another clean rag so that it covers the whole lifter valley and push rods.

Photobucket
Photobucket

25.Now, using a gasket scraper or razor blade, carefully clean the Head surfaces. I find that holding an additional clan rag under the working area catches anything that falls. A quick flick of that rag over your shoulder removes the little bits of dirt and you are ready to clean another area. TAKE YOUR TIME! THIS SURFACE MUST BE CLEANED! And no gouging or scratching the surface...

Photobucket

26.Now clean with Acetone to remove any oil residue. Paint thinner and other cleaners have other oils in them and will leave a film. Pure Acetone is the professionally recommended cleaner to clean the gasket surfaces of the 95 Riviera engine.

27.If you are putting in a new LIM here are some things to know for its prep:
-3/4” long socket for the temp sending unit
-13mm screws for the bypass end plate(if needed)
-10mm for coolant thermostat housing
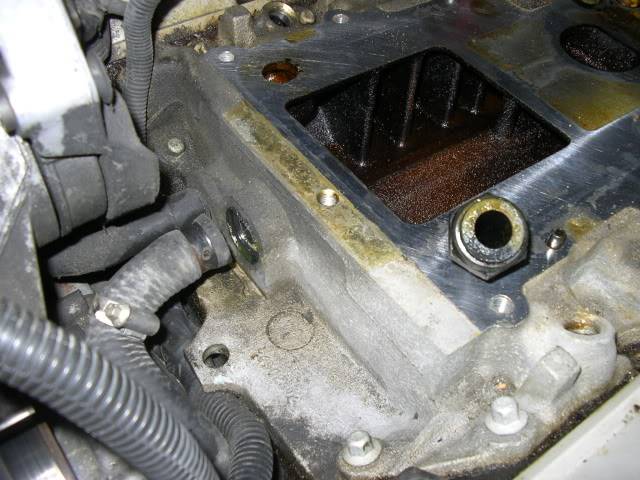
-If you find the new LIM has a large hole in the coolant passage at the back that is threaded, and the bung in your old LIM is fused in place. You can buy a 3/8
NPT boiler plug from any hardware store to screw in. Use thread sealant.

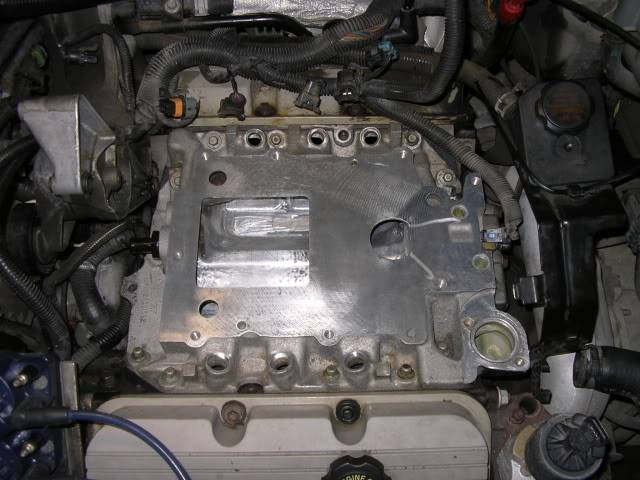
28.Clean out all the threads on your “new” LIM with the appropriate tap to -ensure the bolts go in smoothly. This is not needed if you can put the bolts in all the way by hand, but they are most likely dirty. All the seven SC bolt threads are M8 X 1.25 thread. The thread into the engine heads are 5/16” X 18 if you need to clean those threads too. Use a rag under you work area when cleaning the thread in the engine heads. Also use a wire brush to clean the threads on all bolts that your removed. Make them CLEAN!

(please ignore my 2 gouges, I slipped with the dremel. Also note the 3/8" boiler plug in lower left)
Photobucket

29.If needed, the gasket for the coolant bypass cover on the right end of your LIM is GM #25534752, and the thermostat housing gasket is GM # 25535214

30.Add your new LIM gaskets: Fel-pro #MS94918-1 Add the plastic frame parts first. Carefully put a dab of black RTV sealant(which comes with the gasket set from Fel-pro), in each corner where the head meets where the rubber side gaskets will be. Carefully add the rubber side gaskets. On mine I also added a very small line of RTV along the middle of the rubber side gaskets as my LIM was VERY scratched on the mating surface.

Photobucket
Photobucket

31.Carefully set your new LIM straight down onto the new gaskets. Add blue thread locker to each bolt and finger tighten. Torque the LIM in stages of 60 in/lbs, 120 in/lbs, and 132 in/lbs. Start at the middle and work your way outwards alternating each head.

Photobucket

32.Carefully connect the two coolant hoses that you removed on the left of the LIM. Don't forget the new O-ring for the rear one. The thermostat housing hose does not need to be connected at this time.

Photobucket

33.Clean both the LIM surface and the SC surface with Acetone. Lay out your new SC gasket and coolant O-rings. Part number is Fel-pro# MS95741 Plenum Gasket Set. If your new LIM doesn't have the SC alignment pegs, remove your old ones from the other LIM. They just pop out with pliers.

Photobucket

34.Set the SC down straight onto the alignment pins. Add blue thread locker to the bolts and torque to 89 in/lbs.

35.Re-install the rest in the reverse that you took it apart in. Use blue thread locker on the Fuel rail bolts. Use new injector O-rings.


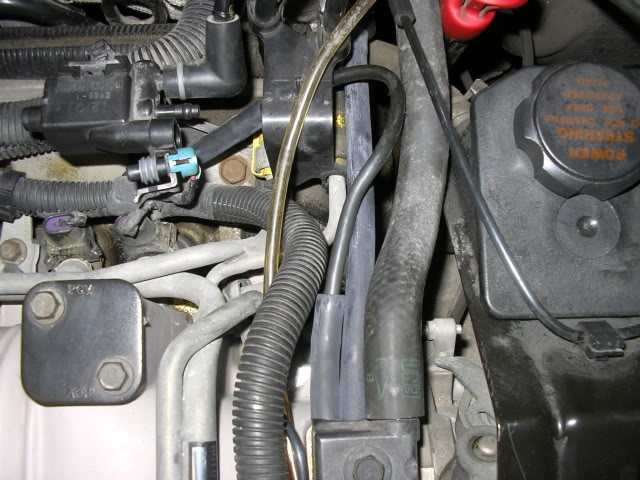
Something that may help get the vacuum hoses back right:
Photobucket


Clean up any leftover tools:
Photobucket

_________________
Warning!


Last edited by Karma on Mon Nov 03, 2008 10:53 pm; edited 1 time in total
Back to top Go down
Chicken
Aficionado
Chicken


Name : Mark
Age : 58
Location : Montana
Joined : 2008-06-13
Post Count : 1296
Merit : 8

Write-Up: Lower Intake Manifold change on a '95 Empty
PostSubject: Re: Write-Up: Lower Intake Manifold change on a '95   Write-Up: Lower Intake Manifold change on a '95 EmptyWed Oct 08, 2008 2:51 pm

Looking forward to the write up, Drew.....

you're going to include how to remove the LIM too, right?
Back to top Go down
http://profile.myspace.com/index.cfm?fuseaction=user.viewprofile
jamie
Fanatic
jamie


Name : Jamie
Age : 36
Location : Truro, NS
Joined : 2008-06-17
Post Count : 283
Merit : 1

Write-Up: Lower Intake Manifold change on a '95 Empty
PostSubject: Re: Write-Up: Lower Intake Manifold change on a '95   Write-Up: Lower Intake Manifold change on a '95 EmptyWed Oct 08, 2008 3:35 pm

Karma, man, these 95' writeups will be very, very much appresh'ed
Back to top Go down
http://www.vancehanesautoparts.com
T Riley
Guru
T Riley


Name : Travis
Age : 34
Location : Minnesconsin
Joined : 2007-02-08
Post Count : 5127
Merit : 10

Write-Up: Lower Intake Manifold change on a '95 Empty
PostSubject: Re: Write-Up: Lower Intake Manifold change on a '95   Write-Up: Lower Intake Manifold change on a '95 EmptyWed Oct 08, 2008 4:23 pm

do a lil porting and polishin!
Back to top Go down
http://www.rivperformance.com
Karma
Aficionado
Karma


Name : Andrew
Age : 39
Location : Ontario, Canada
Joined : 2008-01-14
Post Count : 1949
Merit : 123

Write-Up: Lower Intake Manifold change on a '95 Empty
PostSubject: Re: Write-Up: Lower Intake Manifold change on a '95   Write-Up: Lower Intake Manifold change on a '95 EmptyWed Oct 08, 2008 6:26 pm

it will be ported and polished. You can all expect a full writeup for both the LIM, as well as the TB clean and SC port and P, and "other" things I'm going to be doing.

_________________
Warning!
Back to top Go down
BillBoost37
Junkie


Location : Enfield CT
Joined : 2007-11-28
Post Count : 769
Merit : 26

Write-Up: Lower Intake Manifold change on a '95 Empty
PostSubject: Re: Write-Up: Lower Intake Manifold change on a '95   Write-Up: Lower Intake Manifold change on a '95 EmptyThu Oct 09, 2008 8:40 am

Make sure you have the o-rings for the LIM to SC gasket. GM sells them seperately for $1.5M each. Typically Fel Pro kits include them.

Not sure on the name of it. That's the coolant bypass cover though.

Also make sure you have some o-rings on hand to replace the bypass line rings. You won't need coolant elbows, your setup uses the bypass metal lines.
Back to top Go down
Karma
Aficionado
Karma


Name : Andrew
Age : 39
Location : Ontario, Canada
Joined : 2008-01-14
Post Count : 1949
Merit : 123

Write-Up: Lower Intake Manifold change on a '95 Empty
PostSubject: Re: Write-Up: Lower Intake Manifold change on a '95   Write-Up: Lower Intake Manifold change on a '95 EmptyThu Oct 09, 2008 9:10 am

BillBoost37 wrote:
Make sure you have the o-rings for the LIM to SC gasket. GM sells them seperately for $1.5M each. Typically Fel Pro kits include them.

Not sure on the name of it. That's the coolant bypass cover though.

Also make sure you have some o-rings on hand to replace the bypass line rings. You won't need coolant elbows, your setup uses the bypass metal lines.

excellent. Thats the info i needed. The felpro kit comes with those o-rings. For the o rings for the bypass lines rings, will any o-ring work thats the same size? like from an o-ring kit? or are specific ones needed?

_________________
Warning!
Back to top Go down
Karma
Aficionado
Karma


Name : Andrew
Age : 39
Location : Ontario, Canada
Joined : 2008-01-14
Post Count : 1949
Merit : 123

Write-Up: Lower Intake Manifold change on a '95 Empty
PostSubject: Re: Write-Up: Lower Intake Manifold change on a '95   Write-Up: Lower Intake Manifold change on a '95 EmptyThu Oct 09, 2008 12:50 pm

Anyone know what gasket this guy is?
(not my image)
https://2img.net/h/i21.photobucket.com/albums/b251/bcphotos/DSC03862.jpg
and does anyone know the torque order for the LIM?

_________________
Warning!
Back to top Go down
T Riley
Guru
T Riley


Name : Travis
Age : 34
Location : Minnesconsin
Joined : 2007-02-08
Post Count : 5127
Merit : 10

Write-Up: Lower Intake Manifold change on a '95 Empty
PostSubject: Re: Write-Up: Lower Intake Manifold change on a '95   Write-Up: Lower Intake Manifold change on a '95 EmptyThu Oct 09, 2008 3:40 pm

Karma wrote:
Anyone know what gasket this guy is?
(not my image)
https://2img.net/h/i21.photobucket.com/albums/b251/bcphotos/DSC03862.jpg
and does anyone know the torque order for the LIM?

Lol must be a 95 dealio never saw that on mine?
Back to top Go down
http://www.rivperformance.com
Karma
Aficionado
Karma


Name : Andrew
Age : 39
Location : Ontario, Canada
Joined : 2008-01-14
Post Count : 1949
Merit : 123

Write-Up: Lower Intake Manifold change on a '95 Empty
PostSubject: Re: Write-Up: Lower Intake Manifold change on a '95   Write-Up: Lower Intake Manifold change on a '95 EmptyMon Nov 03, 2008 10:55 pm

BUMP FOR WRITEUP BEING DONE!
(Post #1)

_________________
Warning!
Back to top Go down
porkchok
Amateur


Name : Zack
Age : 35
Location : South Bend, IN
Joined : 2013-02-18
Post Count : 31
Merit : 0

Write-Up: Lower Intake Manifold change on a '95 Empty
PostSubject: Re: Write-Up: Lower Intake Manifold change on a '95   Write-Up: Lower Intake Manifold change on a '95 EmptyFri Feb 22, 2013 11:05 pm

Does anybody know the part # for the large coolant fitting on the LIM? The plastic piece that threads in to the LIM then has the hose clamped on. Not the metal s-shaped fitting.

Edit : Or at least what its called? Doing my LIM gasket tomorrow morning and I'm just wondering in case I end up breaking mine off.

Thanks in advance.
Back to top Go down
robotennis61
Guru
robotennis61


Name : robotennis
Age : 62
Location : las vegas
Joined : 2007-12-17
Post Count : 5562
Merit : 143

Write-Up: Lower Intake Manifold change on a '95 Empty
PostSubject: Re: Write-Up: Lower Intake Manifold change on a '95   Write-Up: Lower Intake Manifold change on a '95 EmptySat Feb 23, 2013 12:18 am

i know what youre talking about but dont know the #. i got mine at the dealers. dormann also sells it in the help section.do not buy another plastic one.they fail.buy the steel one.
Back to top Go down
porkchok
Amateur


Name : Zack
Age : 35
Location : South Bend, IN
Joined : 2013-02-18
Post Count : 31
Merit : 0

Write-Up: Lower Intake Manifold change on a '95 Empty
PostSubject: Re: Write-Up: Lower Intake Manifold change on a '95   Write-Up: Lower Intake Manifold change on a '95 EmptySat Feb 23, 2013 12:21 am

What did you ask for at the delearship? Did you just show them a picture or something?
Back to top Go down
pbrktrt
Enthusiast


Name : patrick gervais
Location : muskegon.mi
Joined : 2011-07-18
Post Count : 164
Merit : 5

Write-Up: Lower Intake Manifold change on a '95 Empty
PostSubject: Re: Write-Up: Lower Intake Manifold change on a '95   Write-Up: Lower Intake Manifold change on a '95 EmptySat Feb 23, 2013 12:53 am

The Dorman # is 56359 which many parts stores use. It's under $5.00 and a good replacement.
Back to top Go down
porkchok
Amateur


Name : Zack
Age : 35
Location : South Bend, IN
Joined : 2013-02-18
Post Count : 31
Merit : 0

Write-Up: Lower Intake Manifold change on a '95 Empty
PostSubject: Re: Write-Up: Lower Intake Manifold change on a '95   Write-Up: Lower Intake Manifold change on a '95 EmptySat Feb 23, 2013 11:23 am

Much appreciated. About to go out and tear into her now. Wish me luck.
Back to top Go down
llamalor2112
Junkie
llamalor2112


Name : Evan
Age : 31
Location : Granite Falls, WA
Joined : 2012-07-13
Post Count : 852
Merit : 13

Write-Up: Lower Intake Manifold change on a '95 Empty
PostSubject: Re: Write-Up: Lower Intake Manifold change on a '95   Write-Up: Lower Intake Manifold change on a '95 EmptyMon Apr 07, 2014 12:56 am

I can't seem to find a torque value on the three bolts from the throttle body to the supercharger. Anybody know what it might be? Oh and same question regarding the ones for the coolant bypass manifold mentioned here..
Karma wrote:
Anyone know what gasket this guy is?
(not my image)
https://2img.net/h/i21.photobucket.com/albums/b251/bcphotos/DSC03862.jpg
and does anyone know the torque order for the LIM?

Back to top Go down
Karma
Aficionado
Karma


Name : Andrew
Age : 39
Location : Ontario, Canada
Joined : 2008-01-14
Post Count : 1949
Merit : 123

Write-Up: Lower Intake Manifold change on a '95 Empty
PostSubject: Re: Write-Up: Lower Intake Manifold change on a '95   Write-Up: Lower Intake Manifold change on a '95 EmptyMon Apr 07, 2014 10:40 am

eh, I'm not sure, my FSM is at the shop. I usually would do them same as the LIM @ 11ft-lbs. Or a bit tighter if you feel the need.

_________________
Warning!
Back to top Go down
llamalor2112
Junkie
llamalor2112


Name : Evan
Age : 31
Location : Granite Falls, WA
Joined : 2012-07-13
Post Count : 852
Merit : 13

Write-Up: Lower Intake Manifold change on a '95 Empty
PostSubject: Re: Write-Up: Lower Intake Manifold change on a '95   Write-Up: Lower Intake Manifold change on a '95 EmptyMon Apr 07, 2014 1:31 pm

Alright, I'll probably do this as long as it feels a good tightness. My progress got haulted last night putting her back together. When I'd taken the lim bolts out they depressurized and sort of burped revealing they all had a wet corroded goop on em in the center of each and every bolt. So I had them soaking in penetrant for about a day and when I went to clean them the hardened crap would not wire brush or razor out of the threads and only three of the bolts want to reseat so this morning I'm out looking for suitable replacements. Sigh... All I can figure is factory shellac? Don't know what else would have crusted into those bolts.
Back to top Go down
Karma
Aficionado
Karma


Name : Andrew
Age : 39
Location : Ontario, Canada
Joined : 2008-01-14
Post Count : 1949
Merit : 123

Write-Up: Lower Intake Manifold change on a '95 Empty
PostSubject: Re: Write-Up: Lower Intake Manifold change on a '95   Write-Up: Lower Intake Manifold change on a '95 EmptyMon Apr 07, 2014 2:32 pm

I've seen pretty stubborn factory loctite before. Not sure if that's what you are describing. I usually use a wire brush in the drill press to clean. You can chase the thread hole with a cleaning tap too if you want. Be sure to reassemble with loctite too. smile

_________________
Warning!
Back to top Go down
deekster_caddy
Master


Name : Derek
Age : 52
Location : Reading, MA
Joined : 2007-01-31
Post Count : 7717
Merit : 109

Write-Up: Lower Intake Manifold change on a '95 Empty
PostSubject: Re: Write-Up: Lower Intake Manifold change on a '95   Write-Up: Lower Intake Manifold change on a '95 EmptyMon Apr 07, 2014 3:12 pm

Karma wrote:
I've seen pretty stubborn factory loctite before.  Not sure if that's what you are describing. I usually use a wire brush in the drill press to clean.  You can chase the thread hole with a cleaning tap too if you want. Be sure to reassemble with loctite too. smile

Yup. It's just thread sealant so oil doesn't flow up through the bolt threads. They are pressure/retention threads, not sealing threads (NPT, etc). When the threads pull and stretch at the proper torque, an air gap may be left behind the thread, allowing oil to pass up through. A hefty dab of RTV or some other sealant may be in place, especially on intake bolts. Not a concern. Wire brush to basically clean, but you don't need to polish them.
Back to top Go down
llamalor2112
Junkie
llamalor2112


Name : Evan
Age : 31
Location : Granite Falls, WA
Joined : 2012-07-13
Post Count : 852
Merit : 13

Write-Up: Lower Intake Manifold change on a '95 Empty
PostSubject: Re: Write-Up: Lower Intake Manifold change on a '95   Write-Up: Lower Intake Manifold change on a '95 EmptyMon Apr 07, 2014 3:21 pm

That'd be the stuff. Been tryin and tryin to clean but a few of the bolts' threads have actually been crushed or busted by the loctite corrosion.  shocked  havin my buddy inspect a bolt at our local cobalt machine shop to give me the bolt specs. Being as even the dealership parts people around here can't get me info on em I'll be sure to report just what they are
------------------
Update

9440227 BOLT-FLANGED HEX HEAD-5/16-18 X 1 1/4

These are the ones and they fit great. Had a set of replacements for the stock parts number at the local O'Reillys. The stock bolts are weird because they mix metric head and sae threading in one bolt. New bolts have a bigger head but the sane flange width so they fit just fine.


Last edited by llamalor2112 on Mon Apr 07, 2014 7:36 pm; edited 1 time in total
Back to top Go down
JacobsRedRivi
Member


Name : Jake
Age : 30
Location : Austin Texas
Joined : 2017-04-06
Post Count : 73
Merit : 0

Write-Up: Lower Intake Manifold change on a '95 Empty
PostSubject: LIM Gasket replacement questions   Write-Up: Lower Intake Manifold change on a '95 EmptyTue Apr 18, 2017 2:01 pm

Hello everyone i had a quick question. when doing the lower intake manifold gasket do i have to replace the Manifold as well or can i clean it up and reuse it?
And, do i need to coat the gasket on both sides with rtv?

Also does anyone have the P/N for the LIM gaskets and coolant elbows? I am purchasing a replacement supercharger and would like to do this while i have the supercharger removed.


Thanks! bounce
Back to top Go down
AA
Administrator
AA


Name : Aaron
Age : 47
Location : C-bus, Ohio
Joined : 2007-01-13
Post Count : 18448
Merit : 252

Write-Up: Lower Intake Manifold change on a '95 Empty
PostSubject: Re: Write-Up: Lower Intake Manifold change on a '95   Write-Up: Lower Intake Manifold change on a '95 EmptyTue Apr 18, 2017 2:55 pm


_________________
'05 GTO 6.0L • 6-spd • 95k miles • 0-60: 4.8s • 16.9 avg MPG • Nelson Ledges Lap: 1:26

'95 Celica GT 2.2L • 5-spd • 165k miles • 0-60: yes

'98 SC Riviera • 281k miles • 298 HP/370 TQ • 0-60: 5.79s • ET: 13.97 @ 99.28 • 4087 lb • 20.1 avg MPG • Nelson Ledges Lap: 1:30
3.4" pulley • AL104 plugs • 180º t-stat • FWI w/K&N • 1.9:1 rockers • OR pushrods • LS6 valve springs • SLP headers • ZZP fuel rails
KYB GR2 struts • MaxAir shocks • Addco sway bars • UMI bushings • GM STB • Enkei 18" EV5s w/ Dunlop DZ101s • F-body calipers
EBC bluestuff/Hawk HP plus • SS lines • Brembo slotted discs • DHP tuned • Aeroforce • Hidden Hitch

^^^ SOLD ^^^ frown

'70 Ninety-Eight Holiday Coupe 455cid • 116k miles
^^^ SOLD ^^^ frown
Back to top Go down
http://www.cardomain.com/ride/657082/4
JacobsRedRivi
Member


Name : Jake
Age : 30
Location : Austin Texas
Joined : 2017-04-06
Post Count : 73
Merit : 0

Write-Up: Lower Intake Manifold change on a '95 Empty
PostSubject: Re: Write-Up: Lower Intake Manifold change on a '95   Write-Up: Lower Intake Manifold change on a '95 EmptyTue Apr 18, 2017 3:22 pm

Thanks!
Back to top Go down
JacobsRedRivi
Member


Name : Jake
Age : 30
Location : Austin Texas
Joined : 2017-04-06
Post Count : 73
Merit : 0

Write-Up: Lower Intake Manifold change on a '95 Empty
PostSubject: Re: Write-Up: Lower Intake Manifold change on a '95   Write-Up: Lower Intake Manifold change on a '95 EmptyTue May 02, 2017 2:10 pm

Hey quick question. Do i put rtv on the supercharger gasket? and on the bottom side of the LIM Gasket?
Back to top Go down
Sponsored content


Write-Up: Lower Intake Manifold change on a '95 Empty
PostSubject: Re: Write-Up: Lower Intake Manifold change on a '95   Write-Up: Lower Intake Manifold change on a '95 Empty

Back to top Go down
 
Write-Up: Lower Intake Manifold change on a '95
Back to top 
Page 1 of 2Go to page : 1, 2  Next
 Similar topics
-
» Write-Up: Lower Intake Manifold (LIM) Gaskets
» New mods.. Gen V, Gen V lower intake manifold, N* TB
» Intake Manifold on New (to me) Riviera
» Intake Manifold Replacement and ???
» Intake Manifold Gasket?

Permissions in this forum:You cannot reply to topics in this forum
Riv Performance ::   Supercharged 3800 Tech :: Series I Engine & Transmission-
Jump to: