 |
The 8th Gen Riviera Resource
|
|
| | Write-Up: Installing Rockers, Valve Springs, & Push Rods |  |
|
+15Mr.Riviera VJD2 robotennis61 Ash Rickw BillBoost37 turtleman L67 ibmoses 97rivsc TonySmooth89 T Riley oldsman105 jax95riv AA 19 posters | |
| Author | Message |
|---|
AA
Administrator

Name : Aaron
Age : 47
Location : C-bus, Ohio
Joined : 2007-01-13
Post Count : 18452
Merit : 252
| | Subject: Write-Up: Installing Rockers, Valve Springs, & Push Rods Mon Jan 15, 2007 11:14 am | |
| Installing Rocker Arms, Valve Springs, and Push Rods (Part I)If you've dropped to a 3.4" supercharger pulley and upgraded the intake, you've got a bit of extra air coming in. Boost numbers are higher now, and if you've tuned your PCM for extra fuel, you've probably seen a good power increase. But what's next? Boost numbers aren't everything. If you want to make power and not just torque, the air/fuel mix needs to move through and out of the engine just as easily as it was taken in. Opening the exhaust helps somewhat, but for this to be effective, the air/fuel needs a way into and out of the combustion chambers, through the intake/exhaust valves. Pushing more air into the cylinders and allowing more exhaust gas flow will open up your engine, allowing it to breath and creating extra horsepower. There are different ways to accomplish this, one being a performance cam or a set of high-flow heads, both of which are fairly involved installations. Certainly the gains with either option is impressive (50 hp+ possible), but not everyone wants to take things this far. If your goal is to build a drag car, or the most powerful street engine you can, a cam and heads are both great breathing mods for building large amounts of horsepower. However, if you want to make your car a bit faster with minimal effort and expense, high-lift roller rocker arms could be the way to go. A popular lift ratio that's currently available is 1.9:1. With this ratio, you'll see a noticeable increase in upper RPM response with little or no negative effect on fuel economy during regular driving. With exhaust mods, rockers may also help to lower engine knock levels. Horsepower gains are typically 25-30 crank, with some extra torque shifted above 4k RPM. The rockers work by moving the intake and exhaust valves about 20% higher than stock, increasing flow significantly. Total cost for all parts is about $700 in the case of a INTENSE Gen III (HS) kit, and some newer packages, including modified stock rockers, are available at a lower price. Lower ratios of 1.85:1 and 1.80:1 are also available. Why run a lower lift ratio? Two reasons: ease of install, and less stress on the valve train. There is debate on whether higher lift ratios are bad for your engine. In theory, the higher spring pressures produced from making very high lift and using stiffer valve springs can cause wear to your timing chain and dampener. In reality, many have used 1.9:1 rockers and ran them for tens of thousands of miles with no problems (I've personally run mine daily for over 150k miles, original timing chain and dampener, with no problems so far). If your car already has high miles, or you are concerned about this, it wouldn't hurt to replace the timing chain with a higher performance version such as a Rollmaster. A good article on high-ratio rockers can be found here. If you choose a lower ratio such as 1.8:1, you may keep the OEM valve springs and push rods, making the installation easier. In this case, all you really need to do is remove the stock rockers and replace with the new rockers and bolts. Probably a 2 hour job. The higher ratio 1.9:1 and 1.95:1 rocker arms require supportive mods to run safely, the most important being higher load (90# or 105#) valve springs. While you're at it, might as well throw in oil-restricted push rods due to the fact that they're very easy to change during the rocker install. The purpose for the higher-load valve springs, according to INTENSE racing, is: "to help reduce the chance of valve float in your motor." And although not absolutely necessary, INTENSE feels it's a good idea to use restricted flow push rods for the following reason: "oil metering works to keep the lifter 'pumped up', and allows the engine to operate at higher speeds with less chance of a failure. These are the best choice for customers with full roller rocker arms."This installation uses LS6 90# valve springs, requiring special LS6 valve caps. Order a quantity of 12 at your local Chevy parts counter. They may take a few days to arrive. Here are the parts I bought for my install: - INTENSE 3rd gen 1.9:1 roller rocker arms....$369.99 - INTENSE oil-restricted push rods...................$99.99 - GM (INTENSE) LS6 90# valve springs...........$99.99 - GM LS6 valve caps.......................................$26.00 - GM (INTENSE) valve cover gaskets...............$26.99 - GM (dealer) fuel injector seal kit...................$59.99 - lever-style valve spring compressor (online)..$12.00 - compression tester gauge (AutoZone)..........$26.99 The above combination of parts has been tested to 150k+ miles operation in more than one SC 3800 engine. It should be noted that as of 2010, INTENSE 3rd Gen rockers are no longer available, but there are several other comparable options.Replacing the valve cover gaskets and fuel injector O-rings are a good idea while you're doing a this job. The GM shop manual puts it this way: "Fuel injector O-rings should always be replaced whenever fuel injectors are serviced." Interestingly, the dealership charges 59.99 for a set of 12 O-rings with new seals for the fuel pressure regulator. I asked them why the high price; they say the factory O-rings are treated with a special coating that protects the rubber from exposure to gasoline. While visiting the ZZ Performance website I found sets of 6 O-rings for $4.99, but they weren't yet in stock. One has to wonder if this low-cost alternative is safe and reliable, and since I was unable to wait around or take chances, I spent the $59.99 for OEM parts. Rockauto sells the rings at this link for a wide range in price. Is this a really good deal, or a case of "You get what you pay for?" It's your engine - you make the call! If installing new springs, you'll need a valve spring compressor tool. There are different types available to buy, or you can rent one from your local auto parts store. I prefer the lever-style, which can be found online for ten dollars + shipping. You'll also need a compression tester, mainly for the air fitting that comes with it. This tool will allow you to pressurize your cylinders for the valve spring installation, as well as determine when cylinders are TDC. INTENSE sells a complete tool kit (spring compressor + tester) for around $80 if you want to make things easy. I also have these tools, and would be happy to lend or sell to anyone willing to pay shipping charges. Below is a picture of the parts (excluding gaskets, seals, and tools):  Before the install, make sure you have a good set of mechanic's tools, an air compressor, and a few drinks on hand. You really don't need a second set of hands, but it's a good idea to have another ride available, as you may forget something and need to take a trip to the store. Also, it's a good idea to let the car cool down for an hour or two beforehand so you don't burn yourself trying to work. Give yourself a good 6 hours to spend on this project, though it could go faster than that. It really depends on how prepared you are, and how good you are at working on cars in general. If installing 1.8:1 or lower ratio rockers, you may skip steps #3 and #7-11. All right, here we go: STEP 1: Disconnect the battery. It's under the rear seat cushion. Just lift it up, loosen the negative terminal, and get it over with. If you skip this step, don't say I didn't warn you... STEP 2: Remove the engine cover and oil filler neck. STEP 3: Disconnect the front plug wires from plugs #1, 3, and 5. Pull plug #5 and test the air fitting that came with your compression tester. You want to make sure it threads securely into the spark plug hole and seals well - before you start taking things apart. Attach a hose (I found that using a swivel joint fitting makes this easier) to the fitting and apply 20-30 lbs of air pressure. There should be no or very little air leakage from the fitting. Remove the hose and fitting - you'll see later why this step is important:  STEP 4: Reroute the wiring harness so that it is clear of the front valve cover. You'll need to unfasten it from the fuel rail and a few other spots. Remove the black plastic piece that holds the plug wires and you should then have access to the front valve cover bolts: 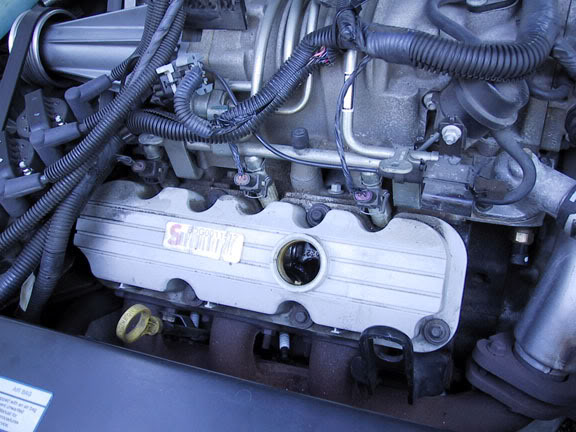 STEP 5: Unscrew the valve cover bolts and remove the cover and gasket. Might as well disconnect the plug wires from the coil packs so they don't get in the way. Now it's time to get dirty:  STEP 6: At this point, you can unbolt the rockers and remove them. Once they're all off, you can lift out the pedestal. The push rods just slide out. Tip: it's a good idea to remove the rockers quickly and wipe excess oil away from the retaining bolt holes. I also used Q-tips to blot up excess oil that got into the threads. This will help ensure the new retaining bolts receive proper torque:  STEP 7: Connect the compression tester to the plug hole of cylinder #5. Use a ratchet or breaker bar to turn the engine via the crankshaft balancer bolt (24mm socket). When the gauge reaches its peak reading, the piston is at top-dead-center. Leave the piston in this position for each cylinder you work on, as this will prevent a valve from being dropped into the cylinder should you lose pressure while compressing the valve springs. NOTE: DROPPING A VALVE IS A BIG DEAL AND WILL RUIN YOUR WEEK - DO NOT NOT RISK IT. MAKE SURE THE PISTON OF THE CYLINDER YOU ARE WORKING ON IS AT TDC SO YOU WON'T HAVE TO PAY BIG $$$ FOR REMOVING THE HEAD TO RETRIEVE A LOST VALVE.Before proceeding further, check that your valve spring compressor tool does not have any clearance issues with the fuel rail or the injectors. If you aren't sure, you may need to complete steps 8 and 9 to find out. I didn't have much of a problem, but it was close. As you can see in the pictures, I didn't unplug the fuel injector connectors, but I probably should have to prevent any damage to them or the injectors. Some valve spring compressor designs may actually hit the fuel rail and you might have to remove it before moving on. If this seems to be the case, skip ahead to step 15 for instruction on removing the rail. STEP 8: Disconnect the compression tester and apply 60 psi air pressure to cylinder #5. Watch the pulleys to be sure the engine doesn't turn:  STEP 9: With air pressure still applied, position the valve spring compressor tool so that its tongue contacts the valve cap, and its hole aligns with the retaining bolt hole. Insert a stock retaining bolt to form a fulcrum, then tighten the bolt as needed to put leverage on the cap and spring. Before fully compressing the spring, wiggle the tool side-to-side as you apply force. The cap and keys can stick to the valve - this helps to "unstick" them. Tip: use a magnet to catch the valve keys. The keys are very small and will fall out when the valve spring is compressed, so be careful not to lose them:  STEP 10: Release valve spring compression and loosen the retaining bolt so the valve spring and cap can be removed. With the cylinder still pressurized with air, repeat step 9 to remove the 2nd spring and cap. Being cautious at first, I looped the valves with twist ties for the added assurance they wouldn't drop, but as it turns out there's nothing to worry about with the cylinder at TDC. 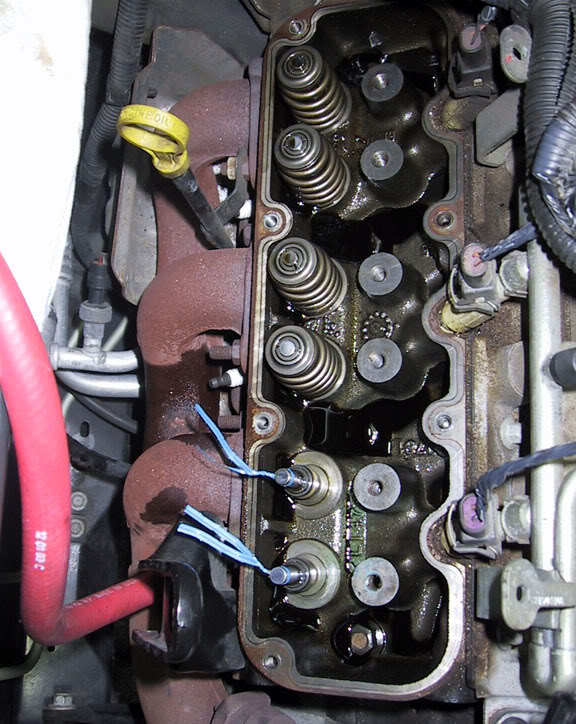 STEP 11: Install the new valve springs and caps using the stock keys. It's a little tricky at first getting the keys to fit, but by shifting the compressor tool left or right they will slide right in. Keep the magnet close by to catch any accidental key drops. Coat the new rods in motor oil and slide them into place, ball end up: 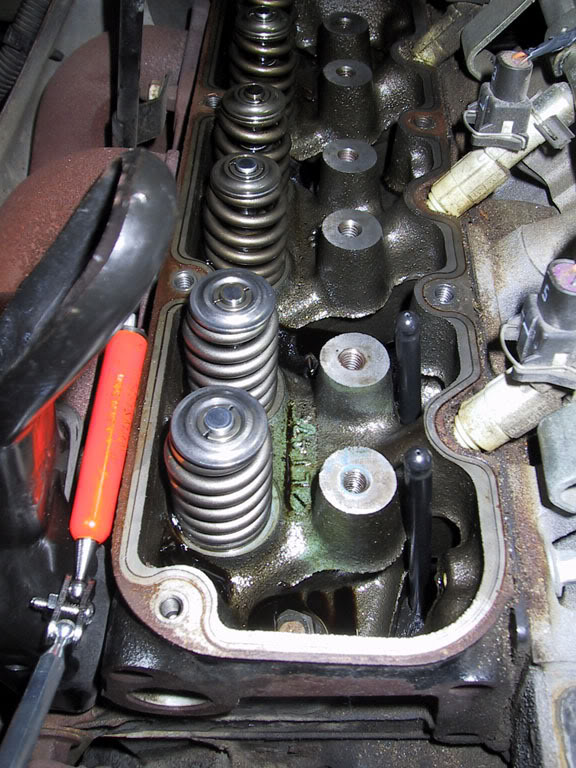 Continued below... _________________ '05 GTO 6.0L • 6-spd • 95k miles • 0-60: 4.8s • 16.9 avg MPG • Nelson Ledges Lap: 1:26'95 Celica GT 2.2L • 5-spd • 165k miles • 0-60: yes'98 SC Riviera • 281k miles • 298 HP/370 TQ • 0-60: 5.79s • ET: 13.97 @ 99.28 • 4087 lb • 20.1 avg MPG • Nelson Ledges Lap: 1:30
3.4" pulley • AL104 plugs • 180º t-stat • FWI w/K&N • 1.9:1 rockers • OR pushrods • LS6 valve springs • SLP headers • ZZP fuel rails
KYB GR2 struts • MaxAir shocks • Addco sway bars • UMI bushings • GM STB • Enkei 18" EV5s w/ Dunlop DZ101s • F-body calipers
EBC bluestuff/Hawk HP plus • SS lines • Brembo slotted discs • DHP tuned • Aeroforce • Hidden Hitch^^^ SOLD ^^^  '70 Ninety-Eight Holiday Coupe 455cid • 116k miles '70 Ninety-Eight Holiday Coupe 455cid • 116k miles^^^ SOLD ^^^
Last edited by AA on Tue May 10, 2011 7:28 pm; edited 6 times in total | |
| | | | AA
Administrator
Name : Aaron
Age : 47
Location : C-bus, Ohio
Joined : 2007-01-13
Post Count : 18452
Merit : 252
| | Subject: Write-Up: Installing Rockers, Valve Springs, & Push Rods Mon Jan 15, 2007 2:59 pm | |
| Installing Rocker Arms, Valve Springs, and Push Rods (Part II)STEP 12: After the first pair of valve springs, caps, and rods are in, the new rockers can be bolted on. Remember to install the pedestal guides with the slots up. The pedestals sit in the slots, and the rockers rest on top of the pedestals. Everything is held together with the new retaining bolts tightened to 25 lb-ft. Try to center the rollers over the valve tips when tightening, and make sure the rods are seated correctly:  STEP 13: Repeat steps 6-12 for cylinders 3 and 1 and you've finished the front side:  STEP 14: Lubricate the rocker arms with an assembly lubricant such as Red Line assembly lube before reinstalling the valve cover. Motor oil can be used, but assembly lube will better cling to the metal parts. After cleaning the valve cover and installing the new gasket, align the cover and tighten the bolts evenly to 10 lb-ft 89 lb-in. (time for a break):  Now for the back side... STEP 15: Detension the tensioner pulley and remove the accessory belt from the alternator pulley. Leave the rest of the belt on - the supercharger belt can stay on as well. STEP 16: Disconnect and remove the alternator:  STEP 17: Remove the alternator mounting brackets, the vacuum port that's mounted on top of the supercharger (near the throttle body), and the vacuum hoses attached to it. There are also vacuum lines attached to the fuel rail and MAP sensor that need to be disconnected. STEP 18: Depressurize the fuel system by removing the black cap on the front fuel rail and pressing the shrader valve in with a small screwdriver. Hold a rag over the valve to absorb the fuel. Next, remove both fuel connections from the top of the rail. You can buy a tool to make this easy, or if you're careful and patient, a small flat head driver will work:  STEP 19: Disconnect the various electrical connectors and clips in order to move the rear wiring loom out of the way. Disconnect the connectors from the fuel injectors. Also, remove the metal shield near the EGR valve and disconnect the water pump hose nearest the valve cover. You will loose a small amount of coolant, so have a rag ready. STEP 20: Loosen all bolts on the fuel rail and lift it off the engine. This will take some force, but the injectors should just pop out of the intake manifold along with the rail.  STEP 21: At this point you can remove the rear valve cover. Do the rear rockers the same way as you did the fronts, following steps 6-14. You'll be surprised at how fast the back side will go. Here's a look at the rockers installed: 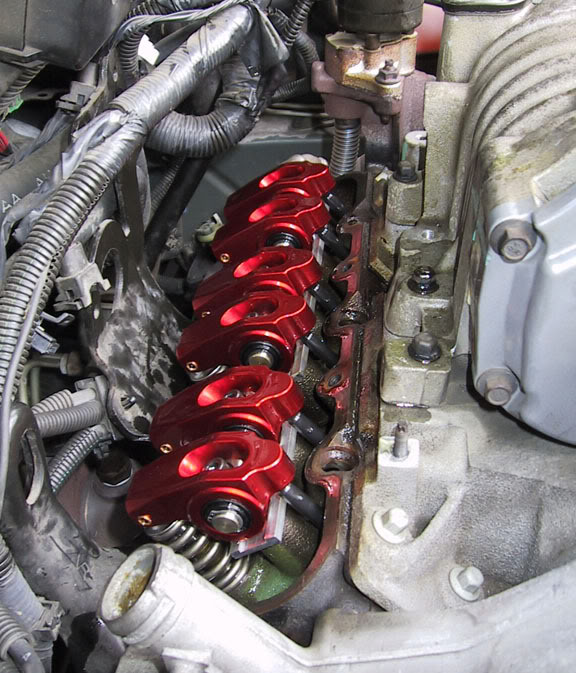 STEP 22: Put everything back together. Remember to oil your new rockers and replace the gasket before putting the valve cover back on. If you have the new o-rings and seals for the fuel injectors and pressure regulator, give them a thin coat of motor oil before putting them on. While you have the chance, it's probably a good idea to clean out the area between the valve covers and the blower. I used a ShopVac to suck up all of the bugs and grit before I put my fuel rail back on. I also wiped my blower housing down with a degreaser and cleaned my alternator and mounts. If you haven't already noticed, there are 3 metal brackets bolted to the sides of the engine that you may want to remove before putting everything back together. Two of the brackets are for engine hoisting, the other helps to hold the engine cover on. If you plan to remove the cover anyway, these brackets have no real purpose other than to add almost 4 lbs of weight to the car. The hoist brackets are located at the corners of the engine (near cylinders 2 & 5), and the cover bracket is located near the middle back of the engine. Fuel rail bolts get tightened to 89 lb-in. Tip: install the injectors back into the fuel rail first, then lower them into the manifold with the rail. This makes it easier than if you put the injectors in the manifold first. Tip: Don't forget to double check all of your vac lines and electrical connections. They make the car run like it's supposed to. I forgot to reconnect the plug to my alternator and got a voltage warning light - oops! So that about wraps it up. Rockers don't require any break in time, so you can test them out as soon as the car is warmed up. A little smoke coming from the engine is normal, as you'll have likely spilled some oil on the exhaust manifolds during course of the project. Hopefully, the extra power gained will have been worth the money and time spent. In my case, I saw a noticeable increase in power above 4k RPM after the installation. This is most evident when you watch the tach needle sprint through the 4-6k range (3-1 downshifts are fun). Be aware that there doesn't seem to be any additional torque produced in the lower RPMs, and because of the the extra 25-30 HP up top, it might feel like you've lost a little torque, but I don't think that's really the case - it just seems that way because the torque curve has changed its shape a bit. Best of luck to anyone who tackles this project. It's not really that difficult, even if you're like me and don't work on cars all the time. I still have 4 extra LS6 valve springs (brand new) which I'd be willing to part with for $20 shipped if anyone's interested. Would like to say thanks to Scott Cook, Todd Allen, and Tim King at INTENSE for their technical assistance, and to Ed Morad for his excellent parts support and L67 knowledge. Please PM or email me with any questions or concerns regarding this write-up. _________________ '05 GTO 6.0L • 6-spd • 95k miles • 0-60: 4.8s • 16.9 avg MPG • Nelson Ledges Lap: 1:26'95 Celica GT 2.2L • 5-spd • 165k miles • 0-60: yes'98 SC Riviera • 281k miles • 298 HP/370 TQ • 0-60: 5.79s • ET: 13.97 @ 99.28 • 4087 lb • 20.1 avg MPG • Nelson Ledges Lap: 1:30
3.4" pulley • AL104 plugs • 180º t-stat • FWI w/K&N • 1.9:1 rockers • OR pushrods • LS6 valve springs • SLP headers • ZZP fuel rails
KYB GR2 struts • MaxAir shocks • Addco sway bars • UMI bushings • GM STB • Enkei 18" EV5s w/ Dunlop DZ101s • F-body calipers
EBC bluestuff/Hawk HP plus • SS lines • Brembo slotted discs • DHP tuned • Aeroforce • Hidden Hitch^^^ SOLD ^^^ '70 Ninety-Eight Holiday Coupe 455cid • 116k miles^^^ SOLD ^^^
Last edited by AA on Sat Aug 15, 2009 12:10 am; edited 6 times in total | |
| | | | jax95riv
Aficionado

Name : Jack
Age : 62
Location : Oklahoma City
Joined : 2007-01-14
Post Count : 1062
Merit : 6
| | Subject: Re: Write-Up: Installing Rockers, Valve Springs, & Push Rods Tue Jan 30, 2007 2:10 pm | |
| Will these same mods apply to the Series I engine? | |
| | | | oldsman105
Junkie

Name : Enrique Patino
Age : 39
Location : Queens, New York City
Joined : 2007-01-24
Post Count : 756
Merit : 10
| | Subject: Re: Write-Up: Installing Rockers, Valve Springs, & Push Rods Tue Jan 30, 2007 2:53 pm | |
| - jax95riv wrote:
- Will these same mods apply to the Series I engine?
yes and no. The rockers and springs are different for the series one. http://www.zzperformance.com/grand_prix/products1.php?id=606
Last edited by oldsman105 on Wed Mar 25, 2009 8:46 am; edited 1 time in total | |
| | | | T Riley
Guru

Name : Travis
Age : 34
Location : Minnesconsin
Joined : 2007-02-08
Post Count : 5127
Merit : 10
| | Subject: Re: Write-Up: Installing Rockers, Valve Springs, & Push Rods Sun Feb 11, 2007 9:29 am | |
| so are all of the instructions clear with pictures if i were to buy a kit like this??? | |
| | | | AA
Administrator
Name : Aaron
Age : 47
Location : C-bus, Ohio
Joined : 2007-01-13
Post Count : 18452
Merit : 252
| | Subject: Re: Write-Up: Installing Rockers, Valve Springs, & Push Rods Sun Feb 11, 2007 10:34 am | |
| Should be. A few have already used this to install theirs. If there are any questions, we're here. _________________ '05 GTO 6.0L • 6-spd • 95k miles • 0-60: 4.8s • 16.9 avg MPG • Nelson Ledges Lap: 1:26'95 Celica GT 2.2L • 5-spd • 165k miles • 0-60: yes'98 SC Riviera • 281k miles • 298 HP/370 TQ • 0-60: 5.79s • ET: 13.97 @ 99.28 • 4087 lb • 20.1 avg MPG • Nelson Ledges Lap: 1:30
3.4" pulley • AL104 plugs • 180º t-stat • FWI w/K&N • 1.9:1 rockers • OR pushrods • LS6 valve springs • SLP headers • ZZP fuel rails
KYB GR2 struts • MaxAir shocks • Addco sway bars • UMI bushings • GM STB • Enkei 18" EV5s w/ Dunlop DZ101s • F-body calipers
EBC bluestuff/Hawk HP plus • SS lines • Brembo slotted discs • DHP tuned • Aeroforce • Hidden Hitch^^^ SOLD ^^^ '70 Ninety-Eight Holiday Coupe 455cid • 116k miles^^^ SOLD ^^^ | |
| | | | T Riley
Guru
Name : Travis
Age : 34
Location : Minnesconsin
Joined : 2007-02-08
Post Count : 5127
Merit : 10
| | Subject: Re: Write-Up: Installing Rockers, Valve Springs, & Push Rods Tue Feb 13, 2007 4:09 pm | |
| INTENSE 3rd gen 1.9:1 roller rocker arms....$369.99
- INTENSE oil-restricted pushrods...................$99.99
- GM (INTENSE) LS6 90# valve springs...........$99.99
- GM LS6 valve caps.......................................$26.00
- GM (INTENSE) valve cover gaskets...............$26.99
- GM (dealer) fuel injector seal kit...................$59.99
- lever-style valve spring compressor (online)..$12.00
- compression tester gauge (AutoZone)..........$26.99
http://www.3800performance.com/Merchant2/merchant.mvc?Screen=PROD&Product_Code=MS-RA&Category_Code=CVT&Product_Count=1
LOOK AT THIS LINK ^^^^^^^^up there and let me kno what else i will need and whether to go with the 1:90:0, 1:80:0, or the 1:70:0 | |
| | | | AA
Administrator
Name : Aaron
Age : 47
Location : C-bus, Ohio
Joined : 2007-01-13
Post Count : 18452
Merit : 252
| | Subject: Re: Write-Up: Installing Rockers, Valve Springs, & Push Rods Tue Feb 13, 2007 4:15 pm | |
|  From the above, should answer your question: quote: "Why would you want to run a lower ratio? There is debate on whether higher lift ratios are bad for your engine. In theory, the higher spring pressures produced from making very high lift and using stiffer valve springs can cause wear to your timing chain and dampener. In reality, many have used 1.9:1 rockers and ran them for tens of thousands of miles with no problems (I have personally run mine daily for 35k miles with no problems so far). If your car already has high miles, or you are concerned about this, it couldn't hurt to replace the timing chain with a higher performance version such as a Rollmaster. A good article on high-ratio rockers can be found here."_________________ '05 GTO 6.0L • 6-spd • 95k miles • 0-60: 4.8s • 16.9 avg MPG • Nelson Ledges Lap: 1:26'95 Celica GT 2.2L • 5-spd • 165k miles • 0-60: yes'98 SC Riviera • 281k miles • 298 HP/370 TQ • 0-60: 5.79s • ET: 13.97 @ 99.28 • 4087 lb • 20.1 avg MPG • Nelson Ledges Lap: 1:30
3.4" pulley • AL104 plugs • 180º t-stat • FWI w/K&N • 1.9:1 rockers • OR pushrods • LS6 valve springs • SLP headers • ZZP fuel rails
KYB GR2 struts • MaxAir shocks • Addco sway bars • UMI bushings • GM STB • Enkei 18" EV5s w/ Dunlop DZ101s • F-body calipers
EBC bluestuff/Hawk HP plus • SS lines • Brembo slotted discs • DHP tuned • Aeroforce • Hidden Hitch^^^ SOLD ^^^ '70 Ninety-Eight Holiday Coupe 455cid • 116k miles^^^ SOLD ^^^ | |
| | | | TonySmooth89
Aficionado

Name : Anthony
Age : 35
Location : Florida
Joined : 2007-11-14
Post Count : 2410
Merit : 16
| | Subject: Re: Write-Up: Installing Rockers, Valve Springs, & Push Rods Wed Mar 12, 2008 1:30 am | |
| If you were to go with 1.8s and kept stock valvesprings how long would you expect it to take to install? Seems like it would be really easy. | |
| | | | AA
Administrator
Name : Aaron
Age : 47
Location : C-bus, Ohio
Joined : 2007-01-13
Post Count : 18452
Merit : 252
| | Subject: Re: Write-Up: Installing Rockers, Valve Springs, & Push Rods Wed Mar 12, 2008 1:44 am | |
| Good question. It's pretty simple to install 1.8s, shouldn't take long at all. Complete steps 1-2, 4-6, 12-22 and you're done. I'll add this info to the write-up. _________________ '05 GTO 6.0L • 6-spd • 95k miles • 0-60: 4.8s • 16.9 avg MPG • Nelson Ledges Lap: 1:26'95 Celica GT 2.2L • 5-spd • 165k miles • 0-60: yes'98 SC Riviera • 281k miles • 298 HP/370 TQ • 0-60: 5.79s • ET: 13.97 @ 99.28 • 4087 lb • 20.1 avg MPG • Nelson Ledges Lap: 1:30
3.4" pulley • AL104 plugs • 180º t-stat • FWI w/K&N • 1.9:1 rockers • OR pushrods • LS6 valve springs • SLP headers • ZZP fuel rails
KYB GR2 struts • MaxAir shocks • Addco sway bars • UMI bushings • GM STB • Enkei 18" EV5s w/ Dunlop DZ101s • F-body calipers
EBC bluestuff/Hawk HP plus • SS lines • Brembo slotted discs • DHP tuned • Aeroforce • Hidden Hitch^^^ SOLD ^^^ '70 Ninety-Eight Holiday Coupe 455cid • 116k miles^^^ SOLD ^^^ | |
| | | | 97rivsc
Fanatic

Name : mike
Age : 35
Location : appleton wisconsin
Joined : 2008-09-28
Post Count : 437
Merit : 0
| | Subject: Re: Write-Up: Installing Rockers, Valve Springs, & Push Rods Tue Mar 24, 2009 8:56 pm | |
| hey aaron, I don't know why, but none of your pictures show up anymore? | |
| | | | AA
Administrator
Name : Aaron
Age : 47
Location : C-bus, Ohio
Joined : 2007-01-13
Post Count : 18452
Merit : 252
| | Subject: Re: Write-Up: Installing Rockers, Valve Springs, & Push Rods Tue Mar 24, 2009 9:20 pm | |
| The links were broken when AOL shut down pictures. I still have the images, need to upload and relink. _________________ '05 GTO 6.0L • 6-spd • 95k miles • 0-60: 4.8s • 16.9 avg MPG • Nelson Ledges Lap: 1:26'95 Celica GT 2.2L • 5-spd • 165k miles • 0-60: yes'98 SC Riviera • 281k miles • 298 HP/370 TQ • 0-60: 5.79s • ET: 13.97 @ 99.28 • 4087 lb • 20.1 avg MPG • Nelson Ledges Lap: 1:30
3.4" pulley • AL104 plugs • 180º t-stat • FWI w/K&N • 1.9:1 rockers • OR pushrods • LS6 valve springs • SLP headers • ZZP fuel rails
KYB GR2 struts • MaxAir shocks • Addco sway bars • UMI bushings • GM STB • Enkei 18" EV5s w/ Dunlop DZ101s • F-body calipers
EBC bluestuff/Hawk HP plus • SS lines • Brembo slotted discs • DHP tuned • Aeroforce • Hidden Hitch^^^ SOLD ^^^ '70 Ninety-Eight Holiday Coupe 455cid • 116k miles^^^ SOLD ^^^ | |
| | | | 97rivsc
Fanatic
Name : mike
Age : 35
Location : appleton wisconsin
Joined : 2008-09-28
Post Count : 437
Merit : 0
| | Subject: Re: Write-Up: Installing Rockers, Valve Springs, & Push Rods Tue Jul 14, 2009 7:04 pm | |
| hey aaron when you get time could you upload and relink the pictures? I will be attempting this soon and would appreciate those pix. | |
| | | | AA
Administrator
Name : Aaron
Age : 47
Location : C-bus, Ohio
Joined : 2007-01-13
Post Count : 18452
Merit : 252
| | Subject: Re: Write-Up: Installing Rockers, Valve Springs, & Push Rods Tue Jul 14, 2009 7:21 pm | |
| Will do. Give me until tomorrow and they'll be up. Thx for the reminder! _________________ '05 GTO 6.0L • 6-spd • 95k miles • 0-60: 4.8s • 16.9 avg MPG • Nelson Ledges Lap: 1:26'95 Celica GT 2.2L • 5-spd • 165k miles • 0-60: yes'98 SC Riviera • 281k miles • 298 HP/370 TQ • 0-60: 5.79s • ET: 13.97 @ 99.28 • 4087 lb • 20.1 avg MPG • Nelson Ledges Lap: 1:30
3.4" pulley • AL104 plugs • 180º t-stat • FWI w/K&N • 1.9:1 rockers • OR pushrods • LS6 valve springs • SLP headers • ZZP fuel rails
KYB GR2 struts • MaxAir shocks • Addco sway bars • UMI bushings • GM STB • Enkei 18" EV5s w/ Dunlop DZ101s • F-body calipers
EBC bluestuff/Hawk HP plus • SS lines • Brembo slotted discs • DHP tuned • Aeroforce • Hidden Hitch^^^ SOLD ^^^ '70 Ninety-Eight Holiday Coupe 455cid • 116k miles^^^ SOLD ^^^ | |
| | | | ibmoses
Aficionado

Name : Bert
Location : North Alabama
Joined : 2008-02-03
Post Count : 1701
Merit : 32
| | Subject: Re: Write-Up: Installing Rockers, Valve Springs, & Push Rods Tue Jul 14, 2009 7:30 pm | |
| I may need this info someday as well.  Bert  | |
| | | | L67
Aficionado
Name : Matt
Joined : 2007-06-05
Post Count : 1125
Merit : 37
| | Subject: Re: Write-Up: Installing Rockers, Valve Springs, & Push Rods Sun Jul 26, 2009 11:46 pm | |
| Thanks for re-uploading the pics AA! They will come in handy this weekend. | |
| | | | AA
Administrator
Name : Aaron
Age : 47
Location : C-bus, Ohio
Joined : 2007-01-13
Post Count : 18452
Merit : 252
| | Subject: Re: Write-Up: Installing Rockers, Valve Springs, & Push Rods Mon Jul 27, 2009 12:07 am | |
| Great; if you run into any issues, or have questions during the install, please post. And if you're doing the springs as well, I cannot stress enough to read STEP #7 closely - just remember to use air pressure to keep the valves closed, and when working on each cylinder, keep at TDC as a safety net. _________________ '05 GTO 6.0L • 6-spd • 95k miles • 0-60: 4.8s • 16.9 avg MPG • Nelson Ledges Lap: 1:26'95 Celica GT 2.2L • 5-spd • 165k miles • 0-60: yes'98 SC Riviera • 281k miles • 298 HP/370 TQ • 0-60: 5.79s • ET: 13.97 @ 99.28 • 4087 lb • 20.1 avg MPG • Nelson Ledges Lap: 1:30
3.4" pulley • AL104 plugs • 180º t-stat • FWI w/K&N • 1.9:1 rockers • OR pushrods • LS6 valve springs • SLP headers • ZZP fuel rails
KYB GR2 struts • MaxAir shocks • Addco sway bars • UMI bushings • GM STB • Enkei 18" EV5s w/ Dunlop DZ101s • F-body calipers
EBC bluestuff/Hawk HP plus • SS lines • Brembo slotted discs • DHP tuned • Aeroforce • Hidden Hitch^^^ SOLD ^^^ '70 Ninety-Eight Holiday Coupe 455cid • 116k miles^^^ SOLD ^^^ | |
| | | | turtleman
Expert

Name : Codith
Age : 37
Location : Villa Park, IL
Joined : 2007-02-08
Post Count : 3671
Merit : 140
| | Subject: Re: Write-Up: Installing Rockers, Valve Springs, & Push Rods Mon Jul 27, 2009 1:21 pm | |
| AA, in regards to step 7, do we not have any problem with the motor turning anywhere once air pressure is applied to the cylinder at TDC? I didn't use air when I did mine but In other cases when applying air pressure, I've had to brace the flywheel so it doesnt move away from TDC. | |
| | | | AA
Administrator
Name : Aaron
Age : 47
Location : C-bus, Ohio
Joined : 2007-01-13
Post Count : 18452
Merit : 252
| | Subject: Re: Write-Up: Installing Rockers, Valve Springs, & Push Rods Mon Jul 27, 2009 1:53 pm | |
| If it's close to TDC (+/- 5º), it shouldn't turn very easily with 60 PSI or less. I did mention to monitor the pulleys in the write-up, but I didn't have any issue. If you are seeing it turn, I agree bracing the flywheel would work, or use less pressure. 20 PSI should be enough to hold the valves shut. _________________ '05 GTO 6.0L • 6-spd • 95k miles • 0-60: 4.8s • 16.9 avg MPG • Nelson Ledges Lap: 1:26'95 Celica GT 2.2L • 5-spd • 165k miles • 0-60: yes'98 SC Riviera • 281k miles • 298 HP/370 TQ • 0-60: 5.79s • ET: 13.97 @ 99.28 • 4087 lb • 20.1 avg MPG • Nelson Ledges Lap: 1:30
3.4" pulley • AL104 plugs • 180º t-stat • FWI w/K&N • 1.9:1 rockers • OR pushrods • LS6 valve springs • SLP headers • ZZP fuel rails
KYB GR2 struts • MaxAir shocks • Addco sway bars • UMI bushings • GM STB • Enkei 18" EV5s w/ Dunlop DZ101s • F-body calipers
EBC bluestuff/Hawk HP plus • SS lines • Brembo slotted discs • DHP tuned • Aeroforce • Hidden Hitch^^^ SOLD ^^^ '70 Ninety-Eight Holiday Coupe 455cid • 116k miles^^^ SOLD ^^^ | |
| | | | BillBoost37
Junkie
Location : Enfield CT
Joined : 2007-11-28
Post Count : 769
Merit : 26
| | Subject: Re: Write-Up: Installing Rockers, Valve Springs, & Push Rods Tue Jul 28, 2009 9:40 am | |
| Hey guys, I came across something this weekend that is good to know information.
ZZP modified 1.9 rockers. The pedistals are modded for the increased travel as well as the rockers. The issue was the front bank had misfires on all three cylinders. Come to find out before my buddy got the rockers someone mistakenly swapped a pedistal with a stocker. The difference is small, but visible to the eye.
If you install modded rockers and have a full bank issue, check the peds. | |
| | | | Rickw
Guru
Name : Rick
Location : Lancaster, MA
Joined : 2008-09-13
Post Count : 6282
Merit : 119
| | Subject: Re: Write-Up: Installing Rockers, Valve Springs, & Push Rods Tue Jul 28, 2009 9:57 am | |
| Thanks for the tip. Installing my ZZP modded rockers today. | |
| | | | L67
Aficionado
Name : Matt
Joined : 2007-06-05
Post Count : 1125
Merit : 37
| | Subject: Re: Write-Up: Installing Rockers, Valve Springs, & Push Rods Wed Aug 12, 2009 12:05 pm | |
| I purchased some modified rockers and was told they came with reusable bolts. The bolts that i received kind of look like the stock ones on ZZP with a red fade. On the head of the bolt it says "KX". Do any reusable rocker bolts have this style or am i the owner of 12 useless bolts. Thanks.  | |
| | | | Rickw
Guru
Name : Rick
Location : Lancaster, MA
Joined : 2008-09-13
Post Count : 6282
Merit : 119
| | Subject: Re: Write-Up: Installing Rockers, Valve Springs, & Push Rods Wed Aug 12, 2009 12:24 pm | |
| - L67 wrote:
- I purchased some modified rockers and was told they came with reusable bolts. The bolts that i received kind of look like the stock ones on
ZZP with a red fade. On the head of the bolt it says "KX". Do any
reusable rocker bolts have this style or am i the owner of 12 useless
bolts. Thanks. I purchased reusable bolts from someone (I think Intense) and they were standard looking socket head cap screws (Allen Head) not hex head. I can't tell by the picture if those bolts appear to have been used before. Can you tell if the red locktite on them looks like they have been used. If so, order or buy some bolts. If the locktite is new then use them for another one time use. The stock hex head bolts I removed look identical to what you have and have the same head markings "KX" | |
| | | | L67
Aficionado
Name : Matt
Joined : 2007-06-05
Post Count : 1125
Merit : 37
| | Subject: Re: Write-Up: Installing Rockers, Valve Springs, & Push Rods Wed Aug 12, 2009 12:28 pm | |
| Yeah these are hex head and would use a socket for installation. I'm not sure how bright the locktite looks when new but these appear to be faded. This is just frustrating because the seller did not include modded pedestals either, and now I probably have to buy new bolts. | |
| | | | L67
Aficionado
Name : Matt
Joined : 2007-06-05
Post Count : 1125
Merit : 37
| | | | | Sponsored content
| | Subject: Re: Write-Up: Installing Rockers, Valve Springs, & Push Rods | |
| |
| | | | | | Write-Up: Installing Rockers, Valve Springs, & Push Rods | |
|
Similar topics | |
|
| | Permissions in this forum: | You cannot reply to topics in this forum
| |
| |
| |
|


