| | Write-Up: Fixing HVAC Climate Control Lighting |  |
|
+32Mr.Riviera LARRY70GS Abaddon J. Chris Davis 97 park ave VJD2 Lostal21 Eldo superivicharg Snowdog Rickw DEMonte1997 98RIV7777 #1BearsFan captshiner ewolfe0050 '96reese albertj LAST1987GN AA nothincame2mind deekster_caddy Shintsu 99Rivman T Riley 96RIVMANN ZEP sburch23 SilverArrow102 racinfan turtleman pwmin 36 posters |
|
| Author | Message |
|---|
J. Chris Davis
Aficionado

Name : Chris Davis
Age : 43
Location : Dixon, IL
Joined : 2010-04-14
Post Count : 1008
Merit : 19
| | Subject: Re: Write-Up: Fixing HVAC Climate Control Lighting Tue Nov 02, 2010 7:19 pm | |
| I just ordered those today, lol. Thanks though. I was hoping the ones I had ordered first were going to work, but they didn't. | |
|
| | |
VJD2
Fanatic

Name : Vinny
Location : Connecticut
Joined : 2010-02-21
Post Count : 310
Merit : 5
| | Subject: Re: Write-Up: Fixing HVAC Climate Control Lighting Fri Nov 05, 2010 12:22 am | |
| The first time I tried to fix my display I had no idea how to solder. Since then I got my learn on and can now do it pretty well.
I'm planning on going back in this winter, fixing the botched solder job I did and replacing all the bulbs with custom color LED's. This will fix the bulbs in the buttons that went out and give it a custom appearence.
I found this place that supplies them which I'll be using to convert the entire interior of my other car over to this coming week when everything comes in. Pretty good prices.
http://www.oznium.com/led | |
|
| | |
albertj
Master

Name :
Location : Finger Lakes of New York State
Joined : 2007-05-31
Post Count : 8687
Merit : 181
| | Subject: Re: Write-Up: Fixing HVAC Climate Control Lighting Fri Nov 05, 2010 9:41 pm | |
| - VJD2 wrote:
- The first time I tried to fix my display I had no idea how to solder. Since then I got my learn on and can now do it pretty well.
I'm planning on going back in this winter, fixing the botched solder job I did and replacing all the bulbs with custom color LED's. This will fix the bulbs in the buttons that went out and give it a custom appearence.
I found this place that supplies them which I'll be using to convert the entire interior of my other car over to this coming week when everything comes in. Pretty good prices.
http://www.oznium.com/led I used the white Oznium LED bars to improve the trunk illumination. Took a wire off the trunk light to each LED bar. Now the inner part of the trunk is not The Cavern Beyond at night, and the lights have 3M trim adhesive foam tape so they *will* stay put. Oznium stuff is decent. Too bad they do not have high brightness LEDs to replace the 3057/3157 bulbs. Albertj | |
|
| | |
Rickw
Guru
Name : Rick
Location : Lancaster, MA
Joined : 2008-09-13
Post Count : 6282
Merit : 119
| | Subject: Re: Write-Up: Fixing HVAC Climate Control Lighting Fri Nov 05, 2010 11:56 pm | |
| - albertj wrote:
http://www.oznium.com/led
I used the white Oznium LED bars to improve the trunk illumination. Took a wire off the trunk light to each LED bar. Now the inner part of the trunk is not The Cavern Beyond at night, and the lights have 3M trim adhesive foam tape so they *will* stay put. Oznium stuff is decent. Too bad they do not have high brightness LEDs to replace the 3057/3157 bulbs.
Albertj
Albert, which P/N and how many did it take to illuminate the back half of the trunk.? thanks for any info you can provide. Rick | |
|
| | |
albertj
Master
Name :
Location : Finger Lakes of New York State
Joined : 2007-05-31
Post Count : 8687
Merit : 181
| | Subject: Re: Write-Up: Fixing HVAC Climate Control Lighting Sat Nov 06, 2010 7:01 pm | |
| - Rickw wrote:
- albertj wrote:
http://www.oznium.com/led
I used the white Oznium LED bars to improve the trunk illumination. Took a wire off the trunk light to each LED bar. Now the inner part of the trunk is not The Cavern Beyond at night, and the lights have 3M trim adhesive foam tape so they *will* stay put. Oznium stuff is decent. Too bad they do not have high brightness LEDs to replace the 3057/3157 bulbs.
Albertj
Albert, which P/N and how many did it take to illuminate the back half of the trunk.?
thanks for any info you can provide.
Rick I used 2 of the 'straight chrome' ones on this page http://www.oznium.com/led-modules with white LEDs. The color tem is not the same as the incandescent light, I have been toying with the idea of getting an LED Festoon bulb to stick in the OE fixture so the color temp of all the lights is the same - maybe if I find $10 in a sock somewhere I"ll do that but it's not *that* important. The way cool thing is that during the day it looks very natural, like the sun was shining in what would be the dark part of the trunk cavity. I used cheapie thin speaker wire to tie them to the OE trunk light switch circuit so they come on and off with the trunk light. I slipped that into the OE plastic wire loom no problem. What you do is detach the wire loom that runs to the trunkk switch, from the trunk lid(like if you were gonna remove the trunk lid from the body). You have to unplug the lamp to do this, then pull the wire loom to wire the jumper to where you want to mount the LED lights then snake them back in (easier than it sounds or looks). leave about 3 feet pigtail of the speaker wire to play with under the rear sill. Then reinstall the wire loom and then install and wire up the LEDs trimming off the extra wires and soldering the connections (crimping would be OK). Albertj | |
|
| | |
Rickw
Guru
Name : Rick
Location : Lancaster, MA
Joined : 2008-09-13
Post Count : 6282
Merit : 119
| | Subject: Re: Write-Up: Fixing HVAC Climate Control Lighting Sat Nov 06, 2010 7:26 pm | |
| Thank you for the info Albert.
Just placed my order with them. | |
|
| | |
albertj
Master
Name :
Location : Finger Lakes of New York State
Joined : 2007-05-31
Post Count : 8687
Merit : 181
| | Subject: Re: Write-Up: Fixing HVAC Climate Control Lighting Sat Nov 06, 2010 9:45 pm | |
| - Rickw wrote:
- Thank you for the info Albert.
Just placed my order with them. you'll prolly have them tuesday, wednesday at latest. IIRC oznium is located in lo-rent space near Pagosa Springs CO, by the municipal airport. Albertj | |
|
| | |
Mr.Riviera
Expert

Name : Matthew
Age : 38
Location : Florida
Joined : 2007-01-17
Post Count : 4394
Merit : 101
| | Subject: Re: Write-Up: Fixing HVAC Climate Control Lighting Sat Aug 13, 2011 11:47 am | |
| Well all of my CC lights finally went out so i am going to tackle this in a few weeks.
I have one question though.
Albert, you have on page 4 of this thread that our OEM bulbs are T1-1/4 with a part # 7382.
When i look those up they show as a T1-3/4
Below is what i found in 14V t1-1/4
From ebay:
Offered is a new box of 10 #7646 Miniature light bulbs.
T1-1/4 Bulb
Bipin Base
14 Volt
0.08 Amp (80mA)
0.5 Candel Power
C-2R Filament
Maximum Length (MOL): 0.60" (15.2mm)
Maximum Diameter (MOD): 0.17" (4.3mm)
Average Rated Lamp Life: (1,000 hours)
Is that what i want for an OEM replacement? The differences i see are the bulb life span and the candel power. The 7382's (T1-3/4) have 40,000hr life and 0.3 candel.
I think i would rather have bulbs a little on the brighter side, but if the factory ones are 0.3 then maybe 0.5 would be distractingly bright? _________________ 1996 with 254k miles, L32 4" FWI -> ported N* -> Ported Gen V w/3.0" Pulley, Stage 3 Phenolic I/C, ZZP FMHE, 1.84 RR, Headers and 3" pipe to mufflers, F-body brakes, and lowered on Eibachs. -RIP AMG C400 White on black. Stage 2 w/E30 - 11.9@117 -daily  | |
|
| | |
albertj
Master
Name :
Location : Finger Lakes of New York State
Joined : 2007-05-31
Post Count : 8687
Merit : 181
| | Subject: Re: Write-Up: Fixing HVAC Climate Control Lighting Sat Aug 13, 2011 10:23 pm | |
| - Mr.Riviera wrote:
- Well all of my CC lights finally went out so i am going to tackle this in a few weeks.
I have one question though.
Albert, you have on page 4 of this thread that our OEM bulbs are T1-1/4 with a part # 7382.
When i look those up they show as a T1-3/4
Below is what i found in 14V t1-1/4
From ebay:
Offered is a new box of 10 #7646 Miniature light bulbs.
T1-1/4 Bulb
Bipin Base
14 Volt
0.08 Amp (80mA)
0.5 Candel Power
C-2R Filament
Maximum Length (MOL): 0.60" (15.2mm)
lly
Maximum Diameter (MOD): 0.17" (4.3mm)
Average Rated Lamp Life: (1,000 hours)
Is that what i want for an OEM replacement? The differences i see are the bulb life span and the candel power. The 7382's (T1-3/4) have 40,000hr life and 0.3 candel.
I think i would rather have bulbs a little on the brighter side, but if the factory ones are 0.3 then maybe 0.5 would be distractingly bright? CONFESSION and clarification. The truth is the bulbs I specified to install for the repair are physically smaller than the OE except for one. One of the lamps is a shrouded lamp for the little red up-arrow. The bulbs I specified are *exact* size in that case. They are correct wattage. If you follow my instructions regarding installing them and coloring them with the paint pen they will all work fine and glow at about the right intensity--a little bright since they are all new. By the way in the years since I posted that note you're the first to call me on that, and I thank you, I should have edited it to make that clearer. Two reasons I did it: 1) easy to get the bulbs from Radio Shack 2) those bulbs can also be used to repair/refit the armrest and door remote lever lighting As for the candlepower, 0.5 is almost twice as bright as 0.3, the difference may bother you (eyestrain and/or aesthetics. It turns out that the bulb size is not *that* cr itical except the shrouded light for the little red up-arrow. It is a little 'grain of wheat' bulb. Given your observation -- you might want to pull the HVAC head and look at the lights for yourself before deciding what to do. It might also be appropriate for those who *have* already followed those instructions to comment, good or bad. Albertj | |
|
| | |
Mr.Riviera
Expert
Name : Matthew
Age : 38
Location : Florida
Joined : 2007-01-17
Post Count : 4394
Merit : 101
| | Subject: Re: Write-Up: Fixing HVAC Climate Control Lighting Sun Aug 14, 2011 10:28 am | |
| Thank you for the clarification.
I agree that bulb size isnt that important. My main concern was finding a bulb that had the same level of brightness as the OEM ones.
If you used the gain of wheat bulbs, which i assume are .3 candel, and say they are as bright as stock then i am OK with using those.
We do have a lightbulb warehouse (bulbtronics?) in town so i may stop by tomorrow and see what they have in stock. _________________ 1996 with 254k miles, L32 4" FWI -> ported N* -> Ported Gen V w/3.0" Pulley, Stage 3 Phenolic I/C, ZZP FMHE, 1.84 RR, Headers and 3" pipe to mufflers, F-body brakes, and lowered on Eibachs. -RIP AMG C400 White on black. Stage 2 w/E30 - 11.9@117 -daily | |
|
| | |
albertj
Master
Name :
Location : Finger Lakes of New York State
Joined : 2007-05-31
Post Count : 8687
Merit : 181
| | Subject: Re: Write-Up: Fixing HVAC Climate Control Lighting Sun Aug 14, 2011 11:16 pm | |
| - Mr.Riviera wrote:
- Thank you for the clarification.
I agree that bulb size isnt that important. My main concern was finding a bulb that had the same level of brightness as the OEM ones.
If you used the gain of wheat bulbs, which i assume are .3 candel, and say they are as bright as stock then i am OK with using those.
We do have a lightbulb warehouse (bulbtronics?) in town so i may stop by tomorrow and see what they have in stock. I used the grain-of-wheat bulbs that I specified (from Radio Shack) in my note. I did a second control head (again with grain-of-wheat) a few weeks ago for a friend. Only difference was I put daubs of black RTV over the bulb leads where they sit proud of the PCB. Albertj | |
|
| | |
Mr.Riviera
Expert
Name : Matthew
Age : 38
Location : Florida
Joined : 2007-01-17
Post Count : 4394
Merit : 101
| | Subject: Re: Write-Up: Fixing HVAC Climate Control Lighting Sat Sep 03, 2011 11:16 pm | |
| Had my dash apart to fix the steering column slop and decided to pull apart the CC display to snap a pic of 2. I dont recall any pictures of the led bulbs for the buttons, only the back side where the resistors are. Left half: 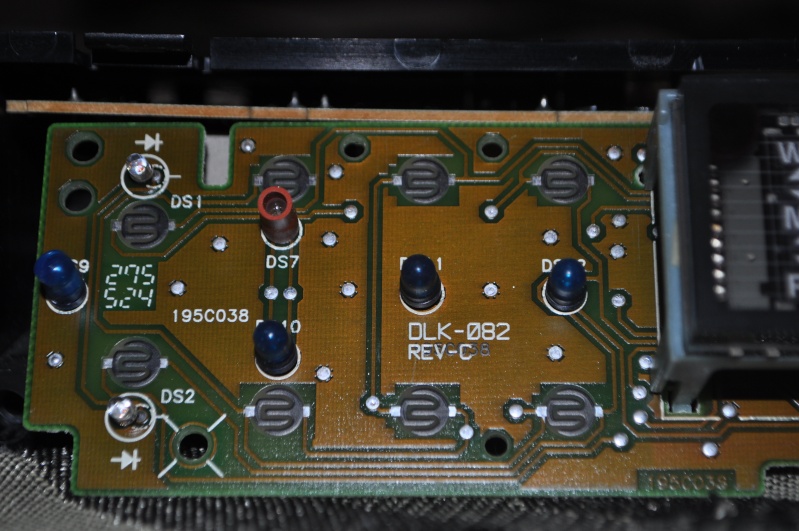 Right half:  _________________ 1996 with 254k miles, L32 4" FWI -> ported N* -> Ported Gen V w/3.0" Pulley, Stage 3 Phenolic I/C, ZZP FMHE, 1.84 RR, Headers and 3" pipe to mufflers, F-body brakes, and lowered on Eibachs. -RIP AMG C400 White on black. Stage 2 w/E30 - 11.9@117 -daily | |
|
| | |
Mr.Riviera
Expert
Name : Matthew
Age : 38
Location : Florida
Joined : 2007-01-17
Post Count : 4394
Merit : 101
| | Subject: Re: Write-Up: Fixing HVAC Climate Control Lighting Sat Sep 03, 2011 11:20 pm | |
| Also noticed my 96 has a slightly different internals than the one pictured on page 1 of this thread. Mine still dims after 180k miles, but all of the bulbs are blown.  _________________ 1996 with 254k miles, L32 4" FWI -> ported N* -> Ported Gen V w/3.0" Pulley, Stage 3 Phenolic I/C, ZZP FMHE, 1.84 RR, Headers and 3" pipe to mufflers, F-body brakes, and lowered on Eibachs. -RIP AMG C400 White on black. Stage 2 w/E30 - 11.9@117 -daily | |
|
| | |
BMD
Aficionado

Name : BMD
Location : Canada
Joined : 2009-04-28
Post Count : 1161
Merit : 36
| | Subject: Re: Write-Up: Fixing HVAC Climate Control Lighting Sat Sep 03, 2011 11:52 pm | |
| Great timing, I am just about pull mine out 'cause the numbers and symbols on the digital display start dim and although they brighten up, they don't get as bright as it once did, or as bright as the radio. Can anyone tell me by looking at these pics what could be causing this? Thanks for the pics Matthew
P.S. (Also let us now what your doing to solve the steering wheel slop Matthew.) | |
|
| | |
Mr.Riviera
Expert
Name : Matthew
Age : 38
Location : Florida
Joined : 2007-01-17
Post Count : 4394
Merit : 101
| | Subject: Re: Write-Up: Fixing HVAC Climate Control Lighting Sun Sep 04, 2011 12:16 am | |
| - BMD wrote:
P.S. (Also let us now what your doing to solve the steering wheel slop Matthew.) Still working on that one...Not going well _________________ 1996 with 254k miles, L32 4" FWI -> ported N* -> Ported Gen V w/3.0" Pulley, Stage 3 Phenolic I/C, ZZP FMHE, 1.84 RR, Headers and 3" pipe to mufflers, F-body brakes, and lowered on Eibachs. -RIP AMG C400 White on black. Stage 2 w/E30 - 11.9@117 -daily | |
|
| | |
albertj
Master
Name :
Location : Finger Lakes of New York State
Joined : 2007-05-31
Post Count : 8687
Merit : 181
| | Subject: Re: Write-Up: Fixing HVAC Climate Control Lighting Sun Sep 04, 2011 1:25 am | |
| - Mr.Riviera wrote:
- Also noticed my 96 has a slightly different internals than the one pictured on page 1 of this thread. Mine still dims after 180k miles, but all of the bulbs are blown.
Yours ahs the same problem as the others, you just have version with 2 ballast resistors instead of 4 and if you flip that board (not the one with the bulbs) over and look at the traces you probably have connections that have opened on those resistors. The resistors are the two ceramic rectangles in the top left of the picture you posted. I need a closeup of those things showing the numbers & Letters on them to say what to get to replace them. I think they say 56 ohms 5%. It may be all you need do is resolder them. All that said, I would consider replacing them with 55 to 60 ohm, 1% resistors that will carry 7 watts or better. Not to mention replacing the light bulbs. Albert | |
|
| | |
Mikel
Enthusiast
Name : Mikel
Age : 47
Location : New Haven, CT
Joined : 2009-07-12
Post Count : 157
Merit : 2
| | Subject: Re: Write-Up: Fixing HVAC Climate Control Lighting Sat Aug 11, 2012 9:00 pm | |
| I just fixed the display dimming issue in my HVAC controller. As someone who is familiar with wave soldering of PC boards, I was appalled at the quality of the solder joints. It's all good now.. Took much longer to remove the controller than the actual fix. Thank you for the write up. | |
|
| | |
albertj
Master
Name :
Location : Finger Lakes of New York State
Joined : 2007-05-31
Post Count : 8687
Merit : 181
| | Subject: Re: Write-Up: Fixing HVAC Climate Control Lighting Sun Aug 12, 2012 2:06 pm | |
| - Mikel wrote:
- I just fixed the display dimming issue in my HVAC controller. As someone who is familiar with wave soldering of PC boards, I was appalled at the quality of the solder joints. It's all good now.. Took much longer to remove the controller than the actual fix. Thank you for the write up.
did you replace the resistors or just resolder them? I was going to leave mine in place but decided to replace them 'cause the new ones were better spec (less drift) than the old ones. | |
|
| | |
Mikel
Enthusiast
Name : Mikel
Age : 47
Location : New Haven, CT
Joined : 2009-07-12
Post Count : 157
Merit : 2
| | Subject: Re: Write-Up: Fixing HVAC Climate Control Lighting Sun Aug 12, 2012 2:11 pm | |
| Just resoldered them. The solder joints were so thin that they had broken off.and allowed the resistors to rattle. | |
|
| | |
albertj
Master
Name :
Location : Finger Lakes of New York State
Joined : 2007-05-31
Post Count : 8687
Merit : 181
| | Subject: Re: Write-Up: Fixing HVAC Climate Control Lighting Sun Aug 12, 2012 3:53 pm | |
| - Mikel wrote:
- Just resoldered them. The solder joints were so thin that they had broken off.and allowed the resistors to rattle.
That will work fine for now - I think, however, the original resistors heat so much because they are underrated. They get hot after long drives and the heat-cool-heat-cool (thermal cycling) tends to bust the solder joint. You need not fudd with it now but if it breaks again you may want to think about replacing the resistors with some that are rated a higher wattage (not a higher resistance of course) -and- tighter tolerance (less drift). They will not heat up as much in a given application (that is the 'less drift' part). The ones that are on your board, I would not have expected to have seen trouble with, however. | |
|
| | |
Mikel
Enthusiast
Name : Mikel
Age : 47
Location : New Haven, CT
Joined : 2009-07-12
Post Count : 157
Merit : 2
| | Subject: Re: Write-Up: Fixing HVAC Climate Control Lighting Sun Aug 12, 2012 8:08 pm | |
| You are probably right. But if it happens again, I now have practice and should be a very quick fix. | |
|
| | |
albertj
Master
Name :
Location : Finger Lakes of New York State
Joined : 2007-05-31
Post Count : 8687
Merit : 181
| | Subject: Re: Write-Up: Fixing HVAC Climate Control Lighting Mon Aug 13, 2012 12:22 pm | |
| - Mikel wrote:
- You are probably right. But if it happens again, I now have practice and should be a very quick fix.
Agreed. And it should not fail soon, could be many months if ever... When I repaired mine I wrapped the wires that bridged between the resistors instead of reusing the board traces -- and as long as I was in there, I replaced the bulbs. I just did not want to be bothered with it further if only because so much **other** stuff can be broken (clips, screw bosses, etc) when you remove and reinstall such a thing. I thought about replacing the amber LEDs with colored ones (red for off, green for vent, blue for recirc, and leave amber for auto, and both defrosts) but decided not to (did not wan to take the time to match luminance among different colored LEDs). Albertj | |
|
| | |
Z-type
Aficionado

Name : Andrew Zamiska
Age : 37
Location : Cecil, PA - 25 miles south of Pittsburgh
Joined : 2009-06-29
Post Count : 1429
Merit : 63
| | Subject: temp Thu Oct 18, 2012 4:54 pm | |
| As it turns out, the new climate control unit I got had a bulb or two out, so I went to Radio Shack and got new bulbs for both units. I was able to buy enough to do my original unit, and to change the one bulb that was bad in the new unit. I changed those, reinstalled the blue light covers, re-soldered any suspicious connections, and changed the 'off' button LED to a red one (stealing the idea from Albert, I believe). I did the same thing to the spare unit, except I left the LED's alone. I also managed to put a nice gouge in the corner of my dash panel when I was putting the dash back together  . | |
|
| | |
Z-type
Aficionado
Name : Andrew Zamiska
Age : 37
Location : Cecil, PA - 25 miles south of Pittsburgh
Joined : 2009-06-29
Post Count : 1429
Merit : 63
| | Subject: Re: Write-Up: Fixing HVAC Climate Control Lighting Thu Oct 18, 2012 9:40 pm | |
| Thanks for moving my post to this thread, whoever did it - it makes a lot more sense here! Anyway, I have some pictures to possibly add to Albert's original write-up on page 3. Only some as I wasn't planning on adding to the write-up. Here's is the climate control basically apart. The rear casing, the buttons (upside down), display/light panel, and control board. 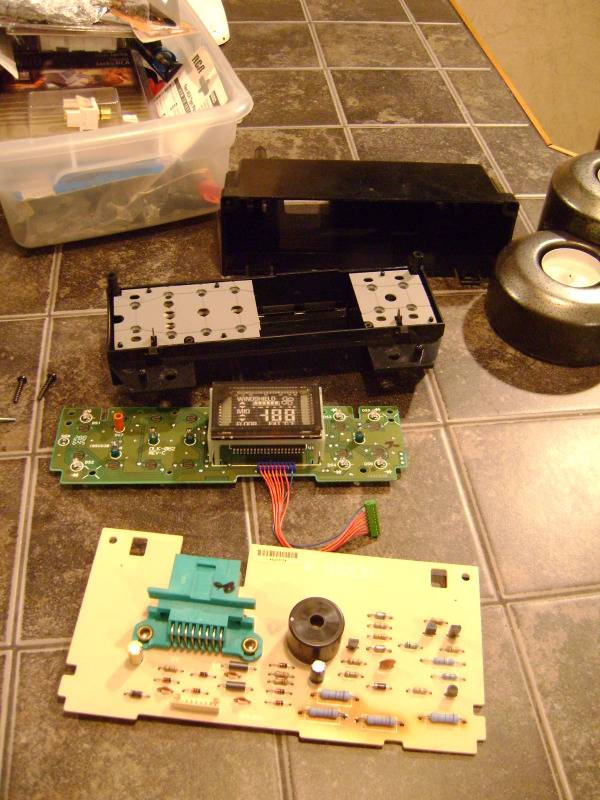 Here's the resistors everyone has spoken of that, when the connections fail, cause the display and lights to dim a bit. They could be blue, brown, or even square depending on the year Riv. 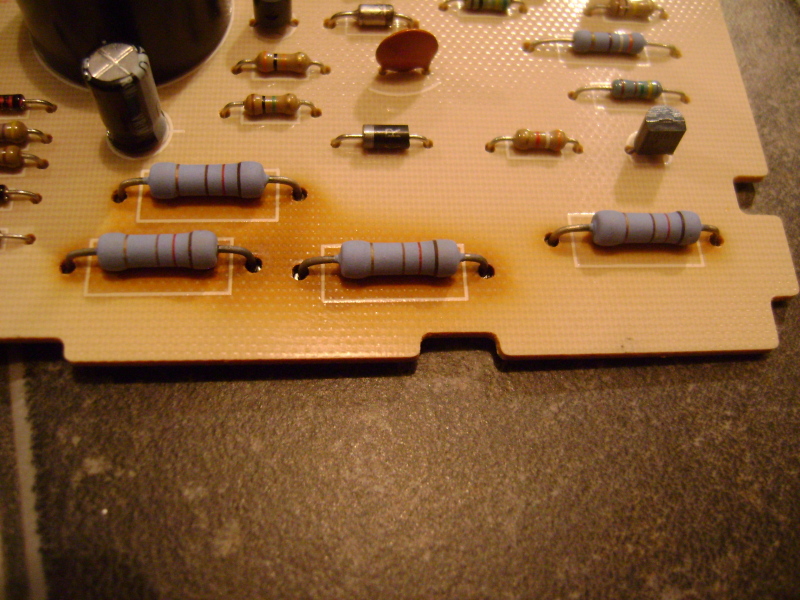 Flip the board over and I found exactly what 97 park ave's photos on page 6 showed. Cracked and broken resistor connections. This is mine after re-soldering. 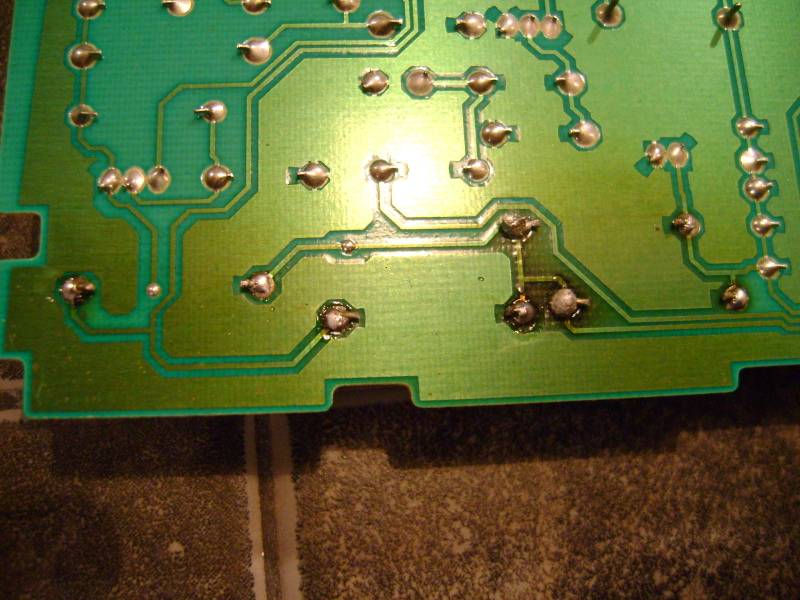 Just an example of what the bulbs look like in stock form, and what you'll be looking for for replacements. These are with the bulb covers removed, except for the red one on top (to raise temperature).  With a bulb cover beside it, for fun! 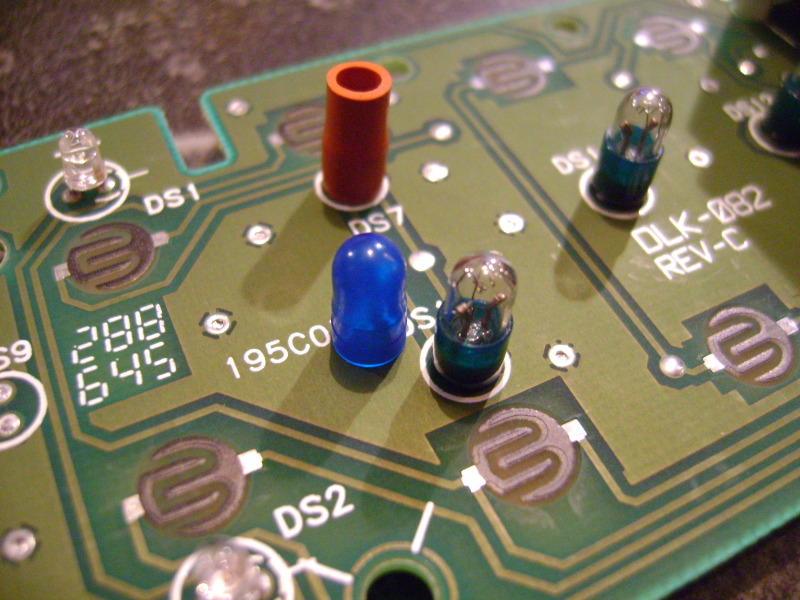 This is what I picked up at Radio Shack (or as my one Audio teacher used to call it, The Shit Shack). These are just a TOUCH smaller physically than stock, so the blue bulb covers are slightly loose. Incidentally, as I believe was mentioned in a previous post, the bulb used for the red covered light (temperature adjustment) is EXACTLY this bulb.  Bulbs replaced, bulb covers back on. 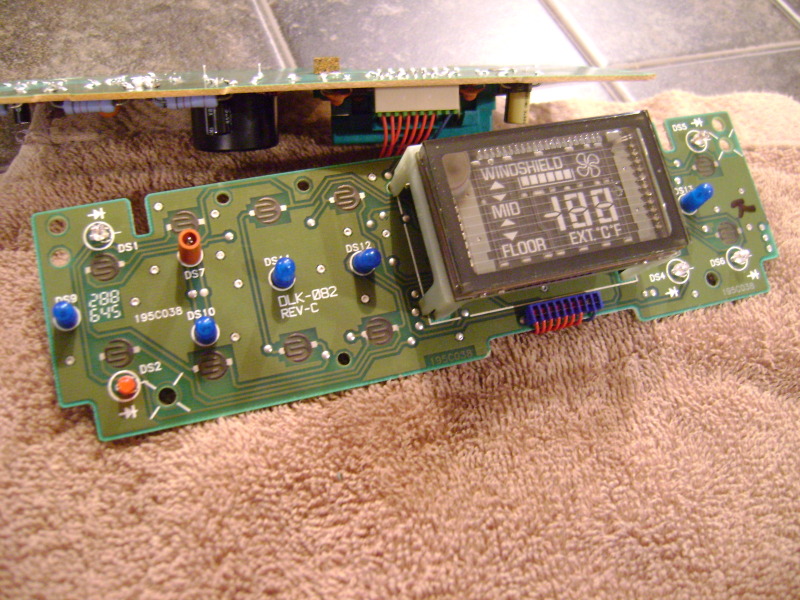 I replaced one of the LEDs, the OFF button, with a red LED. Yep, stole that from Albert as well. But, as Albert also said, if you change these, mind the polarity! Luckily, even with LED's this small, it's easy to tell which end is which if you look close enough. A magnifying glass is OK to use  . 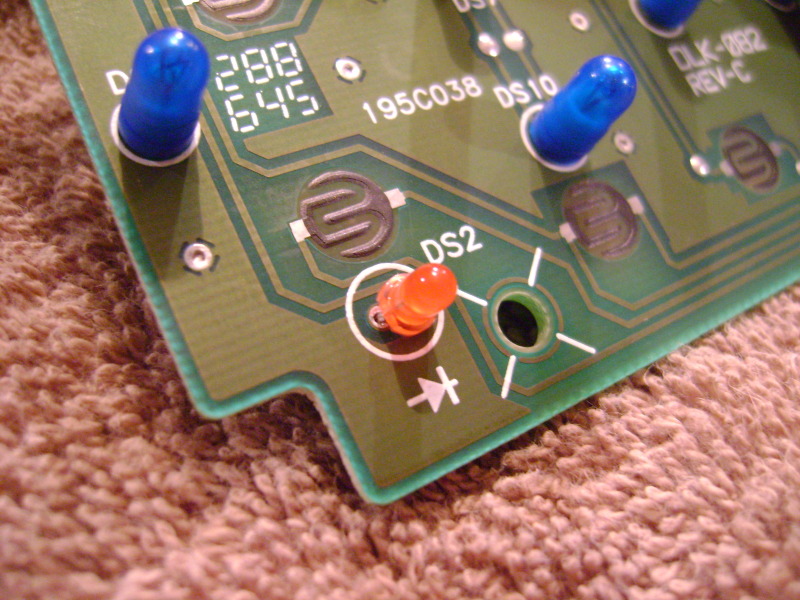 The ever-important test of the lighting panel. I'm glad I did this because one of my bulb's solder joints was not sound, so the bulb did not light.  I hope these pics helped the write-up a little bit! If you have soldering experience, it really is a very simple project. The hardest part is removing the dash panel. -Andrew Z | |
|
| | |
albertj
Master
Name :
Location : Finger Lakes of New York State
Joined : 2007-05-31
Post Count : 8687
Merit : 181
| | Subject: Re: Write-Up: Fixing HVAC Climate Control Lighting Fri Oct 19, 2012 3:09 am | |
| The photos help the writeup, thanks Andrew Z. To the rest of you - when you replace the resistors be sure to get same or higher *wattage* rating as well as same resistance. They will take the heat better. | |
|
| | |
Sponsored content
| | Subject: Re: Write-Up: Fixing HVAC Climate Control Lighting | |
| |
|
| | |
| | Write-Up: Fixing HVAC Climate Control Lighting | |
|


