| | Write-Up: Installing Boost Gauge |  |
|
+73RidzRiv 1997riv bigdave bmcd9179 stan joshuadalegrimes charlieRobinson Fromano matt270avian Johnny5 al_roethlisberger BKRIV Rod.G ghost88 rk0ehn J. Chris Davis GreenMonster GreenSupreme VJD2 7901mark Snowdog Its a car part now GMFreak8 brmcm15 Hometown Hero L67 Ryan from Ohio LARRY70GS 96Super robotennis61 texasfan010 woggy Rickw Fuzzy rivboy 97rivsc lyonsperformance 1wickedninja SuperRiv07 gliderguy agood1 Karma Chicken deekster_caddy albertj Supercharged blackbart95 99 Riviera 99 IBx1 palermocorey90 mr.19982tone Jack the R 98riv RIVhorsepwr RivMan okiedrifter jimmyriv AA 97rivman RhinoFLA urbsnspices dreww SpaceBar NO 4 EVR Jason TType_Riviera turtleman pwmin jax95riv Mr.Riviera oldsman105 1998 Riv T Riley 77 posters |
|
| Author | Message |
|---|
palermocorey90
Expert

Name : Corey
Age : 34
Location : Rome NY
Joined : 2007-10-03
Post Count : 2968
Merit : -24
| | Subject: Re: Write-Up: Installing Boost Gauge Fri Feb 01, 2008 8:00 pm | |
| john if you need some help give me a call | |
|
| | |
IBx1
Expert

Name : ILAN
Age : 33
Location : College Station, TX
Joined : 2007-12-30
Post Count : 4304
Merit : 69
| | Subject: Re: Write-Up: Installing Boost Gauge Sat Feb 02, 2008 12:28 am | |
| They do look very nice in place of the vents, and it makes the remaining vent a bit stronger. You don't even notice a black-faced dial when it's there unless you're looking for it, too! | |
|
| | |
mr.19982tone
Member

Name : john
Age : 40
Location : syracuse ny
Joined : 2008-01-14
Post Count : 52
Merit : 0
| | Subject: thank you for the help Sat Feb 02, 2008 12:06 pm | |
| that pic helped out alot thanks | |
|
| | |
RhinoFLA
Aficionado

Name : Ryan
Age : 36
Location : Port Richey, FL
Joined : 2007-02-27
Post Count : 1029
Merit : 4
| | Subject: Re: Write-Up: Installing Boost Gauge Sat Feb 02, 2008 12:19 pm | |
| anytime. the harder part is figuring out which way you want to run the line.. most people run theirs through their firewall.. I chose the easier path, I ran it along the side of the engine bay, into my door, through the rubber seal and up into the pillar. | |
|
| | |
dreww
Junkie

Location : Dallas
Joined : 2007-04-10
Post Count : 851
Merit : 9
| | Subject: Re: Write-Up: Installing Boost Gauge Wed Feb 06, 2008 6:26 am | |
| be sure not to pinch the airline, or your boost guage wont work at all or might be inaccurate. | |
|
| | |
99 Riviera 99
Amateur
Joined : 2008-03-28
Post Count : 34
Merit : 0
| | Subject: Boost gauge? Sun Mar 30, 2008 2:31 pm | |
| Anyone have one? Which one ya got? If its mechanical how long/hard was it to put in. I'm looking at the nitrod gauge, nitrod.com if anyones interested.
-CAMERON | |
|
| | |
RhinoFLA
Aficionado
Name : Ryan
Age : 36
Location : Port Richey, FL
Joined : 2007-02-27
Post Count : 1029
Merit : 4
| | Subject: Re: Write-Up: Installing Boost Gauge Sun Mar 30, 2008 4:29 pm | |
| I've got the Sunpro Faze boost/vac gauge. It took about 10 minutes to put in. I also didn't route it through the firewall, so it would probably take a bit longer if you went that way.  this might help a little http://www.bonnevilleclub.com/forum/kb.php?mode=article&k=47 | |
|
| | |
blackbart95
Enthusiast

Name : Mark
Age : 58
Location : Canton, NC
Joined : 2007-09-16
Post Count : 104
Merit : 3
| | Subject: Write-Up: Series 1 drivers door boost gauge install Wed May 14, 2008 10:20 pm | |
| I did this install on my 1995 Riv, but I believe most of this info can be applied to all late model Rivs. You will need: Torx screwdrivers T15 and T25, #2 phillips screwdriver, Dremel tool with cut-off wheel and sanding drum or similar, assorted small open end wrenches from 5/16 to 9/16, drill and bits, small rubber grommets, zip ties, 3/16 vacuum line (about 4 feet), 1/8 inch vacuum line (6 feet plus what comes with the gauge), various metal fittings as described later, and patience. Begin by removing the driver side door panel, which is held on by 5 screws: 2 in the door pull handle (these are Torx T25), 1 at each end of the door panel at the top, and 1 in the door handle trim. The bottom of the door panel is held in by several molded hooks. Once the screws are removed the door panel will lift up and out. Before you can completely remove it, you must disconnect several electrical connectors. Next remove the left dash end panel (the one with the fuse door) by pulling it straight out. Be careful not to break the plastic tabs or slots that metal clips engage. You will also need to remove the door jamb trim near the hood release by removing the screws in the hood release lever and then pulling the trim out away from the door opening. Next remove the under dash trim panel by removing the 4 hex head screws. Your car should now look like this:  In order to get the vacuum line and gauge light (and speaker wires in my case) from the gauge to the firewall and beyond, I drilled a ½ inch hole to fit a 3/8 inch rubber grommet (be sure to use a grommet, sharp edges and wires/tubing don’t mix) through the door frame as pictured. Be very careful when drilling anywhere in these cars! They are crowded with wiring harnesses. Double check before drilling!  I removed the bellows that runs between the door and the body to check for wires first and also to make it easier to route my vacuum line and wires. Using mechanics wire or a fish tape, pull the wire(s) and vacuum line through the 3/8 inch grommet, the door bellows and finally through an upper opening in the door shell that will be near the installed gauge. 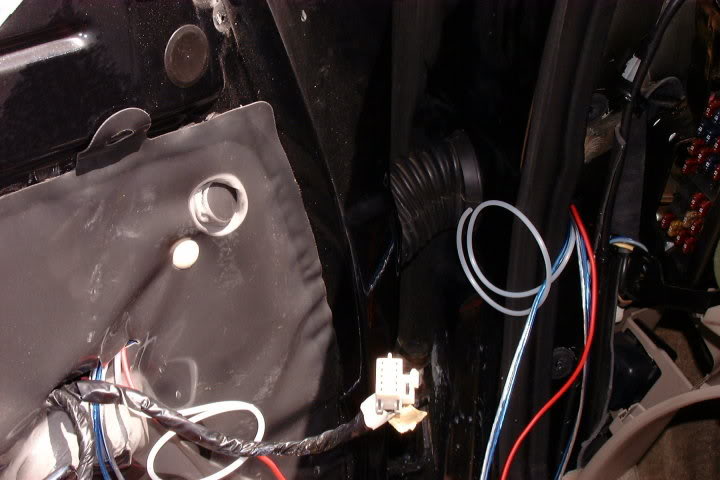 Now that the vacuum lines and wire(s) are routed, its time to mount the gauge! Start by removing the HVAC vent and duct from the door panel by carefully removing the 2 push nuts that retain it. Carefully pull the vent panel from the duct, it is difficult but can be done w/o breaking the tabs. I chose to install the gauge in the lower vent location to be sure I had enough clearance for the back side of the gauge. Remove the lower vent in the vent panel. I used a Dremel tool to remove the lip inside the boss that holds the vent. I removed only enough material to allow for the gauge to fit very snug. Having a snug fit will help here since you can’t tighten the gauge clamp too much w/o bending the vent panel. Position the gauge however you want it in the vent panel. It may be helpful to test fit the vent w/gauge in the door panel so that the gauge is positioned how you want it. Next, install the gauge clamp and two nuts, I had to spread my clamp a little to clear the boss. I also used a little blue Loctite on the gauge nuts and studs since you can’t get them real tight w/o damaging the plastic parts. 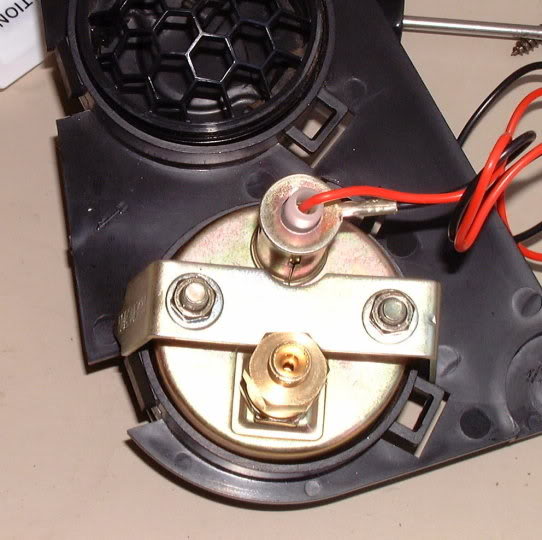 Cut away the lower portion of the duct as shown. Seal the duct with a couple layers of duct tape (what else would you use?  ). Reattach the vent assembly to the duct.  Reassemble the duct and vent assembly to the door panel. Connect the gauge light power and ground wires to an appropriate source. I used the ashtray light for my 12V + power since I removed the ashtray to mount a CD changer remote display (another write-up). I found a suitable ground wire in one of the door panel wiring harnesses. Place the door panel bottom hooks into the door shell to support it while you connect the vacuum line. Be careful not to overtighten the fittings as you can crush the tubing. Then reconnect the factory wiring and reassemble door panel, door handle trim, and 5 screws. Reconnect the door bellows and you are done with the door. Time for a cold beer  . Now we have to get the vacuum line out to the engine. I pulled back the carpet and insulation behind the pedals and drilled a ¼ inch hole through the firewall and installed a small grommet that the vacuum line passed through. Again, be careful not to hit a wiring harness or other component when drilling. I routed the vacuum line under the dash leaving a little slack here and there. I had to buy some extra vacuum line (the plastic kind) and a compression fitting to splice the lines under the dash in order to get to the engine. Secure with several zip ties.  I purchased a brass ¼ NPT TEE, two 3/16 inch hose barbs, and a 1/8 inch hose compression fitting (for the gauge vacuum line) from a local hardware store in order to make the connections to the engine as shown above. I removed the factory vacuum line that runs between the vacuum tree on the SC and the fuel pressure regulator and connected one line from the TEE to the vacuum tree using 3/16 inch rubber vacuum line (from NAPA) as shown (red arrow): 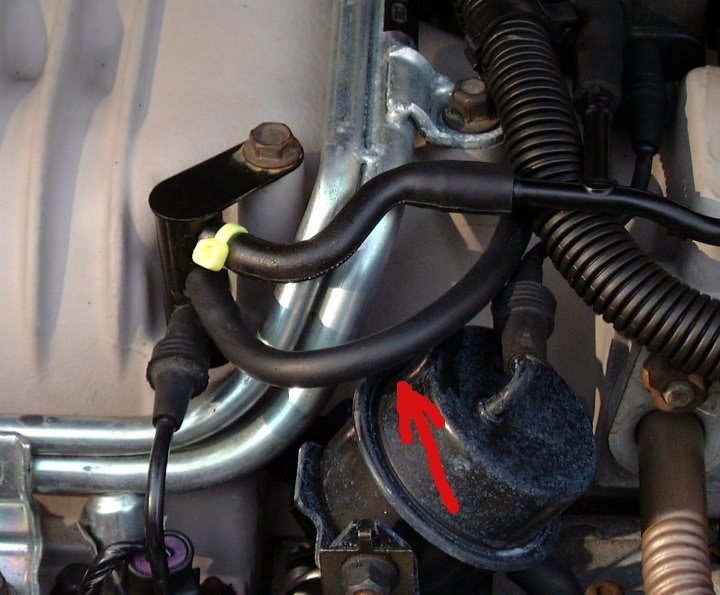 I then connected the fuel pressure regulator to the TEE, again with 3/16 inch rubber vacuum line. Last but not least I connected the vacuum line from the gauge to the TEE using the 1/8 inch compression fitting. I then secured the Tee to a plastic bracket that is clipped to the engine’s plastic fuel lines using zip ties. I routed the gauge vacuum line along the firewall using extra slots I found in my car’s factory steel fuel line guides near the brake booster. Be sure to leave a little slack here and there to allow the tube to move freely. Now all that was left to do was to check the gauge’s function and for leaks, reassemble the dash, and enjoy. Looks factory, doesn’t it? I just wish I could have disassembled my gauge and painted the needle white like my stock gauges. Time start to finish was about 4 hours including breaks. 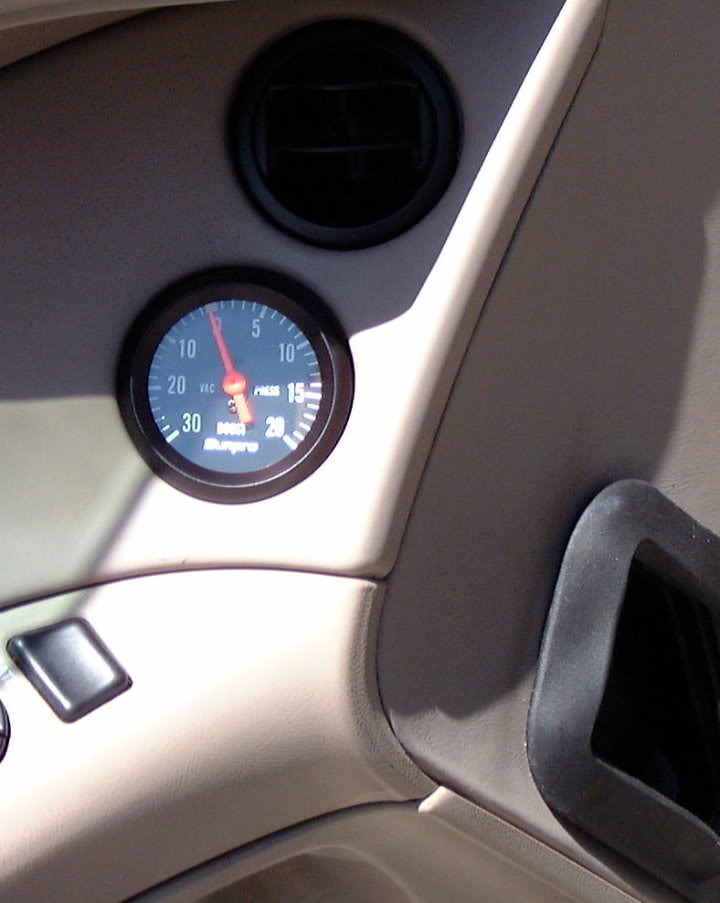 | |
|
| | |
T Riley
Guru

Name : Travis
Age : 34
Location : Minnesconsin
Joined : 2007-02-08
Post Count : 5127
Merit : 10
| | Subject: Re: Write-Up: Installing Boost Gauge Wed May 14, 2008 11:26 pm | |
| | |
|
| | |
AA
Administrator

Name : Aaron
Age : 47
Location : C-bus, Ohio
Joined : 2007-01-13
Post Count : 18452
Merit : 252
| | Subject: Re: Write-Up: Installing Boost Gauge Thu May 15, 2008 8:41 am | |
| Wow, super-nice install, great write-up! This is how it should be done, folks!  _________________ '05 GTO 6.0L • 6-spd • 95k miles • 0-60: 4.8s • 16.9 avg MPG • Nelson Ledges Lap: 1:26'95 Celica GT 2.2L • 5-spd • 165k miles • 0-60: yes'98 SC Riviera • 281k miles • 298 HP/370 TQ • 0-60: 5.79s • ET: 13.97 @ 99.28 • 4087 lb • 20.1 avg MPG • Nelson Ledges Lap: 1:30
3.4" pulley • AL104 plugs • 180º t-stat • FWI w/K&N • 1.9:1 rockers • OR pushrods • LS6 valve springs • SLP headers • ZZP fuel rails
KYB GR2 struts • MaxAir shocks • Addco sway bars • UMI bushings • GM STB • Enkei 18" EV5s w/ Dunlop DZ101s • F-body calipers
EBC bluestuff/Hawk HP plus • SS lines • Brembo slotted discs • DHP tuned • Aeroforce • Hidden Hitch^^^ SOLD ^^^  '70 Ninety-Eight Holiday Coupe 455cid • 116k miles '70 Ninety-Eight Holiday Coupe 455cid • 116k miles^^^ SOLD ^^^ | |
|
| | |
Supercharged
Addict

Name : Blake
Age : 34
Location : Akron, Ohio
Joined : 2008-03-12
Post Count : 611
Merit : 0
| | Subject: Boost guage Sun Jun 22, 2008 5:31 pm | |
| my brother just got a boost gauge for his 2000 regal and im bout to hook a guage up too, we have to use his fuse box for the light on the guage and im gonna have a light tooo but we dotn know where my fuse box is on the riviera
anyone know | |
|
| | |
RhinoFLA
Aficionado
Name : Ryan
Age : 36
Location : Port Richey, FL
Joined : 2007-02-27
Post Count : 1029
Merit : 4
| | Subject: Re: Write-Up: Installing Boost Gauge Sun Jun 22, 2008 5:44 pm | |
| You can splice into the dimming circuit, open the door and it's on the far left side of the interior, parallel to where the door would rest against your dash. I just pigtailed into the cig. lighter circuit, the one on the passengers side, because that circuit is open until the key is turned. | |
|
| | |
Supercharged
Addict
Name : Blake
Age : 34
Location : Akron, Ohio
Joined : 2008-03-12
Post Count : 611
Merit : 0
| | Subject: hooked up the boost gauge Wed Jul 02, 2008 4:41 pm | |
| gotta boost/vac gauge hooked up now
went to autoblown and got assorted t's and got vacuum elbows for 10.67
a few zip ties got it hooked up | |
|
| | |
Supercharged
Addict
Name : Blake
Age : 34
Location : Akron, Ohio
Joined : 2008-03-12
Post Count : 611
Merit : 0
| | Subject: any ideas where to mount Wed Jul 02, 2008 7:57 pm | |
| got the boost guage sitting in the cup holder
any ideas, i see the drivers side door upper air vents is canadite for sure | |
|
| | |
palermocorey90
Expert
Name : Corey
Age : 34
Location : Rome NY
Joined : 2007-10-03
Post Count : 2968
Merit : -24
| | Subject: Re: Write-Up: Installing Boost Gauge Wed Jul 02, 2008 8:50 pm | |
| thats a great spot to do it.what kinda gauge do you have BTW, what brand i mean | |
|
| | |
Supercharged
Addict
Name : Blake
Age : 34
Location : Akron, Ohio
Joined : 2008-03-12
Post Count : 611
Merit : 0
| | Subject: Re: Write-Up: Installing Boost Gauge Thu Jul 03, 2008 1:11 pm | |
| | |
|
| | |
Supercharged
Addict
Name : Blake
Age : 34
Location : Akron, Ohio
Joined : 2008-03-12
Post Count : 611
Merit : 0
| | Subject: NEW GAUGE TOPIC Thu Jul 03, 2008 1:13 pm | |
| I need to find a place to mount my gauge, i seen people do it above to cd holder
any ideas | |
|
| | |
albertj
Master

Name :
Location : Finger Lakes of New York State
Joined : 2007-05-31
Post Count : 8685
Merit : 181
| | Subject: Re: Write-Up: Installing Boost Gauge Thu Jul 03, 2008 3:46 pm | |
| Consider attaching it to the A pillar if you can get a pod for it. Summit Racing sells some for Pontiac for $25 - $30. Maybe they can be shaved to fit the Riv? look for part ATM-10211 or ATM-10212 for a single-gauge pod. Have to paint or cover with headliner fabric to match.
Or see the Stewart-Warner (VDO Gauge) site for ideas:
http://vdovision.com/products/stewartwarnerperformance.htm
Albertj
Last edited by albertj on Thu Jul 03, 2008 3:48 pm; edited 1 time in total | |
|
| | |
deekster_caddy
Master
Name : Derek
Age : 52
Location : Reading, MA
Joined : 2007-01-31
Post Count : 7717
Merit : 109
| | Subject: Re: Write-Up: Installing Boost Gauge Thu Jul 03, 2008 3:47 pm | |
| How big is the gauge? What is it reading? I've also seen people mount a gauge in the drivers door in place of one of the vents... | |
|
| | |
Chicken
Aficionado

Name : Mark
Age : 58
Location : Montana
Joined : 2008-06-13
Post Count : 1296
Merit : 8
| | Subject: Re: Write-Up: Installing Boost Gauge Thu Jul 03, 2008 6:26 pm | |
| I' ve seen people do it in the drivers door vent, and I seen them above the cd holder... or this looks like it might fit....
http://www.wbodystore.com/grandprix/a-pillar-gauge-pod-p-194.html | |
|
| | |
Karma
Aficionado

Name : Andrew
Age : 40
Location : Ontario, Canada
Joined : 2008-01-14
Post Count : 1949
Merit : 123
| | Subject: Re: Write-Up: Installing Boost Gauge Thu Jul 03, 2008 9:31 pm | |
| I dunno if the > 95's are the same. But to the right of the steering wheel I had a nice round spot that had the trip clock reset and the rear defog button. But the space for it is the same as the rest of gauges, it just has buttons in it. I moved it down to just under the kick pannel and put my boost gauge in there. It looks like it belongs, and me being tall I can just see it through the steering wheel. Its hard to explain, maybe tormorrow ill post some pics to make it clearer.
I've never liked the gauge mounted in the drivers vent. To me it kills the symmetry of the vents and looks out of place. _________________  | |
|
| | |
Supercharged
Addict
Name : Blake
Age : 34
Location : Akron, Ohio
Joined : 2008-03-12
Post Count : 611
Merit : 0
| | Subject: Re: Write-Up: Installing Boost Gauge Thu Jul 03, 2008 9:58 pm | |
| it looks like any gauge would fit perfect, if not get electrical tape and make it thicker | |
|
| | |
Supercharged
Addict
Name : Blake
Age : 34
Location : Akron, Ohio
Joined : 2008-03-12
Post Count : 611
Merit : 0
| | Subject: Re: Write-Up: Installing Boost Gauge Thu Jul 03, 2008 10:06 pm | |
| just cruisin 40 it reads about 15-18 on vac, it gets 5-7 pounds easy and when i went on the highway the other night i got 11 pounds in 2nd going into 3rd,
ive got video of it but i cant get any sites to work yet. | |
|
| | |
dreww
Junkie
Location : Dallas
Joined : 2007-04-10
Post Count : 851
Merit : 9
| | Subject: Re: Write-Up: Installing Boost Gauge Fri Jul 04, 2008 3:23 pm | |
| a pillar is popular, but some think it ruins the sleeper look.
I used the a-pillar and put some more where the ashtray went. Theres alot of extra room that can be found in the center console...whether it be for stereo stuff, gauges or whatever. | |
|
| | |
agood1
Special
Joined : 2008-07-09
Post Count : 6
Merit : 0
| | Subject: Re: Write-Up: Installing Boost Gauge Thu Jul 10, 2008 10:49 pm | |
| What make model and size is the gauge? | |
|
| | |
Sponsored content
| | Subject: Re: Write-Up: Installing Boost Gauge | |
| |
|
| | |
| | Write-Up: Installing Boost Gauge | |
|


