Riv Performance
Would you like to react to this message? Create an account in a few clicks or log in to continue.

The 8th Gen Riviera Resource
 
HomeDashboardLatest imagesSearchRiviera Questions & AnswersWrite-Ups IndexRegisterRelated LinksLog in


 Write-Up: Replacing Belts and Pulleys

Go down 
+65
charlieRobinson
Z-type
Sir Psycho Sexy
matt270avian
stan
J. Chris Davis
llamalor2112
96_Juggernaut
Yardley
al_roethlisberger
9001psi
joshuadalegrimes
highwaywarrior
atvinstructor1
98RiviSC
gmann3001
ghost88
turtleman
Jamax
denim
dboydakid
dtrumbo
BKRIV
LARRY70GS
Jayrydingslab
54_nailhead
24198tom
Abaddon
playa
billythekid7
Eldo
71gsx455-4spd
GMFreak8
T Riley
DEMonte1997
wyomork
robotennis61
BMD
Mikel
L67
RivGuy
TonySmooth89
sburch23
Mr.Riviera
Rickw
andrzejsze
1wickedninja
Sweepspear
97rivsc
manofmany
albertj
SuperRiv07
curious riv
Karma
jamie
robertwolf86
deekster_caddy
98riv
dreww
2toneRivi
ibmoses
BillBoost37
1998 Riv
Jack the R
AA
69 posters
Go to page : 1, 2, 3 ... 7 ... 14  Next
AuthorMessage
AA
Administrator
AA


Name : Aaron
Age : 46
Location : C-bus, Ohio
Joined : 2007-01-13
Post Count : 18448
Merit : 252

Write-Up: Replacing Belts and Pulleys Empty
PostSubject: Write-Up: Replacing Belts and Pulleys   Write-Up: Replacing Belts and Pulleys EmptyFri Apr 20, 2007 10:47 am

Contributed by Jack the R (Nov '05)

For tensioner write-ups, see links:

Accessory: https://rivperformance.editboard.com/t7519p15-write-up-replacing-accessory-belt-tensioner

Supercharger: https://rivperformance.editboard.com/t2887p75-write-up-replacing-supercharger-belt-tensioner


Replacing Belts and Tensioner Pulleys on the 95-99 Buick Riviera Supercharged

The moral of this repair is "be prepared." With these instructions, and the needed tools and parts at hand, replacing the belts and tensioner pulleys will only take a few hours and be minimally frustrating.

Replacing the belts and tensioner pulleys on the supercharged Riviera is considerably more involved than the same job on normally aspirated cars. It will take time and patience to accomplish, but need not be extraordinarily challenging.

The majority of the difficulty I experienced came from not knowing what tools would be needed and being unfamiliar with the car and the replacement process. Carefully read through this write up, and keep a printed copy at hand during the repair process, and you should be able to proceed with a minimum of difficulty.

Tools Needed:

millimeter sockets (15, 18 mm)

millimeter deep sockets (13, 15, 18 mm)

millimeter wrenches (15 mm)

torx sockets (T50)

external torx sockets (E8, E10)

various socket wrenches/breaker bars,* and adaptors

Riviera jack and floor jack

scrap 2X4, hammer, nails, saw

*several times I found a need for a 3/8" drive breaker bar with an extra long handle (like on a 1/2" drive breaker bar), as the tight confines between the frame rail and various engine components made it impossible to use a 1/2" drive breaker bar with a 3/8" adaptor.

Parts Needed:

Write-Up: Replacing Belts and Pulleys 01parts

Write-Up: Replacing Belts and Pulleys Pulleys

warning - these parts worked on my 97 (except as noted). If you have another year, check to see what parts are right for your car.

Belts -

Accessory Drive

6K938 (ACDelco#)
K060938 (Gates#)

Supercharger *

6K721 (ACDelco#)
K060721 (Gates#)

*note - This is supposed to be the correct belt for 96-99 years, but didn't work on my 97. Here's the ACDelco/Gates belt compared to my old SC belt and a 72.5" Gatorback belt -

Write-Up: Replacing Belts and Pulleys Beltissues

My advice is to go with the 72.5" Gatorback belt.


Tensioner Pulleys -

Gates # 38015

Gates #38006

Gates #38009

7505118
#12564510
GR.1.062 _____ I had to get the lower SC idler pulley from a dealer.
These are the #'s I found on the box.


The Process:

Make an engine support

Write-Up: Replacing Belts and Pulleys 02enginesupport

Depending on your floor jack, you may need to make a support for the engine (don't be alarmed, but this repair involves removing a motor mount).

Write-Up: Replacing Belts and Pulleys 03oilpan

WARNING! It is not recommended to support the engine by the oil pan gasket. It can/will cause it to leak later on. See this post for ideas https://rivperformance.editboard.com/t725p165-write-up-replacing-belts-and-pulleys#134330

I carved the top of my engine support to fit between these three bolts on the oil pan.

Write-Up: Replacing Belts and Pulleys 04supportengine

This is what you'll be doing (but don't do it yet).

Replace 3 of the 4 Tensioner Pulleys

Get yourself off to a flying start by replacing the 3 easy tensioner pulleys.

*WARNING* - All three of these pulleys use a left-hand thread. Loosen them by turning them clockwise, and tighten them by turning them counter-clockwise. This is the opposite of a normal right-handed thread!

*DOUBLE DOUBLE WARNING* GM gets tricky on the 4th tensioner pulley and reverts to a normal right-handed thread! You're several steps away from removing the 4th pulley, but when you do get to it, don't be fooled! I'll remind you again later.
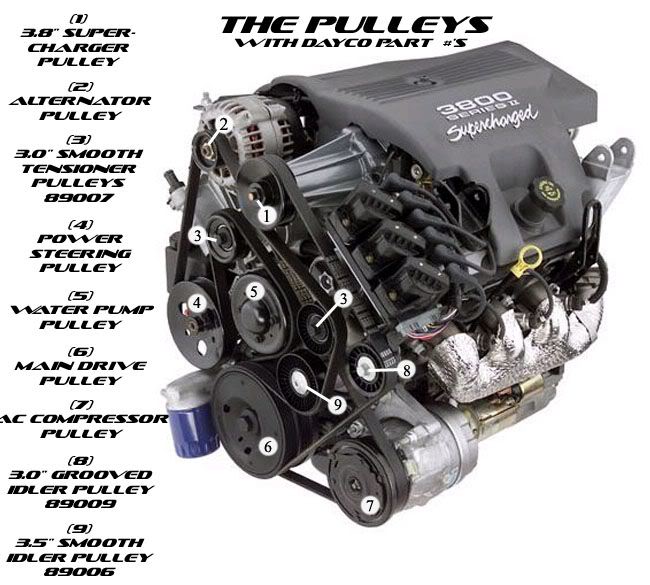
The Pulleys:

Write-Up: Replacing Belts and Pulleys 05pulleychart

1) Accessory belt tensioner pulley (smooth, #38015, left hand thread )

2) Supercharger belt tensioner pulley (smooth, #38006, left hand thread. Note that the replacement part is a heavier metal pulley which looks nothing like the original part)

3) Supercharger idler pulley (grooved, #38009, left hand thread)

4) Supercharger idler pulley (smooth, #?????, RIGHT HAND THREAD!)

Pulleys 1, 2, and 3 are easy to replace. You'll only be able to get to #4 after removing the passenger side motor mount, the power steering pump, and the passenger side engine bracket.

Begin by de-tensioning the two tensioner pulleys (#1 and #2), and sliding the belts off.

Write-Up: Replacing Belts and Pulleys 06detensionpulley

Use the T50 torx socket and a breaker bar. Crank the pulley bolts counter-clockwise and the pulleys will rotate downwards on their tensioner assemblies. Slip the belts off. Crank the pulley bolts clockwise to loosen. Swap the new pulleys for the old ones, tightening the bolts in a counter-clockwise direction.

Jack up the Car and Support the Engine

Once you've got the three easy pulleys replaced, it's time for the big job.

Write-Up: Replacing Belts and Pulleys 07jackitup

Begin by jacking up the car on the front passenger side.

Write-Up: Replacing Belts and Pulleys 04supportengine

Use a floor jack and your engine support to support the engine. You don't need to lift it, just get a little weight onto the jack for now.

Remove the Motor Mount

Write-Up: Replacing Belts and Pulleys 08removebolt1

Remove the bolt indicated. It takes an 18mm and a 15 mm socket. You may need to raise or lower the jack a bit to line the bolt up right so you can pull it out.

Note that this bolt is black. Don't get it confused with the other (gray) motor mount bolt when reinstalling.

Write-Up: Replacing Belts and Pulleys 09loosenbolt23

Loosen, but do not remove, 2 bolts on the inner wall of the engine bay. This takes a 15 mm wrench (not a socket, there's not enough room to use a socket)

Write-Up: Replacing Belts and Pulleys 10loosenbolt4

Remove the other engine mount bolt. Note that this one is gray.

Write-Up: Replacing Belts and Pulleys 11removeenginemount

Write-Up: Replacing Belts and Pulleys 12enginemount

Lift out the engine mount and set it aside.

Unfasten the Power Steering Pump

In order to free the engine bracket, the power steering pump must be detached from the engine.

Write-Up: Replacing Belts and Pulleys Dangpulley

Locate this pulley on the rear/bottom/passenger side of the engine. This is the pulley for the power steering pump. It blocks one of the studs of the engine mount bracket. Since this pulley can't be removed, the entire power steering pump will have to be. Note that the pulley has access holes in it.

Write-Up: Replacing Belts and Pulleys 13accesshole

You can insert a deep socket (13 mm) through these holes to get to the power steering pump mounting bolts. There's one at the top, and a second at the bottom.

Write-Up: Replacing Belts and Pulleys 14topbolt

Write-Up: Replacing Belts and Pulleys 15botbolt

Remove the power steering pump bolts.

Free the Engine Bracket

Write-Up: Replacing Belts and Pulleys 16bracketbackstud

The engine bracket is held on with 3 studs. Push the power steering pump out of the way. Use a deep 15 mm socket to remove this nut. The stud may come with it. If not, use an E8 external torx socket to remove the stud.

Watch for the spacer that falls loose.

Write-Up: Replacing Belts and Pulleys 17bracketfrontstud

Again with the 15 mm deep socket and E8 external torx socket, remove the front top nut and stud.

Write-Up: Replacing Belts and Pulleys 18bracketbigstud

The last stud is the most difficult.

It takes an 18 mm deep socket and an E10 external torx socket.

This time you need to get the nut off before you remove the stud. If you need too, use the external torx socket to hold the stud while you break the nut free. Remove the nut from the stud.

When the nut is off, unscrew the stud from the engine.

This stud is a couple inches longer than the others, and is blocked from removal by the frame rail. Tilt the engine bracket down so that the stud passes under the frame rail. If you don't have enough clearance, jack up the car (not the engine, the car) a small amount and try again.

Write-Up: Replacing Belts and Pulleys 19bigstud

A large spacer comes with the last stud.

Some Riv owners have elected to mod the large spacer by cutting it in half, in order to make it easier to remove the belts the next time. With the spacer cut in half, it is not necessary to remove the engine mount, power steering pump, or the engine bracket to change the belts. When the stud is backed out to the frame (it will strike the frame if the engine bracket isn't freed), the inner half of the spacer will drop free and it will be possible to remove the belts through that opening.

I've decided not to cut the spacer for the following reasons:

1) it's a sturdy piece of metal and I don't think I could make a good job of it with hand tools

2) it's hard enough to remove the belts with all three corners of the engine bracket open - I don't want to try winding them through one.

3) I don't think anyone knows how a cut spacer will perform over time. An imperfect cut might produce a stress risor which could lead to failure of the spacer. That's only speculation on my part, but I'd rather be safe than sorry.

Write-Up: Replacing Belts and Pulleys 20removebelts

Wind your belts out of the engine bracket and remove them.

Replace the Last Tensioner Pulley

Write-Up: Replacing Belts and Pulleys 21unboltlastpulley1

Write-Up: Replacing Belts and Pulleys 22unboltlastpulley2

With the engine bracket free, it is possible - barely - to change the last tensioner pulley. Unfortunately the engine bracket can not be completely removed from the engine while the engine is still in the car. But by wriggling it into various positions and man handling it a bit the last tensioner pulley CAN be removed.

Forum member UrbsNspices reports that the engine mount bracket CAN be removed while the engine is in the car. If you've really got to have it out, try raising the engine/lowering the car. Read UrbsNspices' replies to this thread for other ideas.

Begin by pushing the engine bracket as far down as you can. It should be just possible to get the T50 torx socket into the pulley bolt.

*2nd Warning* Remember, THIS pulley bolt is right hand threaded, like a NORMAL bolt. Right to tight, left to loosen!

Break the bolt loose, and start backing it out. Back it out as far as you can - it will hit the engine bracket. Remember those two bolts, on the side of the engine bay, that clamped down the motor mount? Turn those in as far as they will go. Now pull the engine bracket up and away from the pulley bolt. You will have to use your fingers to back the pulley bolt out the rest of the way. Remove the old pulley.

Congratulations! Disassembly is complete! You are now ready to start putting everything back together again!!

Write-Up: Replacing Belts and Pulleys 22binstallnewpulley


Last edited by AA on Sat Apr 16, 2011 7:00 pm; edited 5 times in total
Back to top Go down
http://www.cardomain.com/ride/657082/4
Jack the R
Master
Jack the R


Joined : 2007-01-16
Post Count : 8046
Merit : 105

Write-Up: Replacing Belts and Pulleys Empty
PostSubject: Re: Write-Up: Replacing Belts and Pulleys   Write-Up: Replacing Belts and Pulleys EmptyMon Apr 30, 2007 10:34 pm

Continued from Part I...

Install your new pulley.

The new pulley must be installed with a 15 mm wrench. There's no using a socket here. The process is made more difficult by the captive bolt design (who thinks of these things?). You can't take the bolt out, stick the pulley on it's shaft, and then use your fingers to get the bolt started. You have to get the bolt started with a wrench, while holding the pulley and engine bracket in a difficult position.

A ratcheting wrench might make the job easier, if you've got one.

Partially Install the Accessory Drive Belt

Write-Up: Replacing Belts and Pulleys Accesorydrivediagram

The accessory drive belt can't be fully installed until the power steering pump is bolted back on, but since it goes inside of the supercharger belt it has to be put on first.

Write-Up: Replacing Belts and Pulleys 23acc01

Start by dropping a loop of the belt around the power steering pump pulley. Bring one side of the belt over the accessory tensioner pulley, and another over the alternator pulley.

Write-Up: Replacing Belts and Pulleys 23acc02

Take the side of the accessory belt that passes over the accessory belt tensioner pulley and pass it through the engine bracket at the back of the bracket. If your belt pops off the tensioner pulleys and alternator pulley like mind did, put it back.

Write-Up: Replacing Belts and Pulleys 23acc03

Loop the belt around the camshaft pulley and underneath crankshaft pulley.

Write-Up: Replacing Belts and Pulleys 23acc04

Unloop the accessory belt from the power steering pump pulley so you have enough slack to work with for the next part.

Write-Up: Replacing Belts and Pulleys 23acc05

1) Pull the bottom loop through the engine bracket at the bottom-front part of the engine bracket (where the big stud and spacer were).

2) Loop the belt over the water pump pulley

3) Make sure the top part of the belt stays within the engine bracket

Write-Up: Replacing Belts and Pulleys 23acc06

(Reference picture taken before repair)

Install the Supercharger Drive Belt

Write-Up: Replacing Belts and Pulleys Superchargerdrivediagra

Write-Up: Replacing Belts and Pulleys Accesorydrivediagram

Drop an end of the supercharger pulley under the engine bracket, and put one side of the loop through the engine bracket at the rear mount.

Write-Up: Replacing Belts and Pulleys 23acc08

1) Loop the supercharger belt under the crankshaft pulley, 2) then the supercharger pulley, 3) the supercharger tensioner pulley, and 4) the upper supercharger idler pulley. Ignore the lower supercharger idler pulley in this step.

Write-Up: Replacing Belts and Pulleys 23acc09

Keeping tension on the belt, so it doesn't pop off the other pulleys, remove it at the supercharger idler pulley.

Write-Up: Replacing Belts and Pulleys 23acc10

Run the loop through the engine bracket at the top-front mounting point.

Write-Up: Replacing Belts and Pulleys 23acc11

Slide the loop over the lower idler pulley.

Detension the supercharger idler pulley and slip the supercharger belt on.

Write-Up: Replacing Belts and Pulleys 23acc12b

Note how the supercharger belt routes around the lower bracket mount.

Reinstall the Engine Bracket

Write-Up: Replacing Belts and Pulleys 24studsnutsspacers

Get your engine bracket studs, nuts, and spacers handy.

I removed the nuts that were rusted on my spacers and used a wire brush to clean up the threads.

Write-Up: Replacing Belts and Pulleys 25frontbotstudspacer

We'll begin by slipping the front/bottom stud and spacer into the engine bracket. We only want them in place on the bracket - don't screw them into the engine yet.

Start by tilting the engine bracket down and slipping the front/bottom bolt (the big one) slightly into it's hole in the spacer. You may need to jack the car up to get the stud to clear the frame rail, but tilting the engine bracket down may be enough (it worked for me). Don't push the stud through the bracket very far. You need space to slip it's spacer in behind it. Do that now. Don't try to screw it into the engine yet, move on to the rear stud/spacer.

Write-Up: Replacing Belts and Pulleys 26rearstudspacer

Repeat the same procedure with the rear stud/spacer. Leaving it hanging in the engine bracket.

Take the top/front stud and, lining the top/front bracket mounting point up with it's corresponding spot on the engine, slide the top/front stud through the engine bracket and screw it into the engine block.

It should now be easier to start the rear stud in it's hole. Do so, then move to the front/bottom stud. The engine bracket should be well enough lined up at this point that the front/bottom stud should start in its hole with an minimum of trouble.

Make a final check of the routing of your belts. You don't want to discover you've done it wrong later!


Tighten the studs, and then screw their nuts on and tighten the nuts.

Reinstall the Power Steering Pump and Finish Installing the Accessory Belt

Feel for the hole where the top bolt of the power steering pump goes then, pushing the top bolt of the pump tight against the pump, use it to probe for the hole. Start the bolt, then tighten it almost all the way in. With the power steering pump halfway mounted, it's possible to find the hole for the lower bolt and get it started. Tighten the two power steering pump bolts. Be sure not to cross thread them.

Slip the accessory belt over the power steering pump pulley. Compress the accessory belt tensioner assembly and slide the accessory belt over the tensioner pulley. Check that the belt sits correctly on all it's pulleys, especially the grooved ones.

Reinstall the Motor Mount

Write-Up: Replacing Belts and Pulleys 09loosenbolt23

Back to these two bolts, which you screwed in earlier when removing the Second Supercharger Idler Pulley. Back them out so there is a 1/2" space between the head of the bolt and the side of the engine bay.

Write-Up: Replacing Belts and Pulleys 27motormount

Slide the motor mount into place.

Installing the motor mount and bolts may require jacking the engine or car up/down, and rocking the engine.

Make sure the bottom flange of the motor mount goes between the bolt heads and the engine bay.

Write-Up: Replacing Belts and Pulleys 28silverbolt

Put the silver bolt in.

Write-Up: Replacing Belts and Pulleys 29enginebaybolts

Tighten the engine bay bolts, but don't make a final tightening yet. Leave them loose enough so the bracket can slide down when the engine's weight is put on it.

Write-Up: Replacing Belts and Pulleys 30blackbolt

Put the black bolt in. Put their nuts on and make a final tightening.

Remove the jack supporting the engine.

[img]https://2img.net/r/ihimg/a/img846/6895/29enginebaybolts.jpg[/[/img]

Now make a final tightening of the engine bay bolts.

FINISHED!!!!
Back to top Go down
1998 Riv
Expert
1998 Riv


Name : Dave
Age : 63
Location : In The AZ Oven
Joined : 2007-01-17
Post Count : 4502
Merit : 44

Write-Up: Replacing Belts and Pulleys Empty
PostSubject: Re: Write-Up: Replacing Belts and Pulleys   Write-Up: Replacing Belts and Pulleys EmptyFri Feb 22, 2008 2:36 pm

So when I do the accessory belt, do I really only need to worry about replacing the one 89007 tensioner pulley? I would think that's the case.
Back to top Go down
1998 Riv
Expert
1998 Riv


Name : Dave
Age : 63
Location : In The AZ Oven
Joined : 2007-01-17
Post Count : 4502
Merit : 44

Write-Up: Replacing Belts and Pulleys Empty
PostSubject: Re: Write-Up: Replacing Belts and Pulleys   Write-Up: Replacing Belts and Pulleys EmptyFri Feb 22, 2008 4:18 pm

Thanks Aaron, accsry tensioner pulley it is.
Back to top Go down
BillBoost37
Junkie


Location : Enfield CT
Joined : 2007-11-28
Post Count : 769
Merit : 26

Write-Up: Replacing Belts and Pulleys Empty
PostSubject: Re: Write-Up: Replacing Belts and Pulleys   Write-Up: Replacing Belts and Pulleys EmptyFri Feb 22, 2008 8:26 pm

I know I'm about a year late to the topic.... but.

And there's no negativity here, only trying to be constructive so that when all use references they are the same.

In some of the diagrams and pictures the waterpump is referenced as the camshaft pulley and the AC compressor is referenced as the water pump.

Then a question, you guys can't change belts only by removing the bottom torque axis mount bolt and spacer to slide the belts in and out? I know it is the recommended method in the FSM on the H body because there is enough room between the SC smooth idler pulley and the torque axis motor side bracket.

Changing the water pump or SC smooth idler requires the removal of the torque axis engine side bracket.
Back to top Go down
ibmoses
Aficionado
ibmoses


Name : Bert
Location : North Alabama
Joined : 2008-02-03
Post Count : 1701
Merit : 32

Write-Up: Replacing Belts and Pulleys Empty
PostSubject: Re: Write-Up: Replacing Belts and Pulleys   Write-Up: Replacing Belts and Pulleys EmptySat Feb 23, 2008 9:46 am

Wow, great information.yay

Thanks
Bert
Back to top Go down
2toneRivi
Member


Name : Chris
Age : 37
Location : BG 562
Joined : 2007-04-24
Post Count : 94
Merit : 0

Write-Up: Replacing Belts and Pulleys Empty
PostSubject: Re: Write-Up: Replacing Belts and Pulleys   Write-Up: Replacing Belts and Pulleys EmptyWed Apr 09, 2008 6:31 pm

one quick question im trying to replace my belts today... is it possible to take off the side engine mount and putting it back on without having to jack the engine?? my jack broke...
Back to top Go down
1998 Riv
Expert
1998 Riv


Name : Dave
Age : 63
Location : In The AZ Oven
Joined : 2007-01-17
Post Count : 4502
Merit : 44

Write-Up: Replacing Belts and Pulleys Empty
PostSubject: Re: Write-Up: Replacing Belts and Pulleys   Write-Up: Replacing Belts and Pulleys EmptyWed Apr 09, 2008 10:02 pm

Probably not.
Back to top Go down
dreww
Junkie
dreww


Location : Dallas
Joined : 2007-04-10
Post Count : 851
Merit : 9

Write-Up: Replacing Belts and Pulleys Empty
PostSubject: Re: Write-Up: Replacing Belts and Pulleys   Write-Up: Replacing Belts and Pulleys EmptyThu Apr 10, 2008 1:11 am

2toneRivi wrote:
one quick question im trying to replace my belts today... is it possible to take off the side engine mount and putting it back on without having to jack the engine?? my jack broke...
you gotta have someway to support the motor to take the pressure off that mount.
either jack from the bottom (easiest) or lift from the top.
Back to top Go down
1998 Riv
Expert
1998 Riv


Name : Dave
Age : 63
Location : In The AZ Oven
Joined : 2007-01-17
Post Count : 4502
Merit : 44

Write-Up: Replacing Belts and Pulleys Empty
PostSubject: Re: Write-Up: Replacing Belts and Pulleys   Write-Up: Replacing Belts and Pulleys EmptyThu Apr 10, 2008 7:16 am

I suppose if you have an engine hoist you could hook up the engine lift brackets, if they're still on your engine, and lift that way.
Back to top Go down
AA
Administrator
AA


Name : Aaron
Age : 46
Location : C-bus, Ohio
Joined : 2007-01-13
Post Count : 18448
Merit : 252

Write-Up: Replacing Belts and Pulleys Empty
PostSubject: Re: Write-Up: Replacing Belts and Pulleys   Write-Up: Replacing Belts and Pulleys EmptyThu Apr 10, 2008 10:34 am

How much can you bench?

_________________
'05 GTO 6.0L • 6-spd • 95k miles • 0-60: 4.8s • 16.9 avg MPG • Nelson Ledges Lap: 1:26

'95 Celica GT 2.2L • 5-spd • 165k miles • 0-60: yes

'98 SC Riviera • 281k miles • 298 HP/370 TQ • 0-60: 5.79s • ET: 13.97 @ 99.28 • 4087 lb • 20.1 avg MPG • Nelson Ledges Lap: 1:30
3.4" pulley • AL104 plugs • 180º t-stat • FWI w/K&N • 1.9:1 rockers • OR pushrods • LS6 valve springs • SLP headers • ZZP fuel rails
KYB GR2 struts • MaxAir shocks • Addco sway bars • UMI bushings • GM STB • Enkei 18" EV5s w/ Dunlop DZ101s • F-body calipers
EBC bluestuff/Hawk HP plus • SS lines • Brembo slotted discs • DHP tuned • Aeroforce • Hidden Hitch

^^^ SOLD ^^^ frown

'70 Ninety-Eight Holiday Coupe 455cid • 116k miles
^^^ SOLD ^^^ frown
Back to top Go down
http://www.cardomain.com/ride/657082/4
2toneRivi
Member


Name : Chris
Age : 37
Location : BG 562
Joined : 2007-04-24
Post Count : 94
Merit : 0

Write-Up: Replacing Belts and Pulleys Empty
PostSubject: Re: Write-Up: Replacing Belts and Pulleys   Write-Up: Replacing Belts and Pulleys EmptyThu Apr 10, 2008 12:44 pm

lol^^^^ damn i hope i never again have to change the belts.. it took me almost 4 hours.... yeah i did need a jack its impossible to do it whitout one... Thanks alot!!!!!!!!!! for this write up!! it was really really helpfull im glad theres a site for rivs!!!!
Back to top Go down
BillBoost37
Junkie


Location : Enfield CT
Joined : 2007-11-28
Post Count : 769
Merit : 26

Write-Up: Replacing Belts and Pulleys Empty
PostSubject: Re: Write-Up: Replacing Belts and Pulleys   Write-Up: Replacing Belts and Pulleys EmptyThu Apr 10, 2008 1:27 pm

Hey guys.. just saw this and wanted to mention it is possible to change belts without supporting the motor or engine mount removal. However it is required that you remove the passenger side tire and splash shields.

Remove the tire, and find the stud for the engine side motor mount bracket next to the crank position sensor wiring. Remove this nut and stud, then wiggle the spacer out from behind the mount. Slide your old betls out and slide the new ones in (pay close attention to how they came out.) Put belts on pulley's etc and tension to ensure you put them in properly before putting the spacer, stud and nut back in place. Replace splash shields and tire.
Back to top Go down
1998 Riv
Expert
1998 Riv


Name : Dave
Age : 63
Location : In The AZ Oven
Joined : 2007-01-17
Post Count : 4502
Merit : 44

Write-Up: Replacing Belts and Pulleys Empty
PostSubject: Re: Write-Up: Replacing Belts and Pulleys   Write-Up: Replacing Belts and Pulleys EmptyThu Apr 10, 2008 1:52 pm

Bill, thanks for mentioning this here. Albertj has also posted this method, which I'll be using this spring for my belts.
Back to top Go down
98riv
Moderator


Location : USA
Joined : 2007-01-14
Post Count : 995
Merit : 30

Write-Up: Replacing Belts and Pulleys Empty
PostSubject: Re: Write-Up: Replacing Belts and Pulleys   Write-Up: Replacing Belts and Pulleys EmptyWed May 07, 2008 10:34 pm

BillBoost37 wrote:
Hey guys.. just saw this and wanted to mention it is possible to change belts without supporting the motor or engine mount removal. However it is required that you remove the passenger side tire and splash shields.

Remove the tire, and find the stud for the engine side motor mount bracket next to the crank position sensor wiring. Remove this nut and stud, then wiggle the spacer out from behind the mount. Slide your old betls out and slide the new ones in (pay close attention to how they came out.) Put belts on pulley's etc and tension to ensure you put them in properly before putting the spacer, stud and nut back in place. Replace splash shields and tire.

I tried to follow the steps when I changed my belt, but I don't think it will work for our cars. The frame gets in the way. So you have to support the engine and remove the bolts. You can leave in the circle bushing thing, but it gets in the way.

_________________
1998 Supercharged Riviera - Custom CAI, Alpine spx-13ref, Infinity 6x9's, Alpine 4 Channel Amp, Kicker KX3, Silverstars, STB, Hawk Brake Pads, Monroe Air Shocks, KYB GR2


Last edited by 98riv on Thu May 15, 2008 12:21 am; edited 3 times in total
Back to top Go down
1998 Riv
Expert
1998 Riv


Name : Dave
Age : 63
Location : In The AZ Oven
Joined : 2007-01-17
Post Count : 4502
Merit : 44

Write-Up: Replacing Belts and Pulleys Empty
PostSubject: Re: Write-Up: Replacing Belts and Pulleys   Write-Up: Replacing Belts and Pulleys EmptyThu May 08, 2008 9:56 pm

Nice write-up Jack, excellent details.

My black and gray eng mount bolts were opposite of yours though. Not sure if it really matters or not, or which of our cars may have been switched when someone else changed pullies. I really have to believe my lower SC idler pulley is original to the car. It is in MUCH worse condition than the other pulleys I've changed out already. Makes me believe my mount may not have ever been off before, but who knows.

Seem to have a possible issue with the Gates 38001 steel lower idler pulley I put on after work today. Once tightened up, I'm able to wiggle the pulley slightly, more than I think is acceptable. Heck the old one didn't have any play in it, just the plastic was falling apart. The Gates is still on, had to quit at that point. However I have the Ford equivalent to this pulley and it is supposed to have a better quality bearing. So I'll change it back out for the Ford pulley and see how it feels. NAPA will be getting the Gates back.
Back to top Go down
1998 Riv
Expert
1998 Riv


Name : Dave
Age : 63
Location : In The AZ Oven
Joined : 2007-01-17
Post Count : 4502
Merit : 44

Write-Up: Replacing Belts and Pulleys Empty
PostSubject: Re: Write-Up: Replacing Belts and Pulleys   Write-Up: Replacing Belts and Pulleys EmptyThu May 08, 2008 11:31 pm

Pulled the Gates 38001 back off, tried out the Ford pulley for fit, and was no better or worse, so I went with the Gates. The mounting bolt has a tighter fit in the original pulley bearing, so I attribute that to the slight wobble I'm finding in the other 2 pulleys.
Back to top Go down
deekster_caddy
Master


Name : Derek
Age : 52
Location : Reading, MA
Joined : 2007-01-31
Post Count : 7717
Merit : 109

Write-Up: Replacing Belts and Pulleys Empty
PostSubject: Re: Write-Up: Replacing Belts and Pulleys   Write-Up: Replacing Belts and Pulleys EmptyFri May 09, 2008 10:44 am

Dave, this doesn't sound right to me at all. Any pullies I replaced were tight and snug when the bolts were tightened. Something's not right here. The bolt has a small shoulder just under the head, does that center snugly into the middle of the bearing?
Back to top Go down
1998 Riv
Expert
1998 Riv


Name : Dave
Age : 63
Location : In The AZ Oven
Joined : 2007-01-17
Post Count : 4502
Merit : 44

Write-Up: Replacing Belts and Pulleys Empty
PostSubject: Re: Write-Up: Replacing Belts and Pulleys   Write-Up: Replacing Belts and Pulleys EmptyFri May 09, 2008 11:15 am

The amount of movement is VERY slight, and the bolt does fit well into the bearing, just not quite as snug as the old bearing. I may be over-reacting, don't know... the bearing is not loose in either of the new pulleys or anything like that. Maybe I should see if NAPA has a Dayco pulley in stock to check out, 89006 I believe.
Back to top Go down
1998 Riv
Expert
1998 Riv


Name : Dave
Age : 63
Location : In The AZ Oven
Joined : 2007-01-17
Post Count : 4502
Merit : 44

Write-Up: Replacing Belts and Pulleys Empty
PostSubject: Re: Write-Up: Replacing Belts and Pulleys   Write-Up: Replacing Belts and Pulleys EmptyFri May 09, 2008 4:12 pm

Got the 89006 at Advance Auto, $21. Found that the mounting bolt actually had some residue or remnants of some type of sealant that was likely the issue, stuck on the flat surface of the bolt shoulder. Scraped it clean, installed the Dayco and fits perfectly. I'll keep the Gates and Ford pulleys for spares or maybe for the upper idler pulley if needed at some point.
Back to top Go down
robertwolf86
Fanatic
robertwolf86


Name : robert
Age : 37
Location : new york
Joined : 2007-03-11
Post Count : 268
Merit : 0

Write-Up: Replacing Belts and Pulleys Empty
PostSubject: Re: Write-Up: Replacing Belts and Pulleys   Write-Up: Replacing Belts and Pulleys EmptyFri May 09, 2008 5:11 pm

i changed my belts and tennioner pully last week and it is frustraing, i did no what i was doing tho. the only thing the fucking pissed me off was that i had to take it apart 3 times b/c i kep putting the belts on the wrong side of the moter mount braket. if you did not have to take the power stearing and all that shit off it would be fine but its all done and i dont realy plan on doing it again
Back to top Go down
1998 Riv
Expert
1998 Riv


Name : Dave
Age : 63
Location : In The AZ Oven
Joined : 2007-01-17
Post Count : 4502
Merit : 44

Write-Up: Replacing Belts and Pulleys Empty
PostSubject: Re: Write-Up: Replacing Belts and Pulleys   Write-Up: Replacing Belts and Pulleys EmptyFri May 09, 2008 5:23 pm

Mm, not particularly frustrating here, just a bit involved and time consuming. Would be a breeze if I had a solid chunk of time to work on it instead of a bit here and then. Not that I want to do it again any time soon, lol.
Back to top Go down
BillBoost37
Junkie


Location : Enfield CT
Joined : 2007-11-28
Post Count : 769
Merit : 26

Write-Up: Replacing Belts and Pulleys Empty
PostSubject: Re: Write-Up: Replacing Belts and Pulleys   Write-Up: Replacing Belts and Pulleys EmptyMon May 12, 2008 8:15 am

Rob... why did you take the bracket off instead of slipping the belt into the one bolt on the bottom with the removable spacer?
Back to top Go down
1998 Riv
Expert
1998 Riv


Name : Dave
Age : 63
Location : In The AZ Oven
Joined : 2007-01-17
Post Count : 4502
Merit : 44

Write-Up: Replacing Belts and Pulleys Empty
PostSubject: Re: Write-Up: Replacing Belts and Pulleys   Write-Up: Replacing Belts and Pulleys EmptyMon May 12, 2008 11:12 am

If Rob replaced the lower idler pulley as well, the engine mount bracket has to be completely unbolted to replace that pulley. It sits RIGHT up against the bracket.
Back to top Go down
BillBoost37
Junkie


Location : Enfield CT
Joined : 2007-11-28
Post Count : 769
Merit : 26

Write-Up: Replacing Belts and Pulleys Empty
PostSubject: Re: Write-Up: Replacing Belts and Pulleys   Write-Up: Replacing Belts and Pulleys EmptyMon May 12, 2008 12:46 pm

Excuse me for being stupid. I like to do that time to time. headbutt
Back to top Go down
Sponsored content


Write-Up: Replacing Belts and Pulleys Empty
PostSubject: Re: Write-Up: Replacing Belts and Pulleys   Write-Up: Replacing Belts and Pulleys Empty

Back to top Go down
 
Write-Up: Replacing Belts and Pulleys
Back to top 
Page 1 of 14Go to page : 1, 2, 3 ... 7 ... 14  Next
 Similar topics
-
» FAQ: Upgrading Serpentine Belts & Pulleys?
» Looking for advice
» head up replacing belts on 96 riviera
» Crunching/Clunking/Roaring noise on takeoff and turning
» Replacing serpentine belts - Series II Supercharged

Permissions in this forum:You cannot reply to topics in this forum
Riv Performance ::   Supercharged 3800 Tech :: Series II Engine & Transmission-
Jump to: