 |
The 8th Gen Riviera Resource
|
|
| | Write-Up: Fuel Pump/Tank Sending Unit Replacement |  |
|
+39Karma charlieRobinson mn2320 Abaddon Yoss DEMonte1997 71gsx455-4spd pbrktrt robotennis61 mike97 Crashtestdummy Northeast Mikel 98inSFl akh Eldo Snowdog playa 96Super albertj LARRY70GS T Riley Jack the R turtleman BMD sburch23 AA 95 super3800 SToP Rickw dscott2000 hotrod58 manofmany deekster_caddy 98SuperRiv ewolfe0050 robertwolf86 TType_Riviera dreww 43 posters | |
| Author | Message |
|---|
Jack the R
Master

Joined : 2007-01-16
Post Count : 8072
Merit : 105
| | Subject: Re: Write-Up: Fuel Pump/Tank Sending Unit Replacement Thu Nov 28, 2019 2:22 am | |
| The Herko FC47 came in today and fits - New Herko Fuel Level Sensor FC47 For Fuel Pump Module E3938M
The wire going to the pump connector is bigger than the wire in the Walbro connector. I would have expected the opposite, but that's how it is. The pins are different, re-pinning the Walbro connector isn't possible. So now I'm back to finding crimps or soldering, finding fuel proof heat shrink tubing, figuring out how to get the main fuel line onto the cannister nipple, and I'm thinking the gap between the bottom of the Walbro and the rubber sleeve makes a possible way for dirt to bypass the cannister filter.
At least the fuel level sensor fits. Progress is progress. | |
| | | | Jack the R
Master
Joined : 2007-01-16
Post Count : 8072
Merit : 105
| | Subject: Re: Write-Up: Fuel Pump/Tank Sending Unit Replacement Thu Nov 28, 2019 4:10 am | |
| Researching gas resistant heat shrink, I found a thread on a 370Z forum that says Cross-linked Polyolefin is the thing to get. There's a link to a product page on Gainger.com that has a few different polyolefin types. It says all are fuel resistant, but the Flexible Polyolefin would seem to be the most resistant?
Hmm, just noticed the items Albert J linked to are both polyolefin, but which kind of polyolefin? | |
| | | | Jack the R
Master
Joined : 2007-01-16
Post Count : 8072
Merit : 105
| | Subject: Re: Write-Up: Fuel Pump/Tank Sending Unit Replacement Fri Nov 29, 2019 10:35 pm | |
| My new fuel cannister strainer came with a seal, which is about twice as thick as the old one, and a little smaller in diameter -  My old seal is in such good shape that I was planning to reuse it. I've got doubts about this new one. It's slightly squishier than the old seal, but not much. It doesn't seem like it would be possible to get the cam lock on with the height of this new seal. | |
| | | | Jack the R
Master
Joined : 2007-01-16
Post Count : 8072
Merit : 105
| | Subject: Re: Write-Up: Fuel Pump/Tank Sending Unit Replacement Sat Dec 21, 2019 11:25 pm | |
| Some progress has been made on the fuel pump cannister, but it's two steps forward and one step back. I soldered the connector for the Walbro onto the Herko fuel sending unit - unfortunately it appears the insulation on the Herko can't take much heat. The insulation on the Walbro connector wasn't bothered at all, but the Herko insulation swelled on the black wire and melted back an inch and a half on the grey wire. Absolutely wonderful. Lucky for me, I'd cut the largest diameter heat shrink tubing extra long. That's all I had of that size, I didn't think I'd have enough left over to be worth saving if I only cut what I thought I needed. So I just cut it in two, and it ended up being long enough to cover the exposed wire on the grey wire. The yellowish shrink wrap turned out to be more garbage, it didn't shrink at all, and had to be cut off. This job has had so much win in it. I've had a piece of this stuff soaking in gasoline for a week now, and it hasn't gotten soft yet, so it looks like the linked polyolefin will be fine in the tank.  I'm extremely unimpressed with the main fuel line. Look at how the original one kinks. That can't be flowing good. I still haven't gotten a new one to go on, and have pretty much given up on it. I melted one end of the new line. I tried practicing on the other end, and noticed that I mashed it into an oval trying to push it onto the nipple. At that point I decided just to reuse the original line, although I did buy extra new lines. Now that I've noticed the constriction in the old line though, I don't know. I'm pretty upset about the main fuel line and the venturi line, but the truth is, this wouldn't have been bad at all if I'd known to - a) Take the little black venturi line off of the pump first, using only a little heat (it doesn't take much to make it workable, and not much after that to melt it). Then take the cannister bottom off and get the little black venturi line out of the way. b)pull the pump (unclip the plastic box and get it out of the way, take the fuel strainer off the pump, and push it up), and then use heat to take the main fuel line off only the pump. The nipple on the pump is smaller than on the cannister, and it's not hard to get the fuel line off this end. Out of ignorance I made this harder than it had to be.  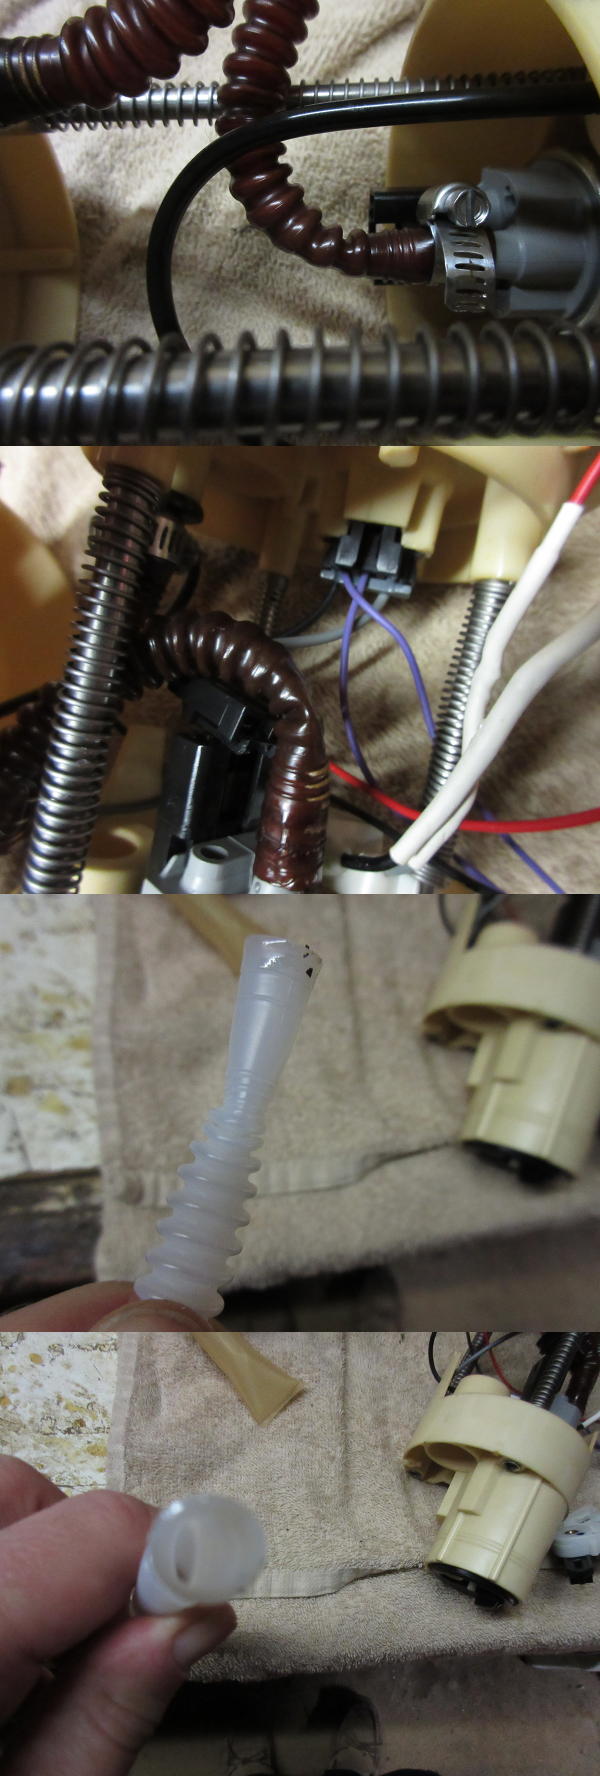 What did you guys do with the plastic box the pump wires go through? The top pic shows it in the correct position - middle pic shows it pushed up by the Walbro, which is taller than the stock pump. That definitely changes the amount of dampening the springs do. I haven't heard anyone complain about it, but it isn't right. I tried putting the pump in the stock position, with the connector on the outside. I managed to knock the venturi nipple off with the plastic box before I noticed the interference issue. I suppose the pump has to be orientated with the fuel line nipple on the outside and the connector on the inside. Ironically, I initially, accidentally, installed the pump that way, before I realized the rubber sleeve is keyed for one position. I made the effort to "do it right," and rotated the pump to what is pictured, only to end up knocking off my venturi nipple. And then breaking one of the grippers on the plastic box taking the pump back out. I could have had my car running a couple days ago if I'd just been lazier. Now it could be down for another week, who knows, maybe more! I ordered some JB Weld Tank Weld to glue the venturi nipple back on. Maybe. The threads are stripped out on the Walbro, but if I coat the nipple threads with glue, it might hold well enough. The Tank Weld looks like it could be too thick for this job, I'm not sure I can get a thin enough coating on the nipple threads, to then go down into the hole on the Walbro. I'm also not sure if the Tank Weld is better than the Steel Stick (which I have on hand). The Tank Weld may not bond as well to plastic, but I'm not sure the Steel Stick will either. No glue really works all that well on plastic. The Tank Weld should handle being immersed in gas better, and the venturi nipple will probably be held in place more by having the glue jammed in the threads than by adhesion to the metal nipple and the plastic pump housing, so I'm guessing the Tank Weld is the stuff to go with. If I can get it in place. I suppose I'll find out in a few days. If I can get the nipple situation fixed, that leaves me trying to figure out what to do with the plastic box. Did you guys leave it as in the middle pic, or do something else? 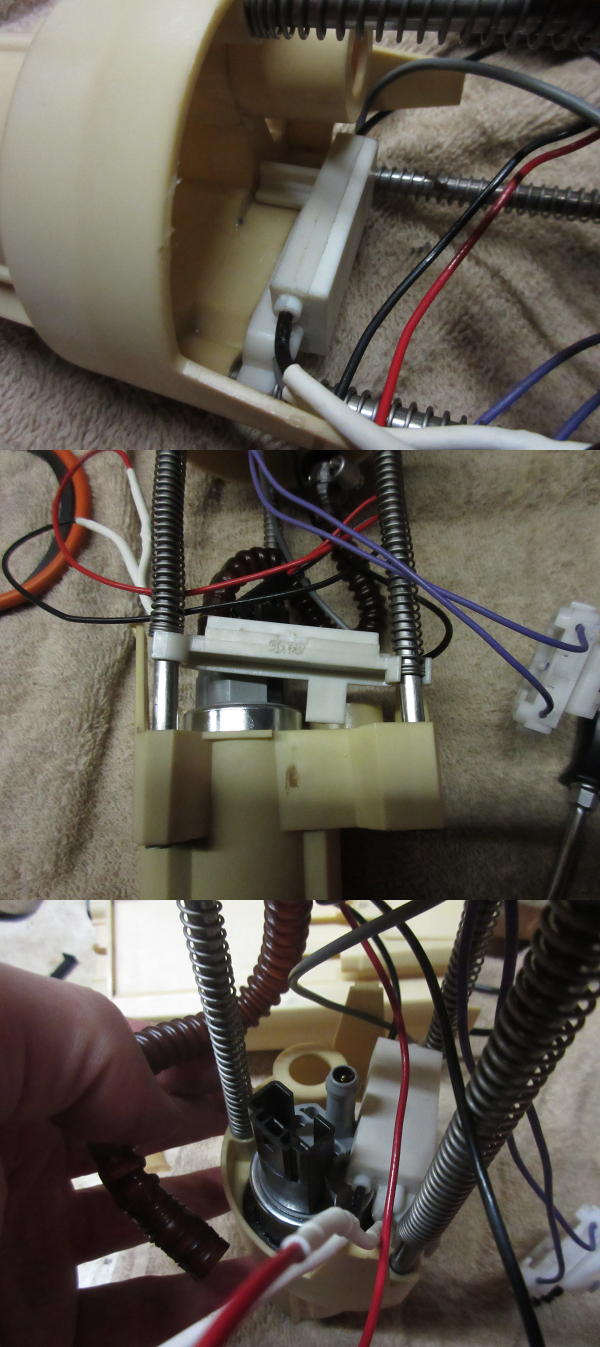 | |
| | | | Jack the R
Master
Joined : 2007-01-16
Post Count : 8072
Merit : 105
| | Subject: Re: Write-Up: Fuel Pump/Tank Sending Unit Replacement Fri Dec 27, 2019 2:34 am | |
|  Here's what went wrong with Intense's venturi nipple mod to the Walbro. John at Intense says they drill and tap this hole themselves. The plastic casing only appears to be 3/32"s thick though, which is not much thickness to thread. But, it gets worse. The nipple Intense uses is not even threaded at the top 1/16." Only the first thread after that blank section is grabbing onto anything. All that is holding the nipple in place is one turn of thread and a dab of glue, and the plastic/metal glue joint is about as effective as you'd think it would be. The venturi nipple on the stock pump is solid. The Intense mod to the Walbro is anything but. I don't know how much force the venturi line puts on the nipple when it's pressurized - I'm wondering if the Walbro is strong enough to blow the venturi nipple right off. I'm attempting to glue my nipple back on with JB Weld Tank Weld (using that for gasoline resistance). Whatever threads I had are gone, I'm basically hoping I got enough Tank Weld jammed in between the nipple and the walls of the hole to lock the nipple in place. I'm not expecting much out of the glue joint itself. I'm kind of expecting this won't work, but I'll give it a try. Here's what I think is the best arrangement of the cannister components to support the tall Walbro pump - 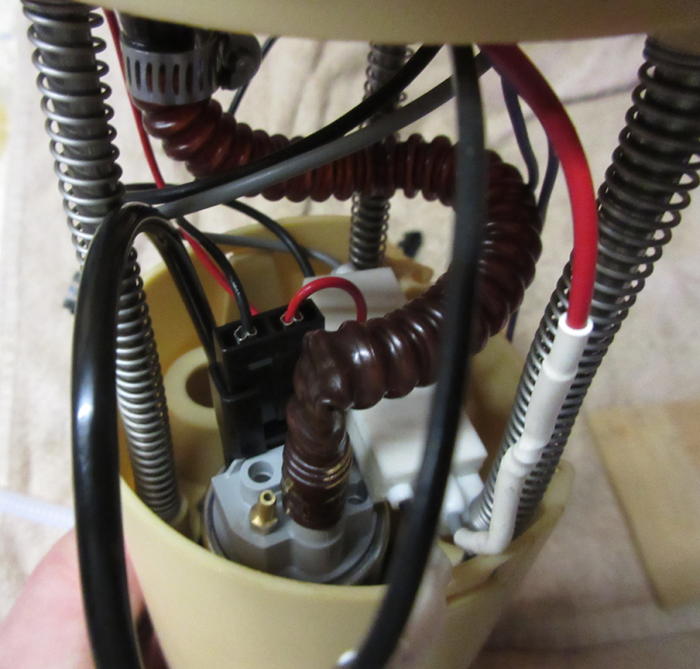 The stock fuel line wants to go over the electrical connector for the pump, and rubs against the connector wires when the cannister compresses. It's bad enough that I can see the wire breaking at the connector eventually. It looks like the main fuel line has to be routed to the side, which means putting in a new main fuel line since the stock one is set in a way that makes it fold over and close at the pump end. Here is how to orientate the pump within the keyed rubber sleeve -  | |
| | | | Jack the R
Master
Joined : 2007-01-16
Post Count : 8072
Merit : 105
| | Subject: Re: Write-Up: Fuel Pump/Tank Sending Unit Replacement Sat Dec 28, 2019 2:31 am | |
| It's finally back together and working. Started and drove well with no noticeable problems. It even seems to idle better, I'm not hearing any misses anymore. I'm not ready to believe that problem is solved yet but I'm going to be thrilled if it is. I suppose a bad spot on the fuel pump could cause a temporary loss of pressure and a miss - doesn't that make sense? All that said, I do have a problem with my venturi line. It felt stout this morning, about as good as it was when I got it - 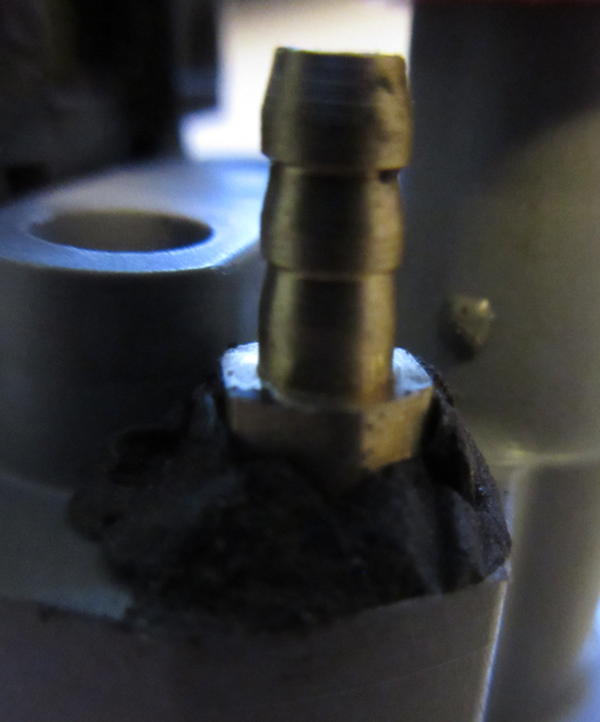 But by the time I got the venturi line on, it had worked loose again -   I don't think it can come out, but there is a gap at the back. I'm not sure how much that hurts the functionality of the venturi line. At this point I thought, I'm either buying a stock cannister or I'm going to put this in and see what happens - so I put it in and it worked fine. If I had to do this again though I would glue the nipple in at an angle instead of straight up. I took a new fuel line and used the heat gun to permanently set it in a curve, so it goes around the pump connector instead of over it. That worked well. I'm really pleased with the way I finally conquered that damn main fuel line -   And here's the whole thing together, at last. The only thing I wish I'd done, besides gluing the venturi nipple at an angle, was test-smash that sprung part all the down to check for any issues in the fully compressed position. I'm wondering what position the plastic box on the fuel pump wires ended up in. I forgot the cannister gets compressed down though. It works and it won't be moving, so I guess it'll be o.k. That's a wrap for this misadventure. I wonder what I can get into next?  | |
| | | | Jack the R
Master
Joined : 2007-01-16
Post Count : 8072
Merit : 105
| | Subject: Re: Write-Up: Fuel Pump/Tank Sending Unit Replacement Sun Aug 07, 2022 8:39 am | |
| - Jack the R wrote:
- Some progress has been made on the fuel pump cannister, but it's two steps forward and one step back.
I soldered the connector for the Walbro onto the Herko fuel sending unit - unfortunately it appears the insulation on the Herko can't take much heat. The insulation on the Walbro connector wasn't bothered at all, but the Herko insulation swelled on the black wire and melted back an inch and a half on the grey wire. Absolutely wonderful. Lucky for me, I'd cut the largest diameter heat shrink tubing extra long. That's all I had of that size, I didn't think I'd have enough left over to be worth saving if I only cut what I thought I needed. So I just cut it in two, and it ended up being long enough to cover the exposed wire on the grey wire.
The yellowish shrink wrap turned out to be more garbage, it didn't shrink at all, and had to be cut off. This job has had so much win in it.
I've had a piece of this stuff soaking in gasoline for a week now, and it hasn't gotten soft yet, so it looks like the linked polyolefin will be fine in the tank. Three years later, I rediscovered my test wire, still soaking in a bottle filled with gas. It was just a bare wire though, no insulation or shrink wrap left. What are my odds of boom? I'm guessing the voltage isn't enough to ignite gasoline, or I would have blown up already. | |
| | | | albertj
Master

Name :
Location : Finger Lakes of New York State
Joined : 2007-05-31
Post Count : 8687
Merit : 181
| | Subject: Re: Write-Up: Fuel Pump/Tank Sending Unit Replacement Mon Aug 08, 2022 12:21 am | |
| - Jack the R wrote:
- Jack the R wrote:
- Some progress has been made on the fuel pump cannister, but it's two steps forward and one step back.
I soldered the connector for the Walbro onto the Herko fuel sending unit - unfortunately it appears the insulation on the Herko can't take much heat. The insulation on the Walbro connector wasn't bothered at all, but the Herko insulation swelled on the black wire and melted back an inch and a half on the grey wire. Absolutely wonderful. Lucky for me, I'd cut the largest diameter heat shrink tubing extra long. That's all I had of that size, I didn't think I'd have enough left over to be worth saving if I only cut what I thought I needed. So I just cut it in two, and it ended up being long enough to cover the exposed wire on the grey wire.
The yellowish shrink wrap turned out to be more garbage, it didn't shrink at all, and had to be cut off. This job has had so much win in it.
I've had a piece of this stuff soaking in gasoline for a week now, and it hasn't gotten soft yet, so it looks like the linked polyolefin will be fine in the tank.
Three years later, I rediscovered my test wire, still soaking in a bottle filled with gas. It was just a bare wire though, no insulation or shrink wrap left. What are my odds of boom? I'm guessing the voltage isn't enough to ignite gasoline, or I would have blown up already. Three years is not much time. I'm at a loss on this one. Albertj | |
| | | | Jack the R
Master
Joined : 2007-01-16
Post Count : 8072
Merit : 105
| | Subject: Re: Write-Up: Fuel Pump/Tank Sending Unit Replacement Mon Aug 08, 2022 3:26 am | |
| I'm in the "you've got to be fucking kidding me!" place. Could the old gasoline be more corrosive than fresh gasoline?
Now I need to pull the fuel pump and see what's going on, but August is not the time to be crawling around in the trunk.
I barely remember working on the fuel pump but it looks like the soldered wires are only on the sending unit. Odds of boom are low? Aren't the contacts exposed to fuel anyway? | |
| | | | albertj
Master
Name :
Location : Finger Lakes of New York State
Joined : 2007-05-31
Post Count : 8687
Merit : 181
| | Subject: Re: Write-Up: Fuel Pump/Tank Sending Unit Replacement Mon Aug 08, 2022 9:25 pm | |
| - Jack the R wrote:
- I'm in the "you've got to be fucking kidding me!" place. Could the old gasoline be more corrosive than fresh gasoline?
Now I need to pull the fuel pump and see what's going on, but August is not the time to be crawling around in the trunk.
I barely remember working on the fuel pump but it looks like the soldered wires are only on the sending unit. Odds of boom are low? Aren't the contacts exposed to fuel anyway? If you know what you're doing, you can put a match out in a container of gasoline. Learned/saw that one in fire safety class in a chemical plant I worked in long ago. Basically, the fumes go boom. Think of the old gasoline as if it was paint remover. Some paint removers take time to work. | |
| | | | Sponsored content
| | Subject: Re: Write-Up: Fuel Pump/Tank Sending Unit Replacement | |
| |
| | | | | | Write-Up: Fuel Pump/Tank Sending Unit Replacement | |
|
Similar topics | |
|
| | Permissions in this forum: | You cannot reply to topics in this forum
| |
| |
| |
|


